
Members Area Tutorial: Photo Manipulate a Nature Inspired Advertisement
In this tutorial I’ll show you how to create a nature inspired advertisement design. You’ll learn how to make a grass sofa, create a depth of field, perspective, blending, use brushes, apply text and more.
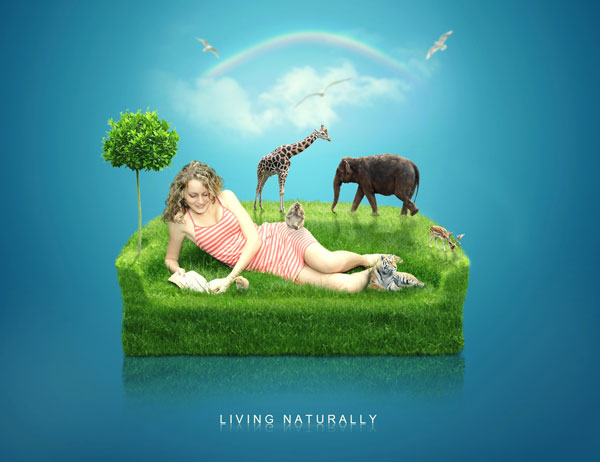
Final Image
As always, this is the final image that we’ll be creating:
Resources Used In This Tutorial
Step 1
Create a new document and fill it with white. I use the size of 1300×1000 px but feel free to make your own. Hit Cmd/Ctrl+Shift+N to make a new blank layer. Press G to active Gradient Tool and choose Radiant Gradient with color #00436e and #5cd0f7. Drag a line from center section to the bottom to get result below:

Step 2
I want to brighten the bottom sides so I make a new layer, use soft brush with large size (350-400 px, it depends on the size of your document), color #a9d4e4 (picked from bright center part of this picture), opacity and flow about 35% to paint over these sides:

Step 3
Open cloud stock. I use Retangular Marquee Tool (M) to make a selection on this part and use Move Tool (V) to drag it into our main canvas, resize it to be much smaller and place at the top center:


Click second button at the bottom of Layer Pallete to add mask for this layer. Use soft black brush with opacity 100% to remove hard edges and blur the center with opacity about 40-50% to get a faded effect. You can see how I did it on layer mask:


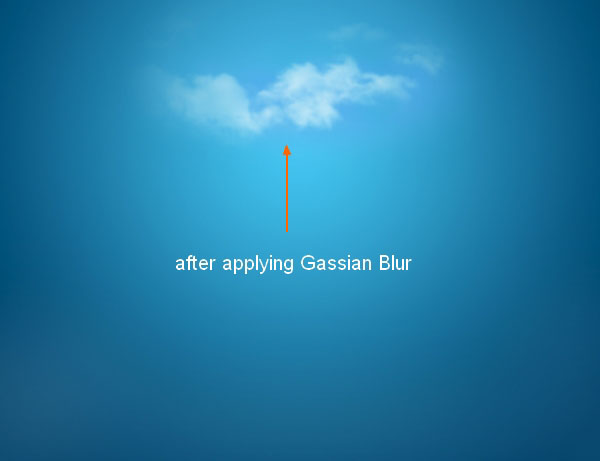
Step 4
To add some depth to this picture, I blur this cloud part. On cloud layer, go to Filter-Blur-Gassian Blur and choose radius as 2 px:

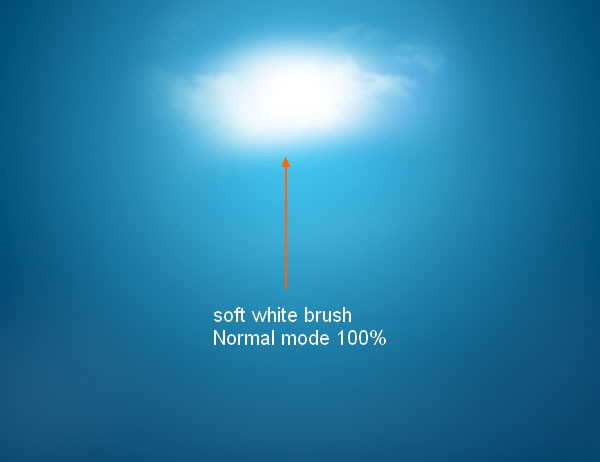
Step 5
Make a new layer and take soft white brush to paint on middle section of cloud to make it a bit brighter. I change the mode to Soft Light 50%:

Step 6
In this step we’ll add a subtle rainbow. Make a new layer, load Special Effects for Gradient Tool, choose Russel’s Rainbow (Linear Gradient):

Drag a line from left to right to get result below:

Go to Filter-Distort-Shear:

Use Cmd/Ctrl+T to transform it and position at the top of cloud:

Change the mode to Screen 50%, apply Gassian Blur with 2 px (as done with clouds) and erase hard edges with layer mask:

Step 7
Extract bird 1 and place him at cloud part after resizing down:

Apply Gassian Blur with 2 px for bird 1:

Step 8
I use an adjustment layer with Clipping Mask to brighten this bird. Go to New Layer-New Adjustment Layer-Levels:


Step 9
Add bird 2 to the left of cloud after isolating him from background, blur him as we did with bird 1:

This bird looks too dark against the background so I brighten him with a Curves layer (Clipping Mask):

Step 10
I want to remove black parts on the bird wings so I make a new layer (Clipping Mask), use soft white brush to paint on these areas. I lower opacity of this layer to 70%:


Step 11
Cut out bird 3, position bird 3 at the right of clouds, blur him:

You can see that light on this bird does not fit background light source (from top center). The head and wings on the left should be brighter (these parts get light). To fix it, I use a layer (Clipping Mask), make Linear Gradient with default colors (black and white):

Set the mode to Soft Light 100%:

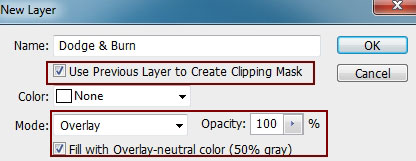
Step 12
In order to change light and shadow of this bird more clearly, I use a new layer, fill with 50% gray and set the mode to Overlay 100%:
Take Dodge and Burn Tool (O) , Midtones Range, Exposure about 30% to brighten the top head (Dodge Tool), darken the tail and right wing (Burn Tool). You can see how I applied this tool with Normal mode:

Overlay mode:

Step 13
Extract sofa and place it at the middle section of picture, downsize it:

I name this layer as “sofa base”.
Step 14
Now it’s time for most interesting stage of this tutorial: we’ll make a grass sofa. Open grass picture. Choose the part you like (I take the part near right foreground) and place it onto upper part of the sofa. I name this layer “grass 1″.


Add layer mask for this grass one. Change brush to grasses ones and choose brushes, number 503, 458 to remove unwanted parts of this grass. With brush number 458, I make settings for it as shown below (press F5 to change settings of brush) to get the remained edges different:


Here is my result after masking with grass brushes:

Step 15
Choose another grass part and place it lower the first one:

Mask with grass brushes:

I use Move Tool to drag selected part (from original grass stock) into our picture again, place it at the left of sofa, transform it with Cmd/Ctrl+T then duplicate it, apply Flip Horizontal (Edit-Transform-Flip Horizontal), move to the right:


Use grass brushes on layer mask following the form of sofa to get the look below:

I name these layers from “grass 2″ to “grass 4″.
Step 16
Choose another grass part and place it at the bottom of sofa and mask it as done with previous parts:

Call this layer “grass 5″ and move this layer under grass 1 one.
Hide sofa base layer. Make a new layer under grass 5 one. Use soft black brush with small size (12-15 px), opacity about 40-45% to paint under this part to make shadow for it:

Step 17
To make reflection for this sofa, I use a new layer under shadow one. Hold Cmd/Ctrl while clicking grass 5 layer mask to load its selection:

On grass 5 layer, press Cmd/Ctrl+C to copy this selection. Choose new layer (layer 19 on screenshot), hit Cmd/Ctrl+V to paste selected part into it. Apply Flip Vertical and move this under sofa:

Lower opacity of this layer to 50% and use layer mask to blur the top part:

Step 18
I use Dodge and Burn Tool to change flat look of grass 5 part, darken the front and brighten the top of it:


Step 19
I add a Curves layer (Clipping Mask) for grass 5 to darken it (as it’s hidden from main light source in sky):

Then I use soft black brush to remove effect on the top (on Curves layer mask):

After darkening I find the reflection should be darker, so I make the change with a Curves layer (Clipping Mask) for it:


Step 20
Make a new layer on the top (above grasses ones) and use Dodge and Burn tool to create corners, sides, edges for this grass sofa:


Step 21
I use a new layer and soft white brush to paint on the top of sofa to brighten it more (the parts that catches light from sky). I put the mode to Soft Light 50%:


Step 22
Open model stock. Extract her and place her above sofa (I keep some grass blades besides model):

To make shadow for model, I use a new layer under this one. Load model section with same method done in step 17 then fill it with black. Apply Flip Vertical and move it under model:

Lower opacity to 20% and apply Gassian Blur with 2 px:

Use layer mask to hide the part covering the bottom of sofa:

Step 23
I want to add some grass around model from model stock to blend it with grass sofa. Open model stock and choose the grass part you like:

Position this part behind model, and set this layer under model one also:

Use layer mask to get the look below:

I call this layer “grass 6″.
I add two another grass parts around model and set these layers above the girl one:

Call them “grass 7, “grass 8″.
Step 24
Make a new layer above the girl one. Active Clone Tool then change brush to hair brushes, number 980, 955 (or the ones you like) to add more hair for the girl. Erase any unwanted parts after cloning:

Step 25
Make group for the girl, girl shadow, hair, grass 6,7,8 then change the mode of this group from Pass Through (default group mode) to Normal 100%:

I use two adjustment layers within this group to change color and brightness of these layers. Go to New Layer-New Adjustment Layer-Selective Color:

Curves:

Because the mode changed to Normal 100% (no Pass Through) so these adjustment layers only affect the layers inside this group.

Step 26
To fix the grass part under model waist (I find it too different from the rest grass on sofa), duplicate grass 2 layer and move it above the girl group. Use layer mask to remove the parts below to make only the part near the waist visible:


Call this layer “grass 9″.
Darken this part with Curves layer (Clipping Mask):


Step 27
Open tree stock. Take tree part only and position it at the left side of sofa:


I blend bottom of the tree with sofa by grass brushes:

I make shadow for this tree as done with model but increase opacity to 30% (as this shadow in a brighter area):

Step 28
I use two adjustment layers (Clipping Mask) to make color and brightness of the tree fit the rest.
Color Balance:

Curves:


Step 29
Isolate the deer and move him at the right side of the sofa:

Blend deer legs with grass brushes on layer mask:

Add shadow for the deer as done with the tree:

Step 30
I use Curves to change brightness of this deer:

I use soft black brush to erase the front of the deer (the part against the light and should be darker):

Step 31
Place tiger beside model legs after cutting him out from background, blend him with layer mask:
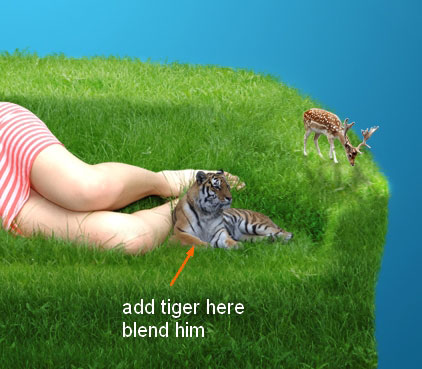
Make shadow for this tiger with opacity 20% ( as it’s in darker area than the deer and tree):
Call this layer “tiger shadow 1″.
On another layer under tiger one, I use soft black brush with opacity and flow about 40-45% to create shadow of this tiger on model leg:

I name it “tiger shadow 2″.
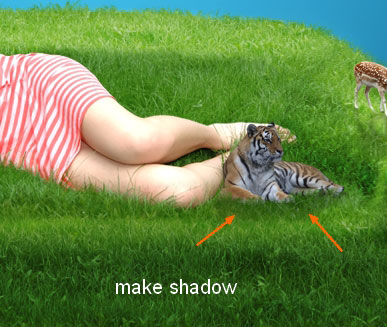
Step 32
I make change for light and shadow of the tiger with Curves:

The bottom of the tiger should be darker (hidden from main light source) so I use soft black brush to remove bright effect there (on Curves layer mask):

Step 33
Extract the monkey and situate him onto model legs:

I use two layers to make shadows for this monkey: shadow on model and shadow under monkey bottom (use soft black brush):

Step 34
I use a Hue/Saturation layer (Clipping Mask) to change color of this monkey a little:


Step 35
Position elephant after removing background on the right of sofa, blend him with ground, add shadow:

Step 36
Cut out the bunny and set him near the model hand, make shadow, blend him:

I brighten this bunny as done with tiger (use Curves, erase bottom part):


Step 37
Add giraffe and make his shadow:

I increase saturation of the giraffe a little with Hue/Saturation:


Step 38
Make a new layer on the top, use Dodge and Burn Tool to change light and shadow of the animals except the tiger. To make this step easier, I load animals selection and only apply this tool within it:


Step 39
In this step we’ll add text to picture. Create a new layer on the top and active Text Tool (T). I choose Arial font, 25 pt and white color to type “L I V I N G N A T U R A L L Y” under sofa reflection. You may notice that I make space between letters to create “relaxing” effect:

Create reflection for this text as done with sofa:

Make a new layer between these text layers, use Elliptical Marquee Tool to create a small selection as shown below, set feather =5:

Fill it with white then lower opacity to 20%:

Use layer mask to blur the sides of this white part:

Step 40
I use some adjustment layers on the top to change color of entire picture.
Gradient Map:

Change the mode of this Gradient Map layer to Soft Light 70%.
Color Fill (New Layer-New Fill Layer-Solid Color):

Set the mode of this fill layer to Exclusion 70%.
Levels:

And We’re Done!
You can view the final outcome below. I hope that you enjoyed this tutorial and would love to hear your feedback on the techniques and outcome.
I added a second outcome with a model TV screen:

Member File Download
Download the original .psd file for this tutorial here:

 Members Area Tutorial: Photo Manipulate a Fantasy Floating Park Landscape
 Members Area Tutorial: Photo Manipulate the Atmospheric Vampire Piece ‘Nocturna’
 Members Area Tutorial: Design a Colorful and Futuristic Photo Manipulation

Leave a comment
0 Comments:
No comments have been posted yet. Be the first!
Leave a Comment: