
Members Area Tutorial: Photo Manipulate the Atmospheric Vampire Piece ‘Nocturna’
In this tutorial I’ll show you how to create a dark photo manipulation called “Nocturna”. You’ll learn how to combine different stock together and blend them corectly, practice special retouching techniques, paint hair, create different kinds of lighting, work with group and more.
Final Image
As always, this is the final image that we’ll be creating:

Resources Used In This Tutorial
Step 1
Open background stock. I crop a part on the top as we don’t need it:

I use a Hue/Saturation layer to darken background. Go to Layer-New Layer-Hue/Saturation and down the Lightness:

Step 2
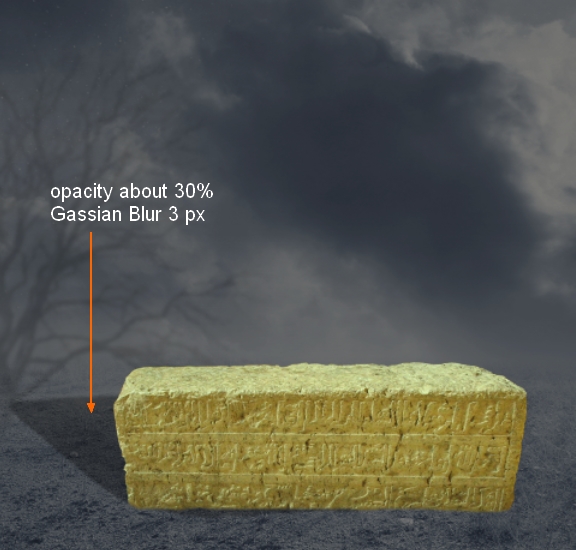
Create a new layer ( Cmd/Ctrl+Shift+N to do it) and set foreground color to black. Use one from tree brushes and paint at the left edge of our document ( I choose number 1288 but you can choose for your taste):

Add layer mask for this layer and use soft black brush to blend tree bottom with background:

Lower opacity of this layer to 20%:

Go to Filter-Blur-Gassian Blur and set radius as 3 px:

Don’t worry if it does not look good as we will fix it later.
Step 3
Cut out stone and place it at the middle section of picture:

Add layer mask and use black brush with hardness about 50% to blend stone bottom with the ground ( don’t use soft brush as it will leave an unatural look):

I aim to set main light source from in front and from right to left ( to be fit with light source on model and it will save our time) so the stone must have a shadow behind. Create a new layer under stone layer. Hold Cmd/Ctrl key while clicking stone thumbnail layer to load its selection:


Fill this selection with black and use Cmd/Ctrl+T to transform it as shown below:

Lower opacity of this shadow to 30% and apply Gassian Blur with 3 px. Use soft black brush with opacity 100% to remove shadow bottom and opacity about 20-30% to blur shadow top:

Step 4
To reduce saturation and change color as well as darken the stone to be fit background, I use some adjustment layers with Clipping Mask. On stone layer, go to Layer-New Layer-Hue/Saturation:


Curves:

This is result we have:

Step 5
Open model stock. Extract her and move into our main picture, resize and place her above the stone:

Make a new layer under model layer. Use soft black brush with very small size ( 9-10 px) to paint under hands, feet, legs and then lower opacity of brush( 50-60%) but increase brush size ( 30-40 px) to paint behind model (as main light source comes from in front, right to left as we determined above):

I use a Hue/Saturation layer with Clipping Mask to reduce saturation of the girl:

Step 6
Since this step we’ll make a complete retouch for model. I’ll use a feature that goes with CS5 to soften model skin and you can use another method if you don’t have.
Hit B to active Brush Tool and then choose Mixer Brush. This is a very useful tool that works basically like Smudge Tool ( to soften, smooth) but allows you to customize colors and some another things ( in this tutorial we just need to care of customizing colors).
First we will soften bright part of model skin. Create a new layer with Clipping Mask for model ( above Hue/Saturation layer in previous step). Use Eyedropper Tool ( I key) to pick color on this part and I get color #decbc7. Make settings for Mixer Brush as shown below:

Paint on the skin part you want to smooth and brighten avoiding the edges. Don’t set Flow too big as it will destroy the details.

For the darker parts of model skin, I use two new layers and change brush color to #ae9b95 and #675b55 and lower the Flow about 25-28%:
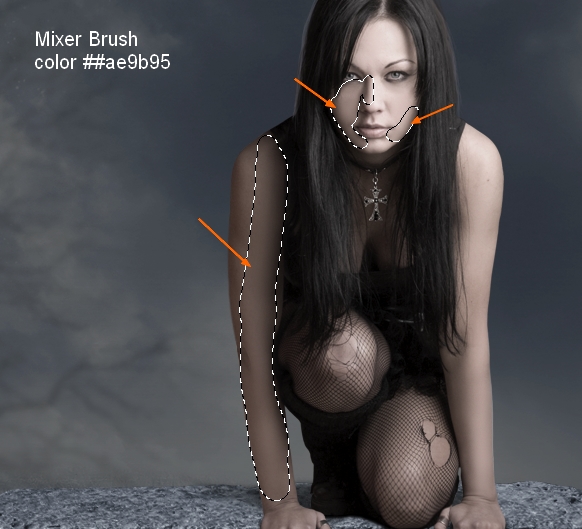

You can see an obivous change of model look after using Mixer Brush:

Step 7
Make a new layer ( Clipping Mask) and choose Smudge Tool with very small size and Strength about 30%. Apply this tool on model lips to make it smoother ( this step is optional):

Step 8
Since this step we’re going to repaint model hair (you can use hair brush instead). You’ll need a graphic tablet to do it or you must be very patient with mouse. Create a new layer ( Clipping Mask) and I choose Smudge Tool. Open brush menu and choose Reset Brushes ( remember to save all new downloaded brushes before doing this step ) and all your brushes will come back to default. Choose Rough Round Bristle from brush list with settings below:

Smudge down the hair in the direction of hair falls and don’t smudge twice on the same part:

I use a new layer, set foreground to #3e3a3d and paint on hair ( mostly on highlights) with soft brush:

Step 9
New layer again and I set brush color to white and set opacity of this layer to 30%. Make brush size about 12-15 px and press F5 to change Control to Pen Pressure ( if you’re using a graphic tablet you must be familiar with it so I won’t say in details). Paint on the hair to make basic strands, remember to change opacity and size of brush because there are some parts of hair that should be brighter ( the curves) and anothers less:

Make a new layer and continue with white brush but with very small sizes ( from 2 to 6 px). Change brush opacity when creating different tiny hair strands. If you keep only one or two opacity numbers the hairs will loose smoothness and will look like fodder ![]() . Make brighter strands for the curvier and leave some dark places for shadows, it’s a basic rule of painting a hair.
. Make brighter strands for the curvier and leave some dark places for shadows, it’s a basic rule of painting a hair.
Here is my result:

Step 10
In this step we will continue retouching model. Make a new layer ( Clipping Mask) and use soft brush with color #e7dad5. Paint on forehead and right side of model to darken them a bit. Change the mode to Multipy 80%:
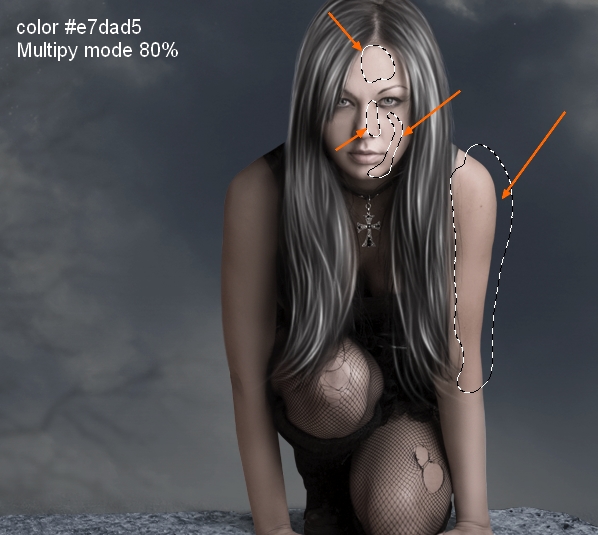
I use a new layer with same brush with Soft Light mode 30%. Paint on the left of model nose to brighten it a bit:

Step 11
To make model eyes look “evil”, I make a new layer and paint on the model pupils with hard white brush:

Put the mode to Overlay 80% and use layer mask to remove the part covering the eyelids with black brush:

Step 12
Create a new layer with Clipping Mask, set to Overlay and fill with 50% gray:

Use Dodge and Burn Tool with Midtones Range and Exposure about 40-50% to darken around the eyes and brighten some parts on hair. You can see how I applied these tools with Normal mode:

Overlay mode 100%:

Step 13
I add some adjustment layers with Clipping Mask to change brightness and color of model. Go to Layer-New Adjustment Layer-Curves:

Hue/Saturation:


Step 14
Open skull stock. Cut it out and place it beside the model, on the stone:

Create a new layer under skull one. Make shadow for it as we did with model:

Step 15
I make some adjustment layers (Clipping Mask) to make skull color and brightness fit the rest of picture.
Hue/Saturation:

Curves:


Step 16
Create two new layers ( Clipping Mask) and use brush with white color and #95918c. Use soft white brush to paint in front of skull and set the mode as Soft Light 100% then brush with color #95918c to paint on highlight on the left side to darken it. Change the mode to Multipy 50%:


I add Layer Style for skull to brighten it a bit more. Double click skull layer and choose Inner Shadow:


Step 17
Since this step we’ll make flame effect for skull. Make a new layer on the top ( non-Clipping Mask) and use soft white brush with size about 60 px to paint above the skull:

Press Cmd/Ctrl+T to transform this white spot and we have the base of flame.

Create a new layer and use hard brush ( I mean hardness 100%) with color #8a2312 to paint on the white part and transform as we did above to make the wick:

Use layer mask to remove the top and bottom:

Step 18
Add a new layer and I use brush with color #ffa948 to create glowing part of flame ( with same method in previous step). Change the mode to Linear Dodge 100%:

To make glowing effect more visible, I use soft brush and color #8a2312 to paint on the top of flame. Set the mode as Linear Dodge 100%:

A new layer with same purpose and brush color, but with Screen mode 100%. Paint on the top:

Step 19
In this step we will add reflected light from flame to the parts around it with same brush ( #8a2312 ) and Linear Dodge mode ( on a new layer). Following a basic rule that the further, the less light, I use different opacities for brush and paint on the top of skull, below parts, stone, model left arm:

Make a new layer with the purpose to make the light on the top of skull ( where catches the light most) more visible. Use same brush, same layer mode:

On a new layer, use this brush to create more “evil” look for the eyes ( 3 px) by spotting on light blobs. I set the mode as Linear Dodge 80%:

Step 20
Open skeleton stock. You can use another stock if you can’t take this photo from Photoxpress. First I use Magic Wand Tool to isolate black background from skeleton and copy it into a new layer. Then I copy many bone parts from skeleton and situate them on the stone, in front and the right side of background. Use transform tools ( I like using Cmd/Ctrl+T key) to make different movements and directions. You can see the part I took below and how I positioned them on the main picture:


I name them from “bone 1″ to “bone 12″.
Step 21
To be easier to edit all the bones together I make group for them. Make all the bone layers selected then press Cmd/Ctrl+G to create a group. Name this layer as “bones”. Click the small triangle on the left of group name to reveal all layers inside. Change the mode of group from Pass Through ( default mode group) to Normal 100%:

On bone 12 layer, go to Layer-New Adjustment Layer-Hue/Saturation and down the saturation to -72 ( use your own settings if you use another stock):

Because the mode of group changed to Normal 100% so this Hue/Saturation layer only affect the layers inside this group ( bones).
I add layer mask for most of bone layers ( except the ones on the stone and the one above two anothers) and use soft black brush to blend them with the ground:

Step 22
In this step we’ll make shadow for the bones. Make a new layer under bone ones and use soft black brush to paint on the top left of bones on the ground and under the one on the stone. Lower opacity of this brush as shadow in the dark is less visible and hard to see ( we’ll darken this part later).

Make a new layer under the bone one which on the stone. Use same method in step 3 to make a shadow behind ( to be fit the light source direction) but with opacity of layer as 60%.

You may notice that we have to make shadow for this bone on another. On my layer pallete, the under bone is “bone 4″ and the upper is “bone 10″. So I make a new layer under “bone 5″ and above “bone 4″. Use soft black brush with opacity about 70% to paint on the indicated part:


Step 23
I use some Curves layers with Clipping Mask for some bone parts: darken the big one in the middle foreground which is named “bone 1″, and brighten small bones under bone 10 ( bone 4, bone 5).


For the bone on the stone I use a new layer with Clipping Mask and soft white brush to paint on the left side of it as this part needs to be brighter. Set the mode as Soft Light 100%.

Step 24
Open grave stock. I only use the top part of it:

Place it on the right side of picture and blend the bottom with layer mask. You can see I make its direction toward the left because I want it in “dynamic” status.

I apply Gassian Blur with 0.3 px for this grave to make it look a bit softer:

Step 25
Make shadow for grave with opacity 30% ( Normal mode) as done in previous steps. Place all grave layers above the tree and under stone ones.

I use a new layer with Clipping Mask for grave with white brushes and Soft Light mode 70%. Paint over the grave to brighten it:

Step 26
Make three new layers on the top of layers. Set foreground to black and use some bat brushes to paint on the top right of picture, remember to transform them to make different movements. Apply Gassian Blur with 2 px for these bats and lower opacity to 40, 50, 60%:

Step 27
Because the light come from right to left so the left part of model hair ( from the viewers) must be a bit brighter. So I make a new layer on the top and use soft white brush to paint on this part of the hair. And I set the mode as Soft Light 60%.

I use a new layer and brush with color #8b939c painting on foreground, in front of stone to darken it. Put the mode as Multipy 50%:

Step 28
Add some adjustment layers to change color of entire picture.
Selective Color:

Curves:

Color Balance:

Hue/Saturation:

We have result:

Step 29
I want to change the light focus so I make a new layer and press G to active Gradient Tool. Choose Radiant Gradient Tool with default color ( black and white):

Change the mode to Soft Light 100% and use layer mask with soft black brush, opacity about 50% to reduce dark contrast on the left side of model and brightness on the right side of picture:

Two new layers and use soft black brush painting on background and foreground, model as I want them to be darker. I set the first as Soft Light mode 80% and another as Soft Light mode 60%:


Step 30
Create a new layer filled with 50% gray and Overlay mode 100%. Use Dodge and Burn Tool again to darken and make some highlights on model. It’s really a powerful tool that can reform facial features and give a painting-like effect for your look. As you can see, I brightened the right side of model face, forehead, make highlights on nose bridge, right cheek, lips, arms, right hand, eyelids, chin and darken a tiny part on the left cheek. But like another tools, just don’t abuse it.
Normal mode:

Let’s see the difference before and after this step:

Step 31
Make a new layer and I use brush with color #a62c2c to paint on the lips and set the mode as Soft Light 80%.

Step 32
To give our picture more visible dark mood, I add a layer and set foreground and background to #212241 and #63638c (picked from midtones and shadows of this picture).
Use any tools you like to make selection like below and set feather for it as 50:

Go to Filter-Render-Clouds:

Lower opacity to 40% and use layer mask with soft black brush ( opacity about 50-60%) to blur smoke effect on some part as shown:

Step 33
I want to darken the left side of stone a bit more so I use a new layer and soft brush with color #a4a4a7. Paint on this part and put the mode as Multipy 70%:


Step 34
Final step: I use a Levels layer to increase brightness for this picture. Go to Layer-New Adjustment Layer-Levels and change the midtones:

Use soft black brush with opacity about 50% to blur effect around model, skull, stone on Levels layer mask:

And We’re Done!
You can view the final outcome below. I hope that you enjoyed this tutorial and would love to hear your feedback on the techniques and outcome.
Member File Download
Download the original .psd file for this tutorial here:

 Members Area Tutorial: Photo Manipulate an Atmospheric Warrior Scene
 Members Area Tutorial: Design a Colorful and Futuristic Photo Manipulation
 Members Area Tutorial: Photo Manipulate a Striking ‘Falling Dream’ Composition

Good tutorial – this is my version: https://www.flickr.com/photos/shroomis/14216571543/
Wow, this is so awesome Joakim! Is that you in the pic?