
Members Area Tutorial: Photo Manipulate a Fantasy Floating Park Landscape
In this tutorial I’ll show you how to create a fantasy-surreal photo manipulation of a park in the sky. You’ll learn different techniques of manipulating, retouching, using brush, masking, blending, working with light and shadow and more.
Final Image
As always, this is the final image that we’ll be creating:

Resources Used In This Tutorial
Step 1
Create a new document and fill it with white ( or any colors you like). I choose the size with 1200×1000 px but you can start with your own settings. Make a new layer and hit G to choose Gradient. Choose Radiant Gradient with settings below. Drag a line from center to bottom:

I use a Color Balance layer to brighten and add a slightly light yellow for picture. Go to Layer-New Adjustment Layer-Color Balance:

Step 2
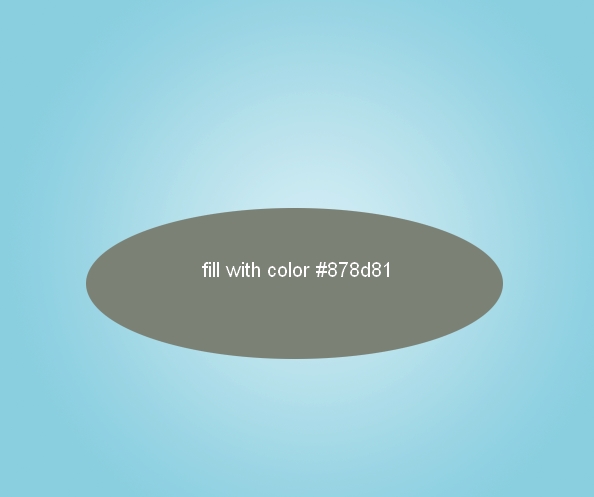
Create a new layer, use Elliptical Marquee Tool to make a selection as shown below:

Go to Edit-Fill and fill with any colors which is darker than background. I choose #878d81:
Hold the Alt/Option +Arrow Up Key to nudge up this part many times until you get a 3D shape look. I use 43 layers for this shape. Then merge all these layers:

This step is to create a basic form for island.
Step 3
Open soil stock. Use Retangular Marquee Tool to make a selection as shown below:

Use Move Tool to drag it into our canvas, resize and place it at the bottom of the shape:

Choose Edit-Transform-Warp and tweak the edges of this soil part:

Call this layer as “soil”. Hide it temporarily.
Grab the Pen Tool and draw a path on the bottom of the shape ( as the soil layer is turned off, you can be easily to trace the contour of the shape):

Choose and turn on the soil layer and press Cmd/Ctrl+Enter to make selection from this path:

Click on Add layer mask button at the bottom of Layer Pallete and we have result:

Step 4
Open grass stock. Use Elliptical to make a selection for the part near the foreground. Move it into our canvas, resize and transform it and place it above the soil layer:


Name it as “grass”.
To make the edges around this grass part look realistic, I use splatter brushes. You can choose the one you feel good but I choose number 1502. Reduce the size of this brush as we need a subtle torn effect. Press F5 to make settings for it as shown below:


Hide the basic shape or you can delete it as we don’t need it anymore. Remember to set foreground color to black and on layer mask of grass layer, use this brush to trim around the grass contour until you get desired result. Here is mine:

Step 5
To make the effect look more realistic, we have to add shadow for the grass covering the soil. Create a new layer under grass layer. Use soft black brush with very small size to paint under the grass part and lower opacity to 25%:

Use splatter brushes with same settings and trim under and two sides of the soil part ( on layer mask of soil). I decrease the size of this brush to 18 px:

Step 6
I use a Hue/Saturation for soil layer with Clipping Mask to reduce saturation and change color for it. On soil layer, go to Layer-New Adjustment Layer-Hue/Saturation:


The soil looks a bit flat so I want to fix it. Create a new layer above Hue/Saturation layer with Clipping Mask. Choose Radiant Gradient with default color ( black and white) with settings below ( remember to uncheck Reverse option on property bar). Drag a line from center to the left:

Change the mode to Soft light 100%. Add layer mask for it and use soft black brush to blur dark effect on the parts as shown:


Step 7
I use an adjustment layer with Clipping Mask for grass . On grass layer, choose Layer-New Adjustment Layer -Color Balance:


Step 8
Choose soil, grass layer and all their clipping mask ones. Press Cmd/Ctrl+G to make group for them. Name this group as “island base”. Right click this group, choose Duplicate Group. Right click again, choose Merge Group. Now this duplicated group appears as a normal layer and call it “island 1″. Hide group of “island base”. Duplicate island 1 layer five times. Resize and place them to different positions, from near to far. Remember that the further the smaller and flatter. Rename them from “island 1″ to “island 6″:


Step 9
Create a new layer on the top ( above island layers). Use soft white brush with 600-700 px to paint on the middle part of picture. Change the mode to Overlay 80%:


Call this layer as “middle light”.
Step 10
Open girl stock. You can use your own model if you can’t download this picture from Photoxpress. Isolate her from background, downsize and place her onto island 1:

Add layer mask for girl one and take splatter brushes with same settings in step 5 but smaller size. Paint around girl part and book which meet the grass part to get the look she is sitting in grass:

To reduce saturation of the girl skin and hair, I use Hue/Saturation layer with Clipping Mask:


Step 11
As the light comes from middle top so the part of the girl which catch this light must be brighter. Make a new layer ( Clipping Mask) for the girl. Use soft white brush painting on indicated parts and change the mode to Soft light 60%:


To add light stroke for the girl, I use Inner Shadow effect. Right click girl layer, choose Blending Options:


Because the middle light is pretty soft so we don’t need to use big settings for opacity.
Step 12
To add shadow for the girl, create a new layer under girl one. Cmd/Ctrl+click girl layer to load her selection:

Fill it with black. Then choose Edit-Transform-Flip Vertical. Move it to the left of girl:

Use transform tool ( Cmd/Ctrl+T) to distort it as shown below:

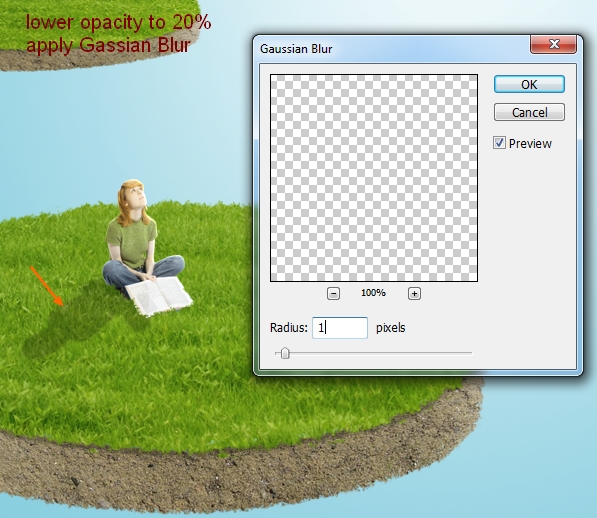
Lower opacity to 20% and apply Gassian Blur ( Filter-Blur-Gassian Blur):
Add layer mask for girl shadow and blur the top:

Step 13
Open umbrella stock. I refine the edge of this umbrella as I find it too sharp and rough ( you can use your own method). After it, use Move Tool to drag it into our canvas and downsize it, Transform and place it above the grass of island 1:

Add layer mask and use splatter brushes as we did in previous steps:

Make shadow for umbrella as done with the girl:

Step 14
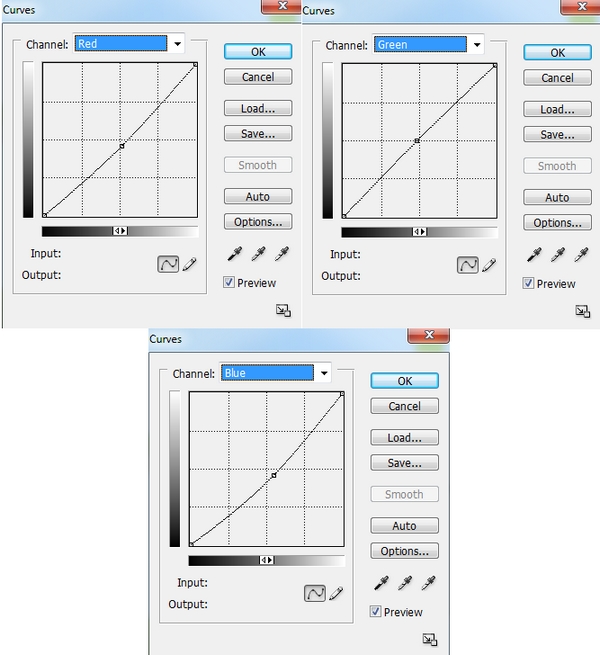
I use a Curves layer for umbrella to make color fit background. Go to Layer-New Adjustment Layer-Curves:


Create a new layer with Clipping Mask and use soft white brush with opacity and flow 50-60% to paint on the part of umbrella which meet the light from above. Put the mode as Soft light 100%:

Apply Inner Shadow effect for umbrella:


Step 15
Open daisies stock pack. I choose the one with yellow flowers:

Resize it to be much smaller and change its direction to place near the girl:

Add layer mask with soft black brush and very small size ( 9-10 px is ok) and make it blend with the grass:

Move this daisy into our document again, scale it down and place it beside the book:

Come back to daisy stock. Use Polygonal Lasso Tool ( L) to make selection for a part of this flower:

Move it into our canvas, resize and place it on the part as shown below:

Use layer mask as usual to blend it, then duplicate it many time and position them over grass part. You should resize and transform them a bit to make a natural effect. I use 20 layers for all daisies on grass:

To be easier to manage, you can group daisy layers.
Step 16
Open butterfly stock. Move some of them into our main picture then resize them. You can see which butterfly I choose and you can use your own butterfly stock for your taste. Place them as I did below:

Name the layer with white butterfly as “butterfly 1″ and yellow ones as “butterfly 2″ to “butterfly 4″. I use a Hue/Saturation layer ( Clipping Mask) for butterfly 2, 3, 4 with settings below:


Step 17
Open tree 1 stock. Make selection for tree part:

Move into our main document and resize it as usual. Place it above the island 2:

As this tree part has blue background ( sky) so I’ll use Blend If Tool to remove it. Right click tree 1 layer, choose Blending Options. Hold the Alt key while dragging the white button of This Layer to the left and remember to change Blend If option from Gray ( default) to Blue:


Add layer mask to remove rough edges of this tree:

Create a new layer under tree 1 one. Use soft black brush to paint on the part of grass where the shadow of tree should fall. Change opacity to 20%:

Step 18
To make color of this tree intergrate better with the rest, I apply a Hue/Saturation layer with Clipping Mask for it:


Make a new layer ( Clipping Mask) and choose color #b0ba8e for brush. Paint with this brush along the tree avoiding the edges to reduce brightness. Change the mode to Multipy 50%:


New layer ( Clipping Mask) and I use brush with same color #b0ba8e. Paint on the dark park which creates shadow in original picture. Put the mode to Soft light 100%:

Step 19
Open bench stock. Extract it and move into our picture and downsize it, place it onto island 2:

Use layer mask to blend the bench into grass:

I use a Curves layer with Clipping Mask for the bench:


After that, make a new layer ( Clipping Mask) and use soft white brush with opacity about 50% to paint on the part of bench which catch light from sky. Put the mode as Soft light 100%:

Add more light for the bench by Inner Shadow effect:


Step 20
In this step we will make shadow for the bench. It’s a bit different way from our usual as it has different angles. First we have to determine the parts of bench which will cast shadow. From the direction of light source I indicate them in the pic below:

Create a new layer under bench layer. Use Polygonal Lasso Tool to create a shape based on shadow direction then fill it with black:

Lower opacity to 20% and apply Gassian Blur with 1 px as we did with shadows in previous steps:

Add layer mask and blur the parts below:

Step 21
Extract the giraffe, resize and move it to island 3:

Use layer mask to blend its feet into grass:

Add shadow for it in the usual way (make a new layer, load its selection, fill with black, Flip Vertical, transform, lower opacity to 20%, Gassian Blur, layer mask):

I use a Hue/Saturation ( Clipping Mask) to change color of giraffe:


Add Inner Shadow effect for giraffe to add more reflected light:


Step 22
Cut out the zebra and drag it onto island 3, downsize and use layer mask to blend its feet as we did with giraffe. Also make shadow for it ( I won’t say in details as you can follow previous steps as reference):

In order to make color of zebra fit background, I use two adjustment layers with Clipping Mask:
Color Balance:

Curves:

Apply Inner Shadow effect for the zebra with same settings with giraffe:

Step 23
Open fountain stock. Extract it ( don’t take water part, we’ll add it later):

Move it into main picture and resize, position it on island 4 and add shadow for it as usual:

You can see that I don’t add layer mask for fountain as we took the grass part covering the fountain bottom from original already so it looks blended with grass of island after adding shadow.
Step 24
Change color of the fountain by Curves layer ( Clipping Mask):


And I use a new layer ( Clipping Mask) to brighten the left part of fountain as it meets soft sunlight from sky. Take soft white brush and paint while the mode of layer changed to Overlay 70%:

Step 25
Create a new layer and set foreground to white. Take water brush, number 833 and paint over the fountain as shown below:

Transform it to be fir the fountain:

Add layer mask to remove one part covering the fountain body:

Duplicate this layer to make this effect more visible:

Name these layers as “water 1″, “water 2″.
Duplicate these water layers and apply Flip Horizontal for two duplicated layers. Move it to the right and call them “water 3″, “water 4″:

Step 26
Extract birds from original photos and move them into our canvas, remember to downsize them to be much smaller. Situation them on island 5, around fountain:

Duplicate bird 1 and move it to the left, apply Flip Horizontal :

Create a new layer under bird ones. Take soft black brush and paint under bird feet which are on fountain. Lower opacity to 20% to make shadow for them:

For the bird which is standing on the grass, I create shadow for it as in previous steps:

Call these layers as “bird 1″ to “bird 4″.

Step 27
I use some adjustment layers for birds ( Clipping Mask) to make them blend better with background.
Color Balance for bird 3:


Curves and Hue/Saturation for bird 4:


Create a new layer with Clipping Mask for bird 2, 4 and I use soft white brush to paint on bird head and body. Change the mode to Soft light 100% for bird 4 and 50% for bird 2:

Step 28
Open topiary stock pack. I choose this one and move it into our picture, resize it. Duplicate it three times and transform to different size, place them on island 5. As always, add layer mask for these topiaries to blend them with grass, also add shadow. It’s done with same techniques in previous steps so I won’t repeat it any more:


To edit all topiary layers together, I group them. On topiary 4 layer, press Cmd/Ctrl+G to make group for this layer. Then use Move Tool to drag all another topiary layers and their shadow into this new group:

Change the mode of group 1 from Pass Through ( default group mode) to Normal 100%:

Step 29
I use two adjustment layers for topiaries to change their color. On topiary 4 layer, go to Layer-New Adjustment Layer-Color Balance:

Layer-New Adjustment Layer-Levels:


Because the mode of group changed from Pass Through to Normal so these adjustment layers only affect the layers inside the group ( topiaries). Rename this group as “topiaries”.
Step 30
Open garden stock pack. Choose the tree one and take this part into our canvas, resize and situate it on island 6. Add layer mask to blend it with grass and make shadow for it. Call it “tree 2″:


Add three adjustment layers for tree 2 with Clipping Mask.
Color Balance:

Curves:

Hue/Saturation:

Use soft black brush on layer mask of Hue/Saturation layer to restore the fresh green of the leaves:

Step 31
Open daisies stock pack again. Choose yellow and white ones, downsize them and duplicate many times, position them on island 6, near the tree 2:

Group them like we did with topiaries.
Step 32
Extract the fence from field image, resize and transform it. Move it on island 6 :

Duplicate it, apply Flip Horizontal, move it to the right. You can use Warp Tool ( Edit-Transform-Warp) to tweak it to get the desired curve:

You can use layer mask to remove any unwanted parts.
Duplicate two fence layers and place them under tree 2 layers. Use transform tool and Warp tool to bend it then layer mask to delete unecessary parts to get the look below. Call these layers as “fence 1″ to “fence 4″:

Step 33
Extract balloons from stock and position them in the top of picture ( you can use your own images but better choose the ones with natural lighting and similar colors so it will save your time – you can see the ones I choose have similar light source and some common colors ). Resize and remember not to place them in the same line to get rid of static look. I set the middle one biggest and anothers a bit smaller:

Group them as done with topiaries, call it “balloons” ( remember to change the mode to Normal 100%).
I add Layer Style for the balloon in the middle ( I call it balloon 1) to make lighting on it more visible and fit the main light source of picture:


With the same purpose, I add two layers with Clipping Mask for balloon 1. On the first, take brush with color #d6cd87 and paint on the middle of this balloon and change the mode to Multipy 80%:

On the second, use soft white brush to paint long the balloon contour. Set the mode to Overlay 100%:

I use a new layer with Clipping Mask for balloon in the right ( I call it balloon 2). Use soft white brush to paint on the left side of it and put the mode as Soft light 100%:

Step 34
Make two adjustment layers in balloons group ( on the top of balloon layers).
Curves:

Hue/Saturation:


Step 35
Open cloud stock. Use Move Tool to drag it into our picture, place this layer above Color Balance 1 layer and change the mode to Screen 100%. Name it as “clouds 1″. If you use your own stock, depends on the brightness/contrast of it to put approriate mode. If you picture is too bright, you should change the mode to Soft light then use adjustment layers ( with Clipping Mask) to fix the contrast and colors. About me, I use Levels and Hue/Saturation to reduce the brightness and change colors:


Then add layer mask for “clouds 1″ and remove the cloud at the bottom:

Step 36
I want to add more clouds to foreground to create a depth for picture. On cloud stock, use Lasso Tool make a selection for cloud on the top:

Move and resize it, place it near the island 1. Position this layer on the top of layers ( above balloons group).

Use layer mask to remove the parts as shown:

Name this layer “clouds 2″.
Add two adjustment layers with Clipping Mask for this cloud.
Hue/Saturation:

Levels:


On clouds 2 layer, go to Filter-Gassian Blur:

Step 37
In this step we’ll make rainbow. Create a new layer above clouds 1 layer and it’s clipping mask ones. Hit G to active Gradient Tool and choose Linear Gradient. Open Gradient box and choose Special Effects then Russell’s Rainbow:

Drag a line horizontally:


Go to Filter-Distort-Shear:

Transform it and add layer mask to remove rough edges of this rainbow. Place it to make an arc between island 3 and 4:

Change the mode to Screen 100% then apply Gassian Blur with 3 px:

Step 38
Create a new layer on the top. Use soft white brush to paint on islands, trees, topiaries, bench to brighten it. I put the mode to Soft light 100%:

Create a new layer, apply Radiant Gradient Tool with default color ( black and white). Change the mode to Soft light 30% to add a subtle vignette effect for picture:


Add layer mask to remove this effect on tree 1:

Step 39
Now it’s time for blending. I was thinking what the tone I should add for this picture till I realized a slight vintage effect would be nice. A very simple and fast way to add vintage effect to any picture is to use a Color Fill layer with very dark blur or cyan and change the mode to Exclusion or Difference with big opacity ( 70 %+) and you can get a light yellow vintage tone. With this picture, I choose color #000d2d and Difference mode 70%. Go to Layer-New Fill Layer-Solid Color:


Add more yellow vintage by a Levels layer:

And We’re Done!
You can view the final outcome below. I hope that you enjoyed this tutorial and would love to hear your feedback on the techniques and outcome.
Member File Download
Download the original .psd file for this tutorial here:

 Members Area Tutorial: Create a Mystical Floating Chinese Symbol Landscape
 Members Area Tutorial: Create the Surreal Photo Manipulation ‘Twisting Water’
 Members Area Tutorial: Design a Colorful and Futuristic Photo Manipulation

Leave a comment
0 Comments:
No comments have been posted yet. Be the first!
Leave a Comment: