
Members Area Tutorial: Create a Beautiful Mixed Media Portrait in Photoshop
Digital art is great, but it can begin to look a little generic after a while. Sleek photo manipulations become a little dull if that’s all you ever create.
Luckily, it’s possible to design some more creative looking designs using Photoshop. This includes mixed media style work, that emulates the work of non-digital compositions.
Today’s advanced tutorial will teach you how to create a beautiful mixed media portrait effect.
You can use this effect for high-end client work, but it could equally be an amazing way to impress your friends and colleagues by converting your personal photos across social media. Why not bring your portfolio site’s about page to life with a super creative mixed media self portrait?
In today’s tutorial you’ll work with:
- Professional blending techniques
- Applying textures and stocks correctly
- Creatively using filters for drawing purposes
- And much more!
Let’s dive right in!
Final Image
As always, this is the final image that we’ll be creating:

Resources Used In This Tutorial
Step 1
Create a new document and fill it with white. I use the size of 1000×1100 but feel free to make your own. Open paper 1 stock. Use Move Tool (V) to drag it into our document and lower opacity to 30%:

Step 2
Drag paper 2 into our canvas and continue lowering opacity to 30%:

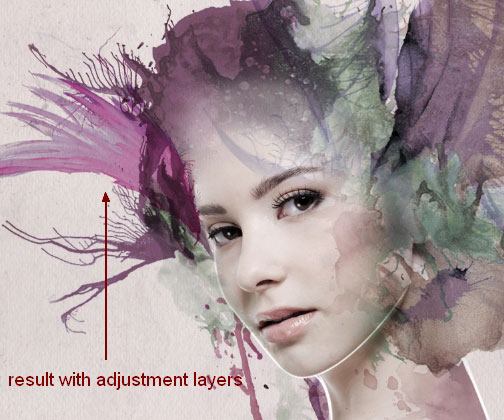
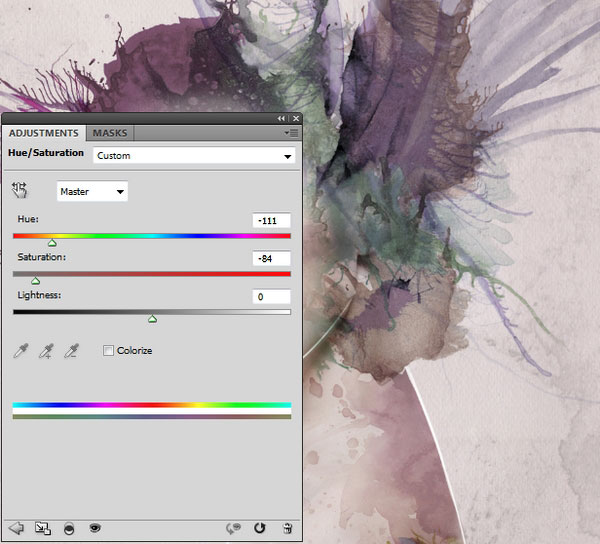
Step 3
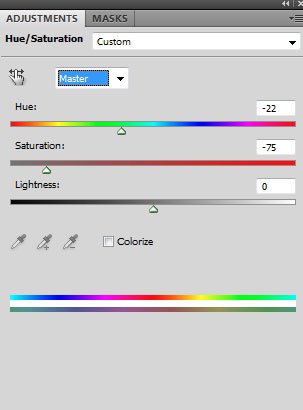
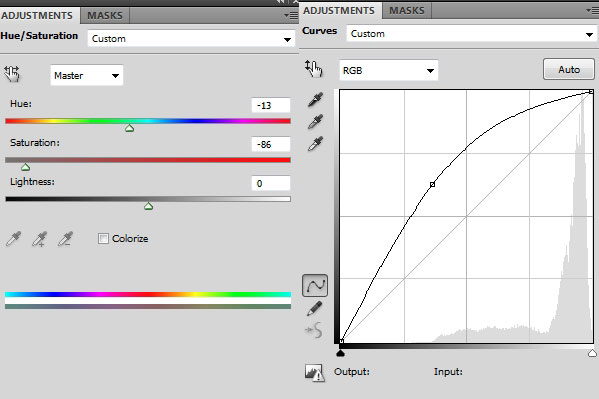
I use an adjustment layer to change color of the picture. Go to Layer-New Adjustment Layer-Hue/Saturation:

Step 4
Open the model stock. You can use your own photo, but I advise that you choose a high quality one, as this will give you a much better end result.
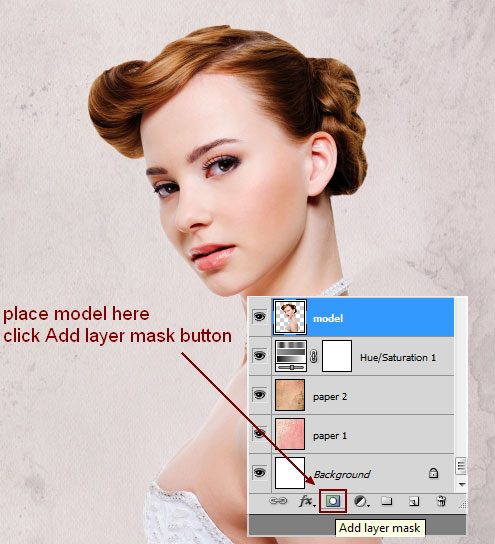
Extract the model and place her at the middle of our picture. Then click the second button of Layer Pallete to add layer mask to model one.
Use a soft black brush to remove the hair part then change brush to splatter ones. Choose some from these brush and blend the bottom of model with background:

Step 5
Create a new layer with Clipping Mask options for model layer. Use Clone Tool (S) to remove model necklace:
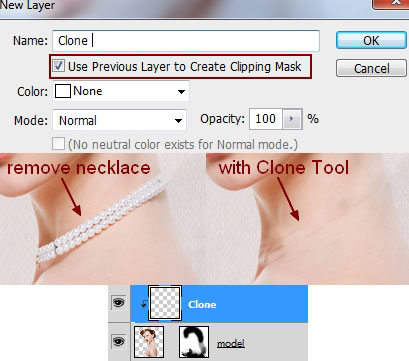
Don’t worry if the result doesn’t look perfect, we’ll add more element there later.
Step 6
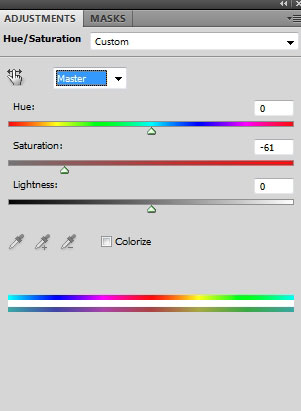
I make an adjustment layer with Clipping Mask to reduce model saturation:

Step 7
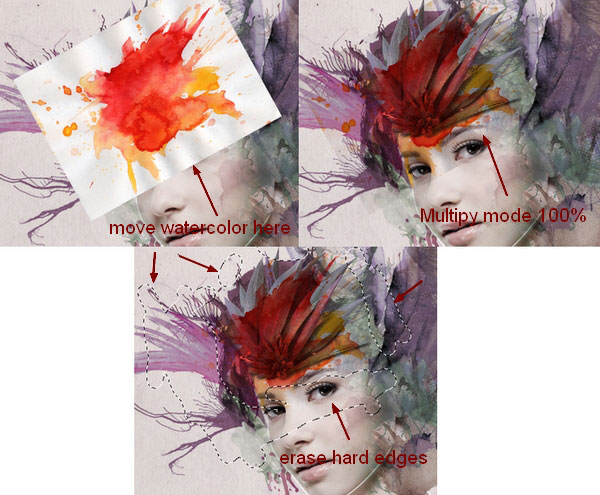
Open watercolor 1 stock. I choose one from this pack and place it onto model shoulder, also set this layer under model one.
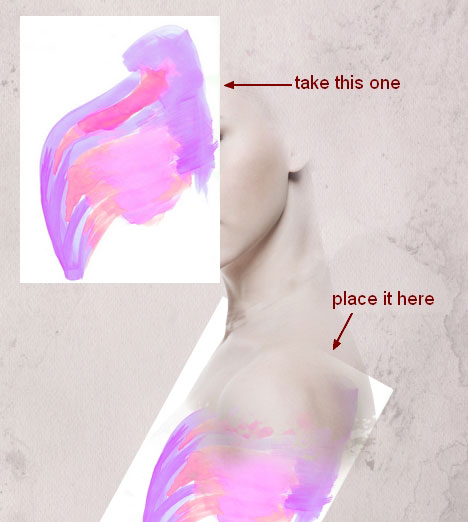
Change the mode to Multipy 100% and use layer mask with opacity about 50-55% to blur the left side:

Step 8
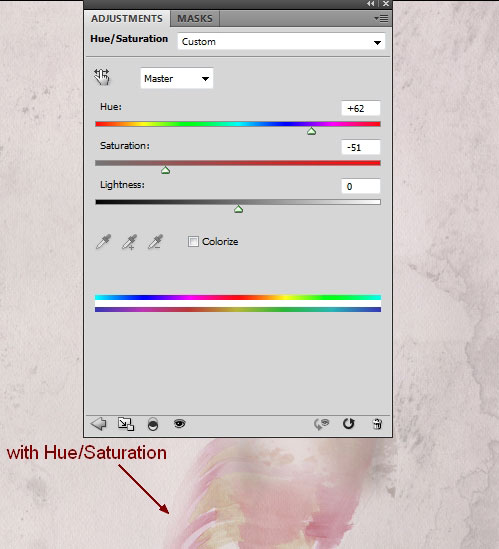
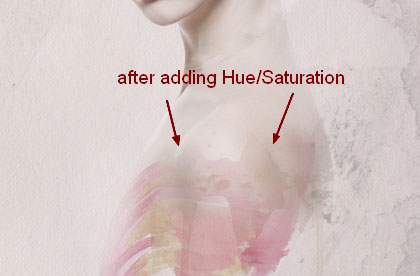
Create a Hue/Saturation layer (Clipping Mask) for this watercolor layer (I name it “watercolor 1″):
Step 9
Open watercolor 2 stock. I rotate it using Cmd/Ctrl+T and place it at the shoulder area, put the mode as Multipy 100% (set this layer above model one). Then I use layer mask to erase remained dark edge after changing the mode:

Apply a Hue/Saturation layer (Clipping Mask) to create a subtle effect:

Step 10
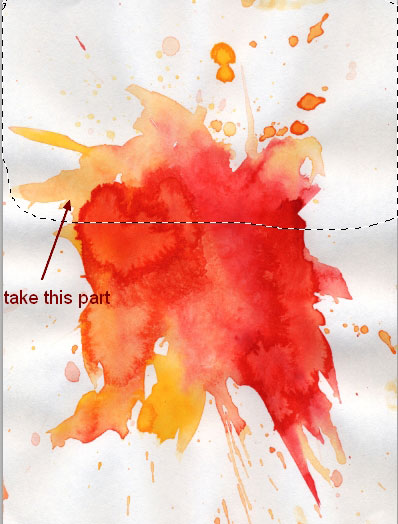
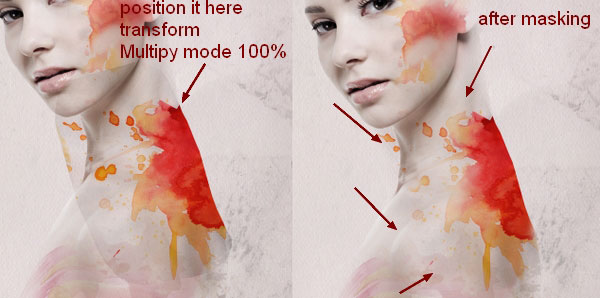
Open watercolor 3 image. Position watercolor 3 at the model cheek and set the mode to Multipy 100%. I erase hard edges with layer mask:
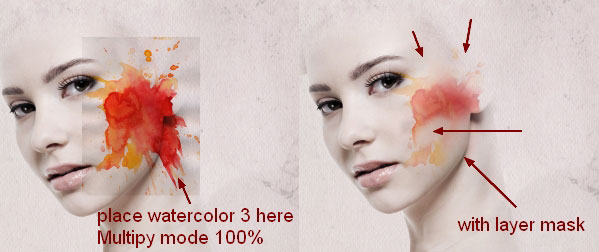
Choose the top part of this watercolor stock to paste into model shoulder and cheek after transforming, change the mode to Multipy 100% and clear unwanted parts with layer mask:
I name these layers “watercolor 3″ and “watercolor 3-1″.
Step 11
Make these two layers selected then press Cmd/Ctrl+G to make group for them. Change the mode of this group from Pass Through (default group mode) to Multipy 100%. Create a Hue/Saturation within this group to reduce saturation of these layers:
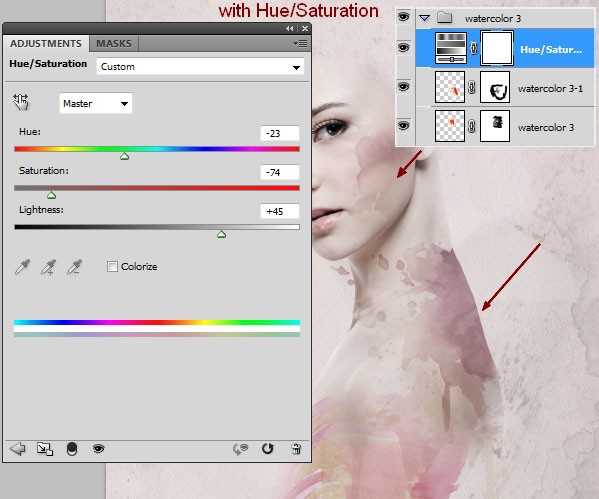
Because the mode changed to Multipy 100% so this Hue/Saturation only affects the layers inside this group (watercolor 3 ones).
Step 12
Add another watercolor image to model shoulder, alter the mode to Multipy 100% and clear unecessary with layer mask:
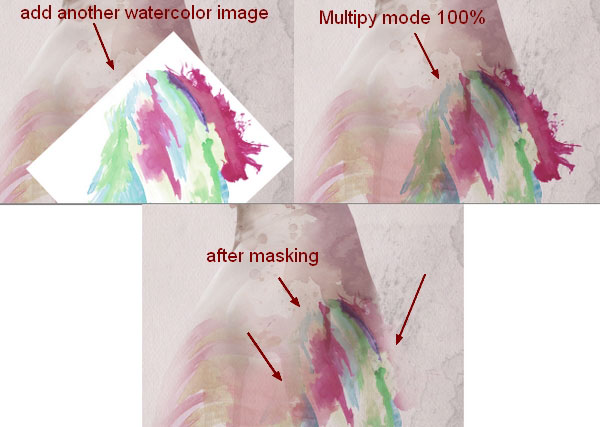
Use a Hue/Saturation layer (Clipping Mask) to blend this effect with the rest:

Step 13
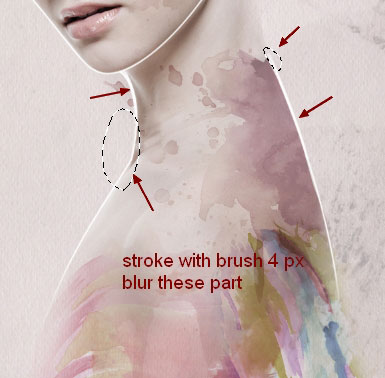
Make a new layer on the top. Use Pen Tool to draw some paths along model contour then stroke them with white brush, 3 px:

I use layer mask and blur the paths to get a faded effect:
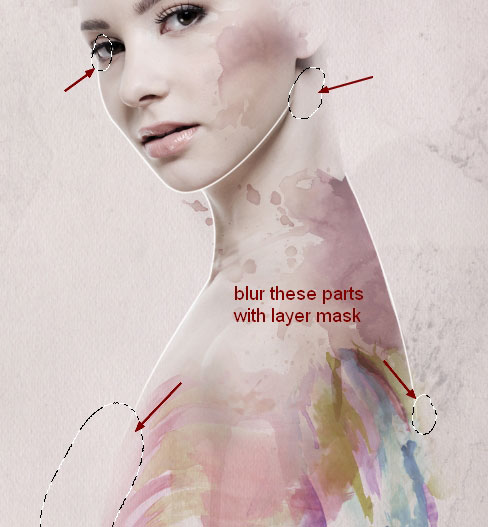
Create a new layer and make two paths along model neck and shoulder, stroke them with brush 4 px then blur their sides:
Step 14
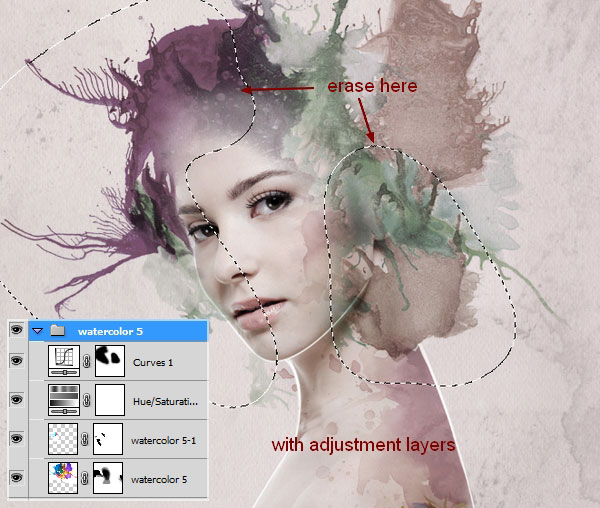
Come back to watercolor pack. I choose an image to add to model head area and put the mode as Multipy 100%. Then erase a part covering the face and the bottom left and right:
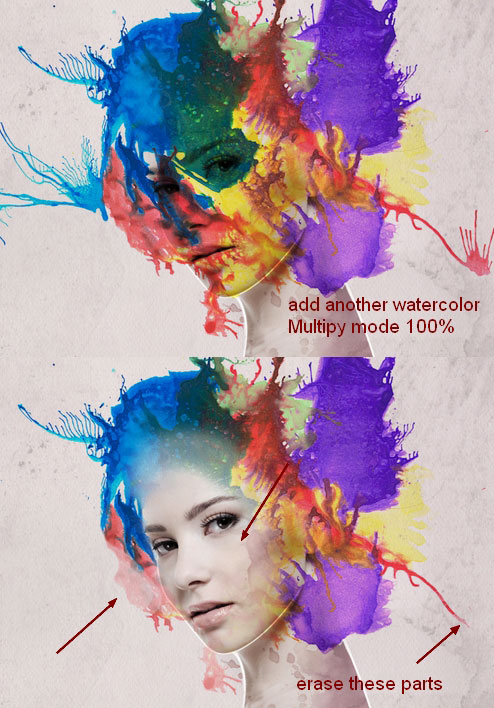
I name this layer “watercolor 5″
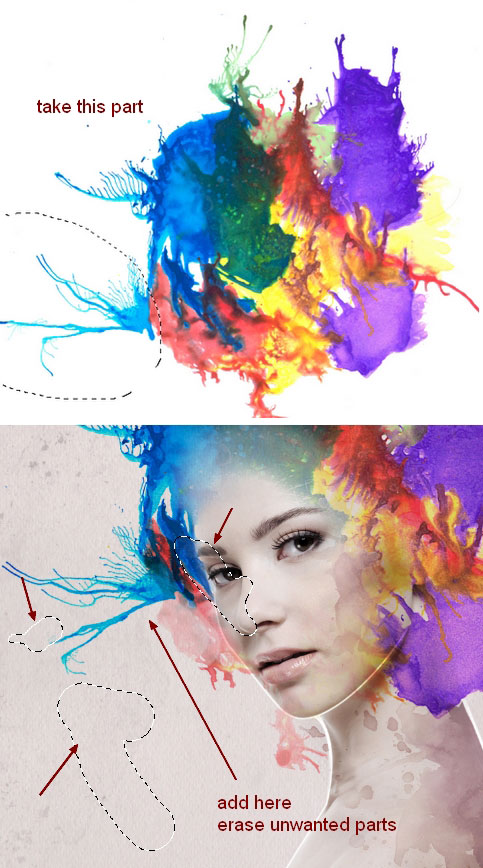
Copy a part from this stock and place at the left of watercolor 5, set the mode to Multipy 100% and erase unecessary parts:
Step 15
Make group for these layers as done in step 11. I use Hue/Saturation and Curves layer to change color and brightness of this effect.
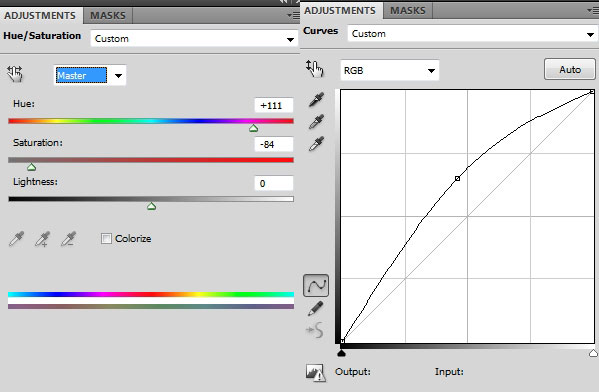
I use soft black brush on Curves layer mask to reduce brightness of the top left and bottom right:
Step 16
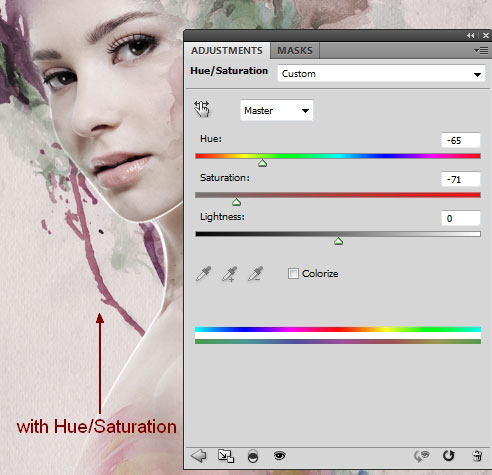
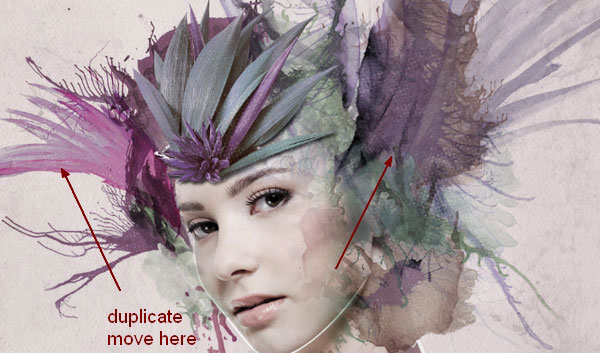
Drag watercolor 2 again into our picture, place it behind the left of model head (arrange this layer under model one). I change the mode of it to Multipy 100% as usual and remove some hard edges with layer mask:
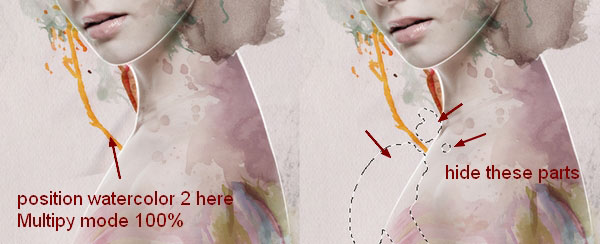
Change color of it with a Hue/Saturation layer (Clipping Mask):
Step 17
I take a blue watercolor image from the pack and situate it at the top right of model head. I put the mode as Multipy 100% and hide the parts I don’t like:
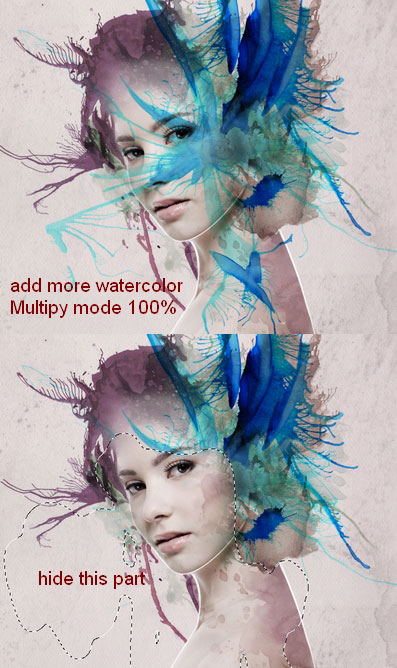
Add some adjustment layers (Clipping Mask) to this watercolor layer:

Step 18
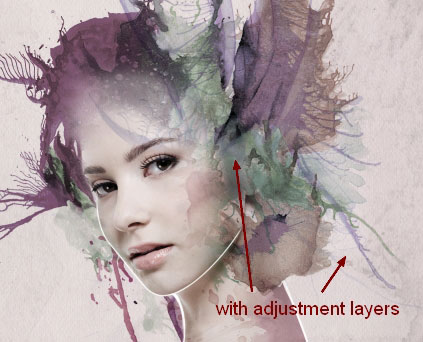
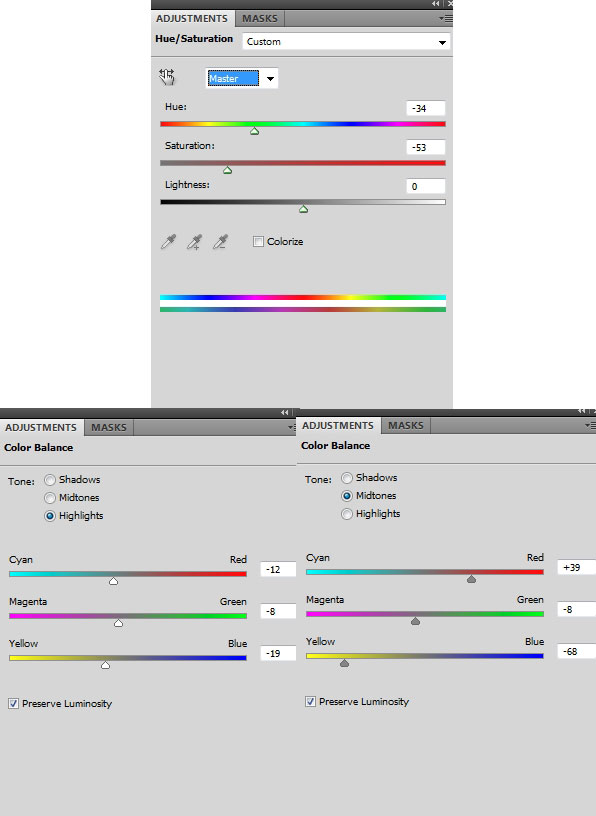
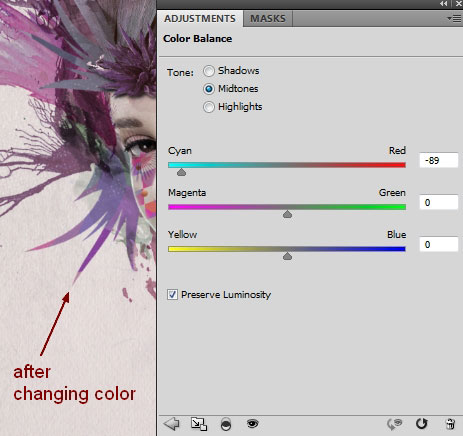
Choose another watercolor to paste into the top left of model head. As always, set the mode to Multipy 100% and change its color with Hue/Saturation and Color Balance layers (Clipping Mask):
Step 19
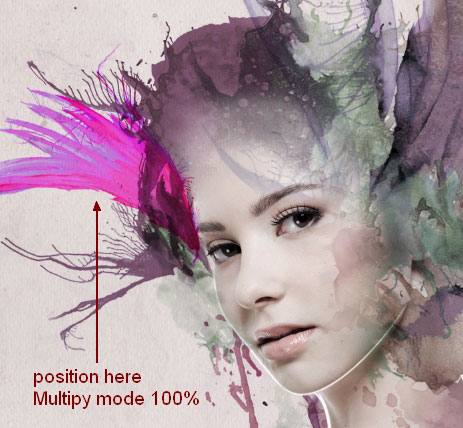
Add another watercolor to the top right of the head with Multipy mode 100%. Use Hue/Saturation for this layer:

Step 20
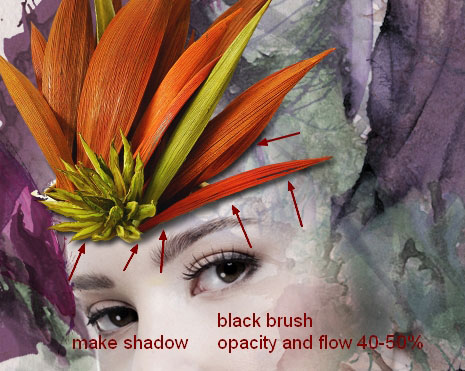
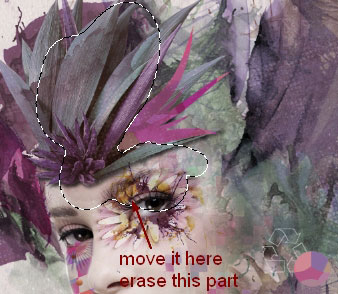
Extract ornament and move it above model forehead and flip it horizontally (Edit-Transform-Flip Horizontal). Add layer mask and remove the leaf at the bottom:

Create a new layer under ornament one. Use soft black brush with opacity and flow about 40-50% to paint under ornament to make shadow for it.
Step 21
I use Curves, Color Balance, Curves to change color of this ornament.


Step 22
Choose one from halftone pack and place it on model head, press Cmd/Ctrl+I to invert it then change the mode to Soft Light 100%:
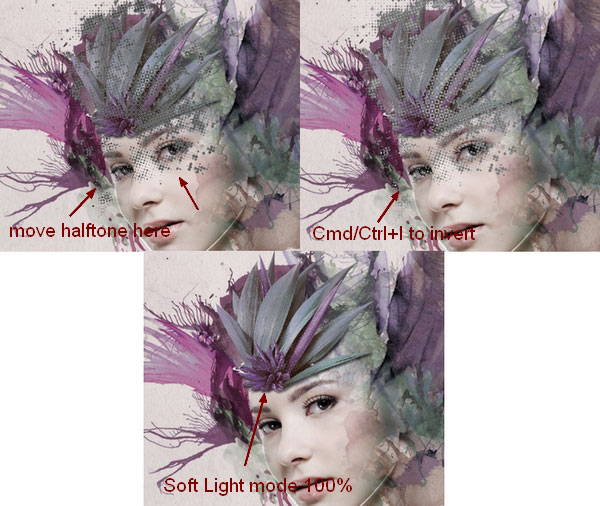
Duplicate this layer twice and move to the two sides of model head:
Step 23
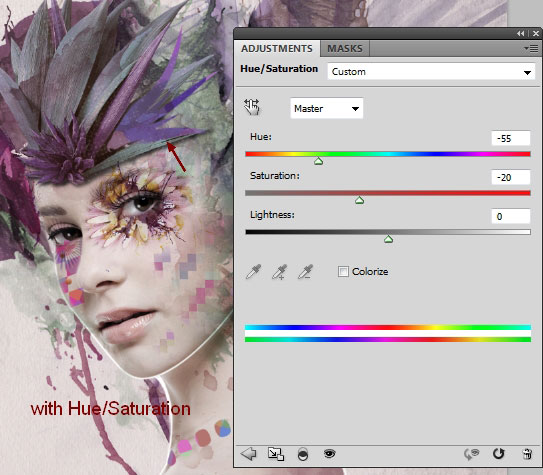
Choose watercolor 3 to place over the ornament, set mode to Multipy 100% and erase hard edges:
Make change for color of this effect with Hue/Saturation and Curves:

Step 24
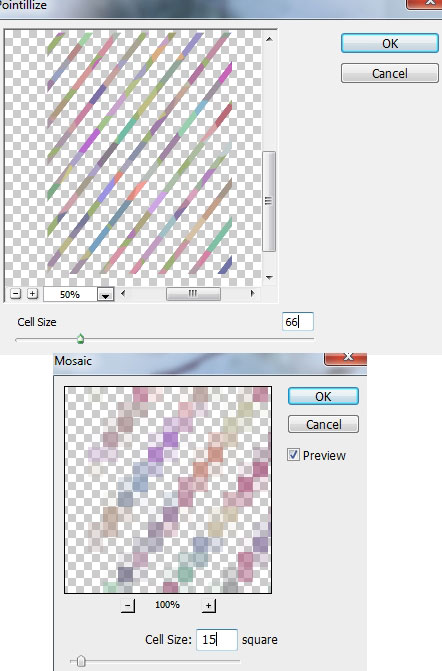
Make a new layer and active Custom Shape Tool with settings below:
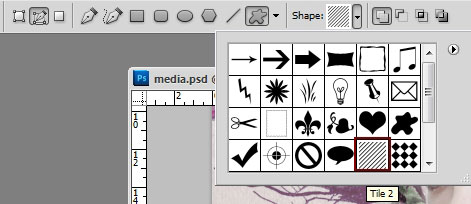
Draw a shape on picture then hit Cmd/Ctrl+Enter to turn this shape into a selection. Fill this with color #b3a6b0:

Go to Filter-Pixelate-Pointillize then Filter-Pixelate-Mosaic:
Step 25
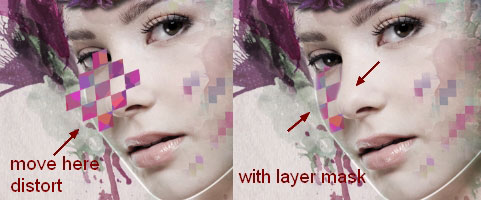
Move this result onto model face and distort it a bit using Cmd/Ctl+T:
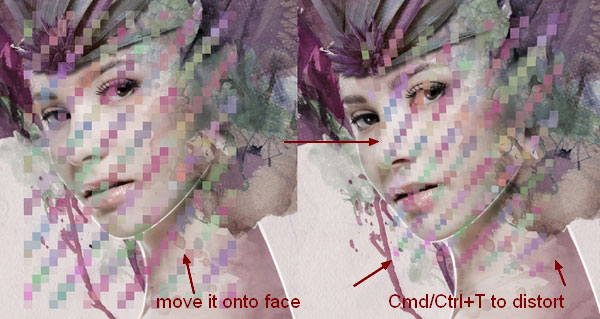
Use layer mask to reduce or remove this effect as shown:
Call this layer “face make up 1″.
Step 26
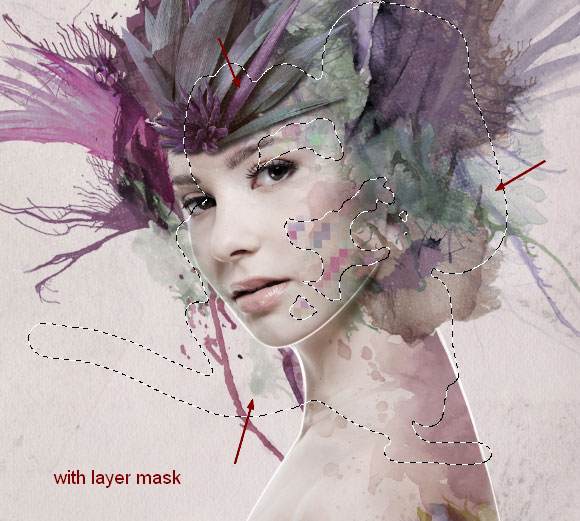
New layer and I choose another shape to apply Pointillize filter with same settings in previous step, with color #b76290:
Move it to the left eye, distort it and use layer mask to clear unecessasy parts:
I name it “face make up 2″.
Step 27
Make a new layer and I use Pen Tool to create a shape under the left eye, fill with color #8b2f58 and change the mode to Soft Light 100%:

Call it “eye make up 1″.
Step 28
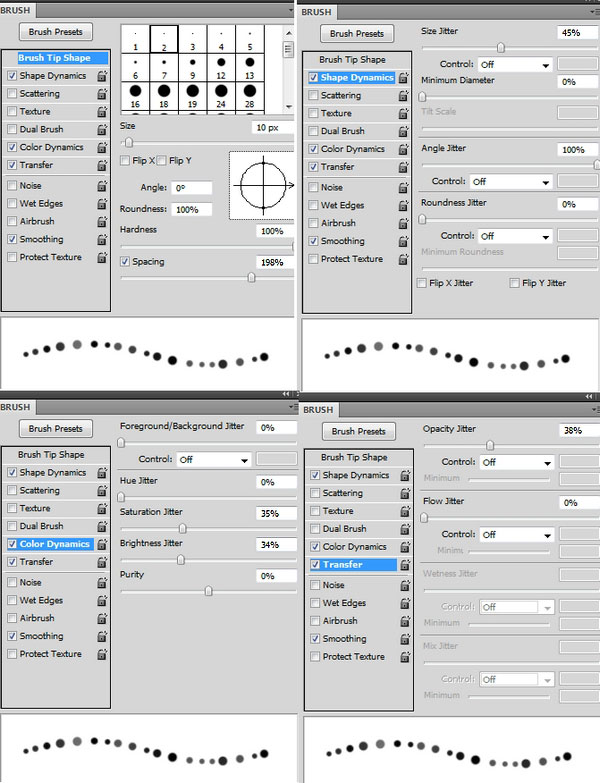
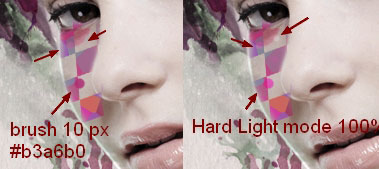
Create a new layer, set foreground to #b3a6b0 and press F5 to make settings for this brush:
Make some dots under left eye then change the mode to Hard Light 100%:
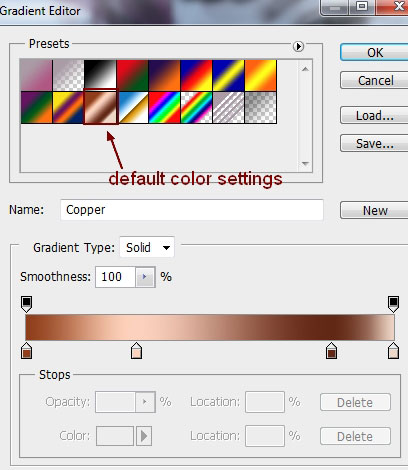
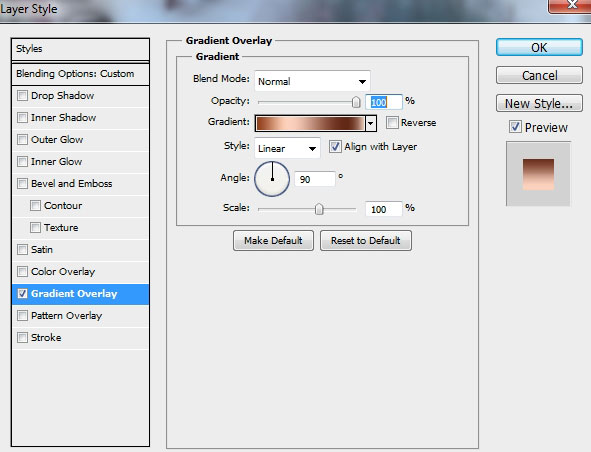
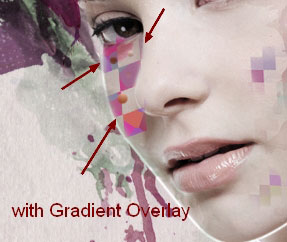
Double click this layer, apply Gradient Overlay with one of default color settings:
Step 29
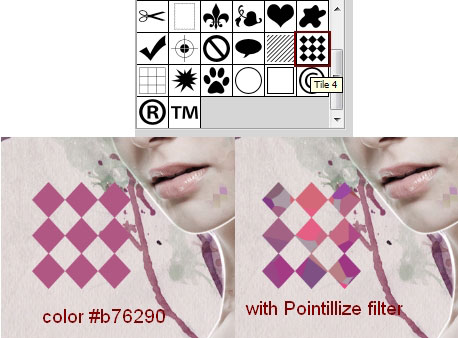
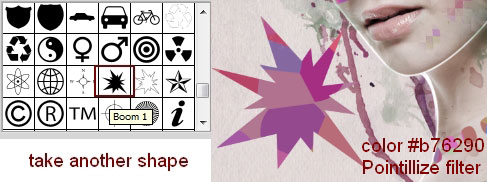
Load all shapes from menu and I choose a symbol one to play with. I use color #b76290 and spot on model shoulder:

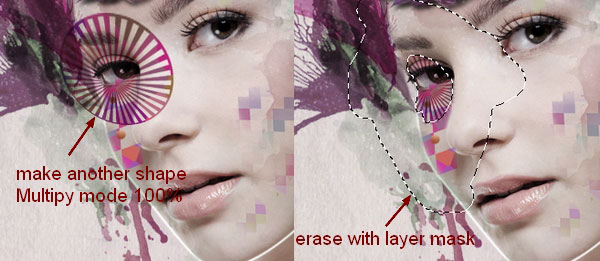
Make another bigger shape using the same symbol, apply Pointillize filter and move to left eye, transform and change the mode to Multipy 100%. Use layer mask to erase the part covering the eye:
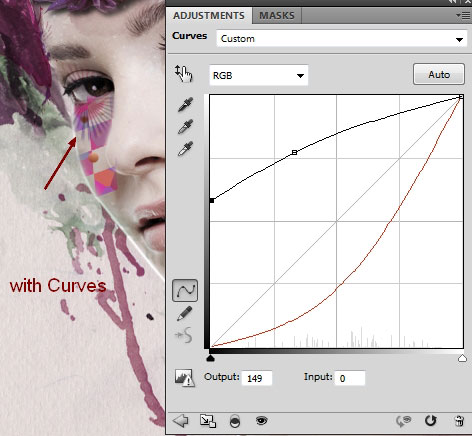
I use Curves to brighten and change color of this effect a little:
Step 30
Take another shape from shape menu and apply Pointllize with same settings in previous steps. I use color #b3a6b0 :

I use Warp tool (Edit-Transform-Warp) to tweak it a bit to fit the neck form then use layer mask to remove vertical line:

Step 31
Choose another circle from shapes and apply Pointillize filter again. I use Warp Tool to bend it to make it lying on the shoulder:

Step 32
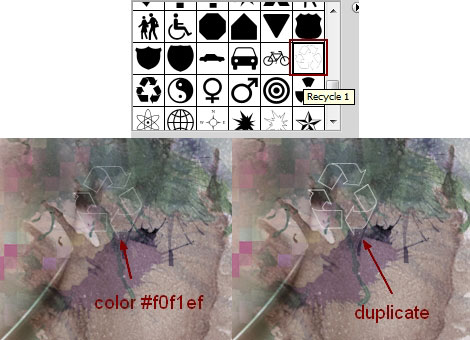
Make a new layer and I use an arrow shape to add to the right of model head. I use color #f0f1ef in this case then duplicate to make a stronger effect:
Step 33
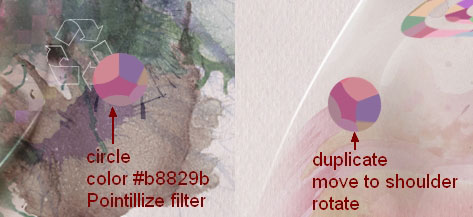
New layer, and use Elliptical Marquee Tool to make a circle and fill with color #b8829b then apply Pointillize filter again. Then duplicate it, rotate and place at model shoulder area:
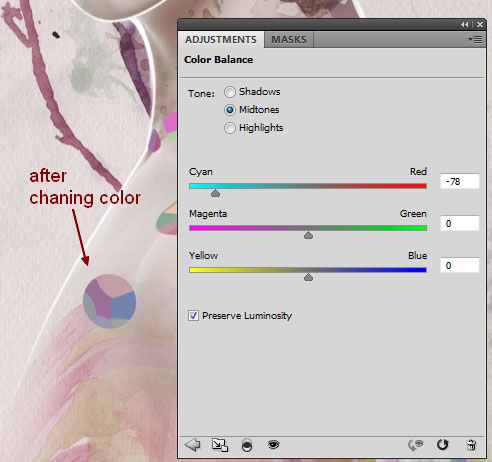
I use Color Balance to change color of the circle on shoulder:
Step 34
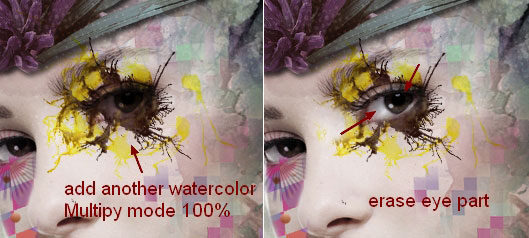
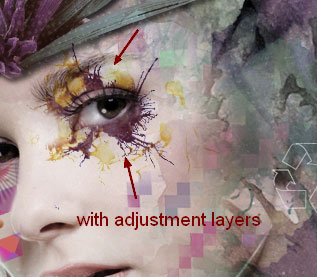
I use another watercolor image with splatter effect to add to the right eye and put the mode to Multipy 100%. Use layer mask to remove the part inside the eye:
Apply Hue/Saturation and Color Balance for this effect:

Step 35
Open abstract shape pack. I take number 23 that I find suitable for our tutorial and place it over the right eye, set the mode to Multipy 100% and transform it a bit. Press Cmd/Ctrl+I to invert then use layer mask to remove some parts to get the result below:

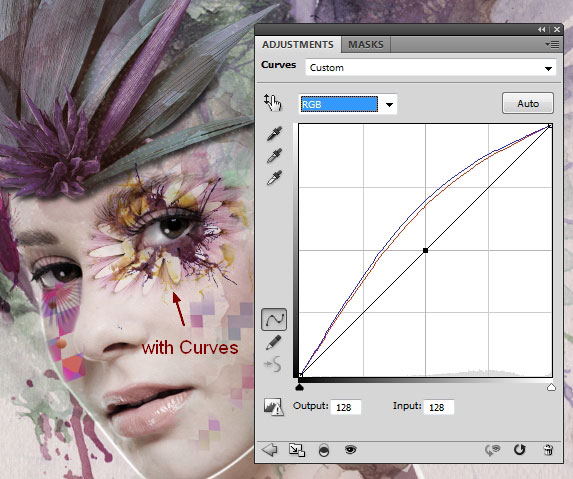
Change color of this effect with Curves:
Step 36
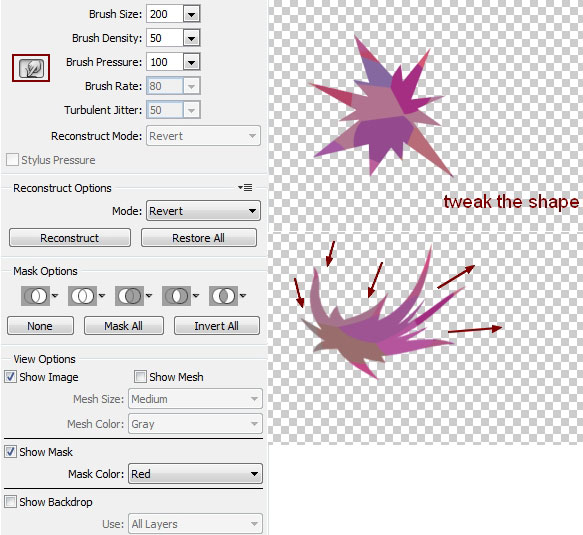
Make another shape and fill with color #b76290 . Apply Pointillize filter but increase the Cell size to 103 (or whatever value you find suitable):
Go to Filter-Liquify and choose Forward Warp Tool to tweak this shape to get a look below:
Move it to the right of ornament and hide a part with layer mask (use hard black brush). Set this layer under halftone ones (above ornament layers):
I use Hue/Saturation to change color of this shape:
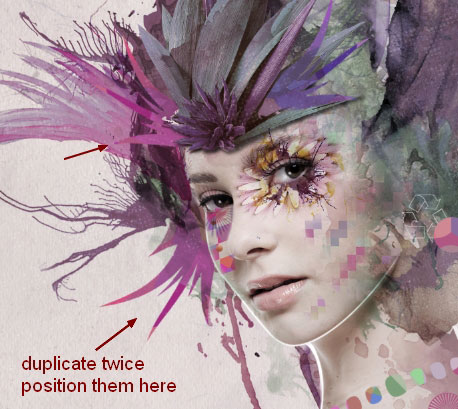
Step 37
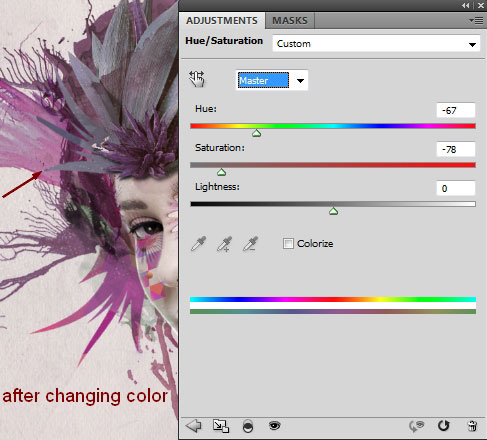
I duplicate this shape twice and place one under ornament layer, one under model one and transform them as shown below:
I apply Hue/Saturation and Color Balance for these shapes:
Step 38
Make a new layer on the top. Make selection for lips part, fill it with color #7c8181 and change the mode to Color 80%:
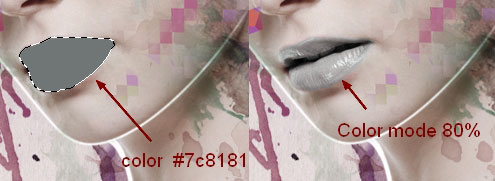
Call it “lips”.
Step 39
Create a new layer and change brush to splatter one, foreground to #eb97bd. Hold Cmd/Ctrl while clicking lips layer to load its selection. Choose brush with number 478 (or any you like) and spot over the lips. Change the mode to Multipy 100% then use layer mask and this splatter brush to trim the edges of this effect:

Step 40
Make some adjustment layers on the top (Gradient Map, Color Balance and Brightness/Contrast).

Set this Gradient Map layer to Soft Light 100%.
And We’re Done!
You can view the final outcome below. I hope that you enjoyed this tutorial and would love to hear your feedback on the techniques and outcome.
Member File Download
Download the original .psd file for this tutorial here:

 Members Area Tutorial: Create a Mixed Media Effect in Photoshop
 Members Area Tutorial: Create A Mixed Media Piece From A Hand Drawn Illustration In Photoshop
 Members Area Tutorial: Create Beautiful Sunrise Landscape Matte Painting in Photoshop

That’s a great Tutorial! The paint effects blend perfectly with the outcome, I’m definitely going to apply these techniques to my future works. Thumbs up!!