
Members Area Tutorial: Create a Spectacular Fantasy Airship Scene
In this tutorial you’ll learn how to create an illustration using techniques such as photo manipulation, creating a stylized background, applying patterns and texture moulds effectively, adding ink outlines and creating realistic lighting.
The template for today’s subject, an airship, was created in the Blender 3D suite. If you’re interested in including 3D in your workflow, I highly recommend this Open Source 3D software. You can download it for free at www.blender.org.
Final Image
As always, this is the final image that we’ll be creating:

Resources Used In This Tutorial
Step 1
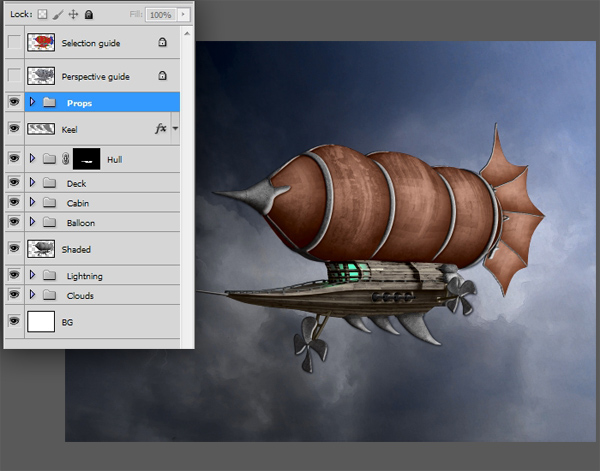
Start Photoshop if you haven’t already done so and open “Starter.psd” from the Assets.zip file. Inside this psd you’ll find 4 layers: BG, which is a plain white layer, and 3 layers each representing the airship. The first layer, Shaded, we’ll use as the foundation for the art work. The second one, Perspective guide, we’ll use as a guide for placing textures and the third, Selection guide, is rather garish but very handy for making quick and accurate selections of the various parts of the airship.

Step 2
Before going any further, let’s set up the brushes and patterns we need. The brushes are first. Activate the Brush tool (B) and right+click somewhere in the image. The brush presets dialog appears. Click on the small arrow at the top right and choose Replace Brushes from the menu. Locate the “Airship.abr” file and click the Load button.

Next, click on the arrow again and, this time, choose Load Brushes from the menu. Find the lightning brushes you downloaded (firestorm_lightning4.abr) and click Load to append these brushes to the brush presets.

Step 3
To conclude the preparations, we’ll load the patterns. Press Shift+F5 to bring up the Fill dialog. Set Use to Pattern and click on the arrow next to the Custom Pattern swatch. The pattern presets dialog will be displayed. Click the small arrow at the top right of the dialog box and choose Replace patterns from the menu. Locate the “Airship.pat” file and click Load to load the patterns into Photoshop.

Step 4
Alright, let’s get going! First off, save the Starter.psd file to another name (Ctrl+Shift+S/Cmd+Shift+S) to keep the original safe. I called my version “Airship.psd” but you can call yours anything you like.
We’ll start with the background. Turn off all airship layers (Shaded, Perspective guide and Selection guide) by clicking on the eye icons in front of the layers. Click on the BG layer to make it active. Create a new layer by clicking on the New Layer icon at the bottom of the Layers palette and rename this layer to “Sky Gradient”. Activate the Gradient tool (G) and click on the Gradient swatch in the Options bar. When the Gradient Editor appears, set the first color to a bright sky blue (#0277ec) and the second color to pure white (#ffffff).
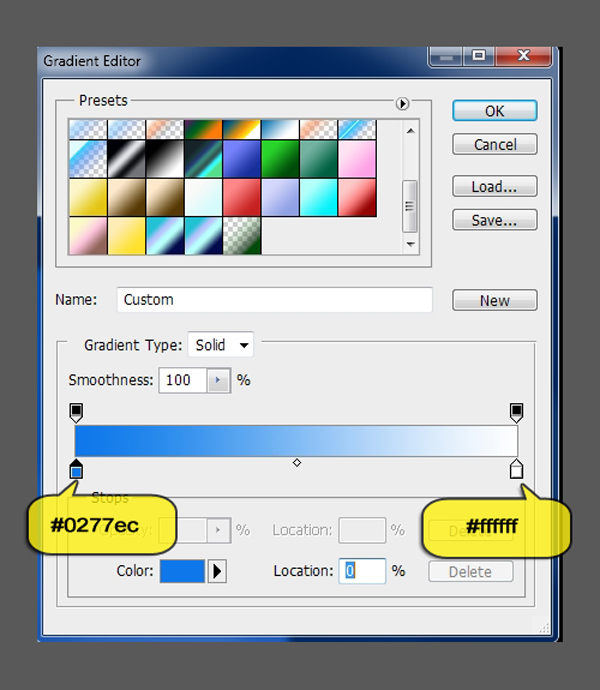
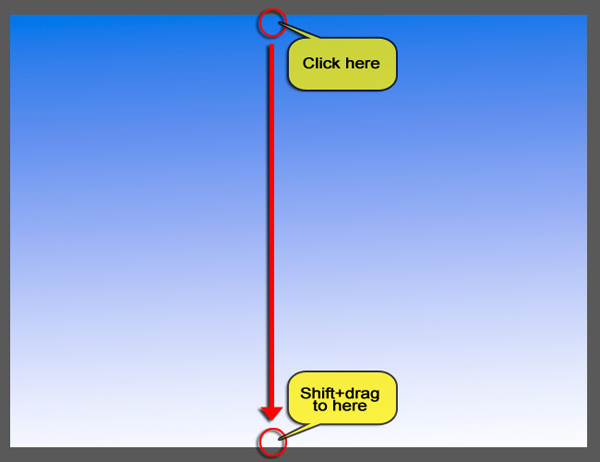
Click Ok to set the gradient to the colors you just specified. Click at the top of the image, Shift+drag all the way down to the bottom and release the mouse button to create the gradient.
Step 5
Open the Sky 1 image (1077522_97541131.jpg). Press Ctrl+A/Cmd+A to select the whole image. Next copy it to the clipboard (Ctrl+C/Cmd+C) and close the Sky 1 image by pressing Ctrl+W/Cmd+W. Back in the Airship image, paste the sky above the Sky Gradient layer (Ctrl+V/Cmd+V). Rename the new layer to “Sky 1″.
As you can see the sky image is a little too small. Use Free Transform (Ctrl+T/Cmd+T) to scale it up so that it fits.

Next, set the Sky 1 layer’s Blend Mode to Multiply and its Opacity to 70%.

Step 6
Open the Sky 2 image (1263723_42231450.jpg) and copy and paste it into the Airship image as you did with Sky 1. The new layer should sit above the Sky 1 layer. If not, drag it into place in the Layer’s palette. Rename this new layer to “Sky 2″.
As with the previous sky image, it’s too small. Again, use Free Transform to scale it until it fits.

Next, in the Layer’s palette right+click in an empty space next to the Sky 2 layer’s name and choose Convert to Smart Object from the popup menu.

Why we’re doing this will become clear in a minute. For now, set the Sky 2 layer’s Opacity to 70%.
Step 7
To start building the effect we’re after we need to apply a filter from the Filter Gallery to the Sky 2 layer. However, as you’ve probably noticed, the image is in Lab Color mode. Although this is a great color mode, many filters, including all Filter Gallery filters, are not available in Lab Color, which means we have to perform some special ops to work around this limitation. Fortunately for us, since Smart Objects are available to us from Photoshop CS3, this is not a problem.
Double-click on the Sky 2 layer’s thumbnail. This will cause the Smart Object to open in a separate window as Sky 2.psb.
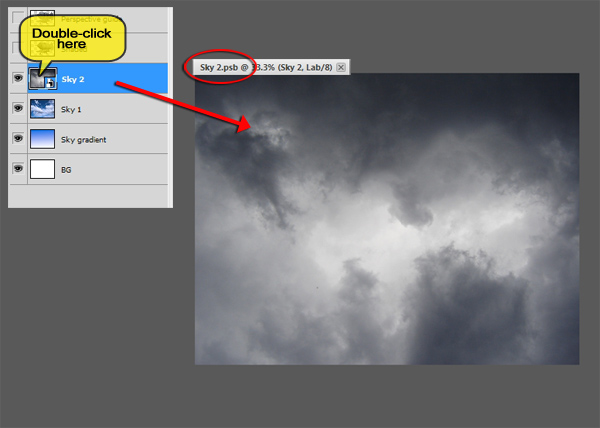
In order to apply a Filter Gallery filter, the image needs to be in RGB color mode. To make it so, choose Image>Mode>RGB Color from the menu.
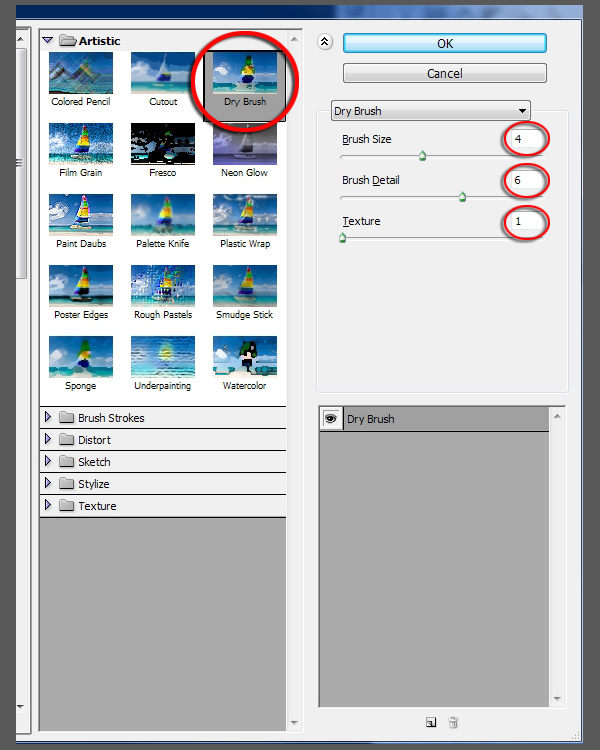
Next, choose Filter>Filter Gallery from the menu and locate the Dry Brush filter, which lives under the Artistic heading. Set Brush Size to 4, Brush Detail to 6 and Texture to 1. Click Ok to apply the filter.
Save the Smart Object (Ctrl+S/Cmd+S) and close it (Ctrl+W/Cmd+W). The main Airship image will now be automatically updated to reflect the changes we made. Note that, although we converted the Sky 2 Smart Object to RGB color, the main file is still in Lab Color mode, which is exactly as it should be.
Step 8
Now it’s time to give the sky the right atmosphere. For this we’ll need a number of adjustment layers. The first one will lighten the upper right corner of the sky. Click on the Create New Fill or Adjustment Layer icon at the bottom of the layers palette and choose Hue/Saturation from the list. Rename the new adjustment layer to “Lighten”. Set the Lightness to +43.

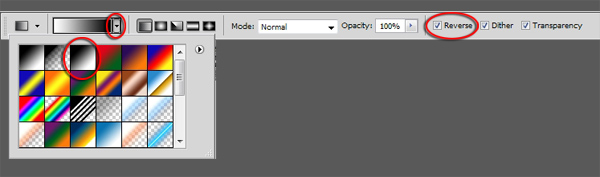
Press G to activate the Gradient tool. Click on the arrow next to the gradient swatch and set the gradient to Black, White. Click on the Reverse checkbox to turn it on.
Click on the Lighten layer’s layer mask to make it active and draw a gradient from just below the upper right corner of the image to just left of the center as shown below.

Your image should now look like the one below.

Step 9
Create another Hue/Saturation adjustment layer by clicking on the Create New Fill or Adjustment Layer icon and picking Hue/Saturation from the menu. Rename the layer to “Desat”and set the Saturation slider to -64.

Click on the Desat layer’s layer mask to make it active and, using the Gradient tool (G), draw a mask as indicated below.

Step 10
To make the clouds on the left hand side of the image look like storm clouds, we need to darken them quite a bit. To do this, create a new Curves adjustment layer, rename it to “Darken” and set the Lightness channel like so:

The Darken layer needs the same layer mask as the Desat layer. To make that happen, click on the Desat layer’s layer mask and Alt+drag/Opt+drag it onto the Darken layer. When Photoshop asks if you want to replace the layer mask, click Yes.

Step 11
We need one more adjustment layer. This time we’ll bump up the contrast in the sky to make it look even more dramatic. Create a Levels adjustment layer and rename it to “Contrast”. Adjust the Lightness channel by setting the black point to 6 and the white point to 224.

Step 12
Next, we’ll make the sky look as if it was painted with water colours over pencil lines. Make sure that the three airship layers are still turned off and that all the sky layers are turned on. Press Ctrl+A/Cmd+A to select the whole image, followed by Ctrl+Shift+C/Cmd+Shift+C to send a merged copy of the sky to the clipboard. Make sure that the Contrast layer is selected and press Ctrl+V/Cmd+V to paste the merged copy of the sky as a new layer above the Contrast layer. Rename the new layer to “Pencil lines”.
Press Ctrl+Shift+U/Cmd+Shift+U to desaturate the Pencil lines layer and set its Blend Mode to Multiply. To complete the effect, choose Filter>Stylize>Find Edges from the menu.
Below you see a before and after shot of the sky.

Step 13
Click on the Sky gradient layer and Shift+click on the Pencil lines layer to select all sky layers. Press Ctrl+G/Cmd+G to group them and rename the new group to “Clouds”.
As a finishing touch, let’s put in some lightning. Create a new layer above the Clouds group and activate the Brush tool. Right+click and choose one of the lightning brushes from the presets. I picked lightning brush 7 but you can pick any you like. Set the brush’s Size to 1100 pixels and your foreground color to pure white (#ffffff).

Click once somewhere inside the image to create a lightning bolt. Use the Move tool to position it over the dark clouds on the left.

Create a duplicate of the layer by pressing Ctrl+J/Cmd+J. Choose Edit>Transform>Flip Horizontal from the menu and use the Move tool (V) to position the second lightning bolt as shown below.

Press Ctrl+J/Cmd+J once more to create another copy and leave it where it is. Next, click on the first lightning layer (Layer 1) and Shift+click on the third lightning layer (Layer 1 copy 2) to select all the lightning layers and merge them by pressing Ctrl+E/Cmd+E. Rename this layer to “Lightning”.
Set the Lightning layer’s Blend Mode to Soft Light.
As you can see, the lightning is hardly visible at this stage. To fix that, Ctrl+click/Cmd+click on the Lightning layer’s thumbnail to create a selection from it.
Click on the Create New Fill or Adjustmment Layer icon at the bottom of the Layers palette and pick Levels from the menu. A new Levels adjustment layer is created with the lightning selection attached as a layer mask. Rename the layer to “Contrast” and set the white point in the Lightness channel to 175.

Select both the Lightning layer and the Contrast layer and group them (Ctrl+G/Cmd+G). Rename the group to “Lightning”.
If all went to plan, your image and layer palette now look similar to this:

Step 14
Let’s move on to the airship. Unhide the Shaded layer and the Perspective guide layer by clicking on the eye icons. All new layers we create from this point forward will sit above the Shaded layer and below the Perspective guide layer.
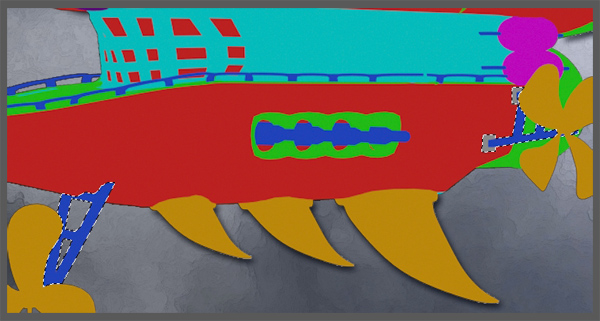
We’ll work from back to front, which means we start with the rudder. Unhide the Selection guide layer and click on it to make it the active layer. Use the Magic Wand tool (W) to select the top blue portion of the fin.

Turn off the Selection guide layer and click on the Shaded layer. With the selection still active, create a new layer by clicking on the New Layer icon at the bottom of the Layers palette, followed by clicking on the Add Layer Mask icon. This attaches the selection to the layer as a layer mask.

Rename the layer to “Rudder 1″. We have to temporarily detach the layer mask from the layer to avoid that the layer mask is harmed when we transform the contents of the layer. To do that, click on the link icon between the layer and the layer mask.

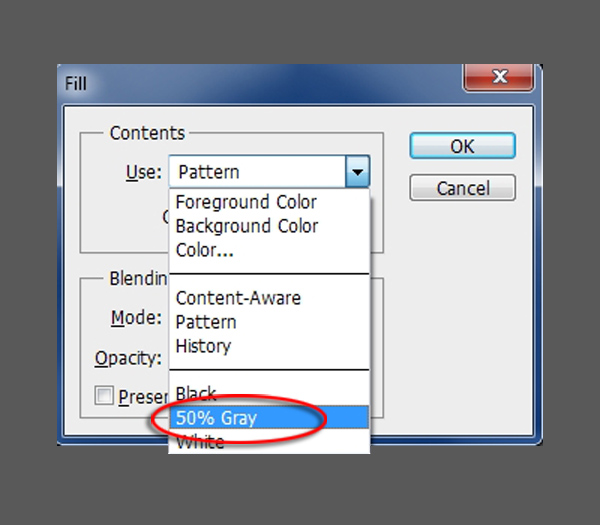
Make sure the layer and not the layer mask is selected and use the Rectangular Marquee tool to draw a selection around the top part of the fin. Give yourself plenty of space. Next, press Shift+F5 to bring up the fill dialog. Set Use to Pattern and click on the arrow next to the swatch. Pick the Cloth pattern from the list, which is the first swatch.

Click Ok to fill the selection with the Cloth pattern and press Ctrl+D/Cmd+D to get rid of the selection. Next, choose Edit>Transform>Warp from the menu and distort the piece of cloth so that it follows the perspective lines better. It doesn’t have to be 100% accurate but try to match the shape of the fin as best as you can.

When you’re done, hit Enter/Return to apply the distortion. Next, set the Rudder 1 layer’s Blend Mode to Hard Light and click on the space between the Rudder 1′s layer and its layer mask to relink them.
When you’re done, turn off the Perspective layer for now. the result should look like this:

Step 15
We need to add some color and shadow to the Rudder 1 layer. We’ll use a layer style for that. In the Layers palette, double-click on the Rudder 1 layer in an open space next to its name.
When the Layer style dialog appears, click on Color Overlay and set the Color Overlay options to match those shown below.

Next, click on Pattern Overlay and change the settings as follows: (the pattern’s name is 040 and it’s located near the bottom of the pattern presets list)

The Pattern Overlay adds some variation to the color so it doesn’t look so blatantly computer generated.
To finish the layer style, click on Inner Shadow and set it’s parameters like so: (don’t forget to turn off the Use Global Light option!)

We’ll use this layer style again, so it’s a good idea to save it. To do so, click on the New Style button, name the new style “Cloth” and turn off the Include Layer Blending Options checkbox.

Step 16
Turn the Perspective guide layer back on and repeat Step 14 for the remaining three pieces of the rudder fin. Name the layers “Rudder 2″, “Rudder 3″ and “Rudder 4″ respectively and apply the Cloth layer style to each one.
When you’re done, the rudder fin and your Layers palette should look like this:

Select all Rudder layers and group them. Rename the new group to “Rudder fin”.
Step 17
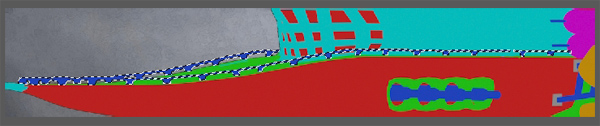
Turn on the Selection guide layer and use the Magic Wand tool (W) to select all the red pieces which belong to the rudder fin’s frame.

Turn the Selection guide layer of and click on the Rudder fin group, Create a new layer with layer mask as you did for the rudder fin pieces and rename the layer to “Rudder frame”. Next, use the Rectangular Marquee tool (M) to draw a rectangular selection around the frame.

Press Shift+F5 and fill the selection with 50% gray. Press Ctrl+D/Cmd+D to remove the marching ants.
Step 18
To make the frame look more like metal and to give it some dimension, we’ll create another layer style. Double-click on the layer next to its name to open the Layer Style dialog.
First we’ll add a pattern to give the flat gray surface some variation. Click on Pattern Overlay and adjust it’s options as follows

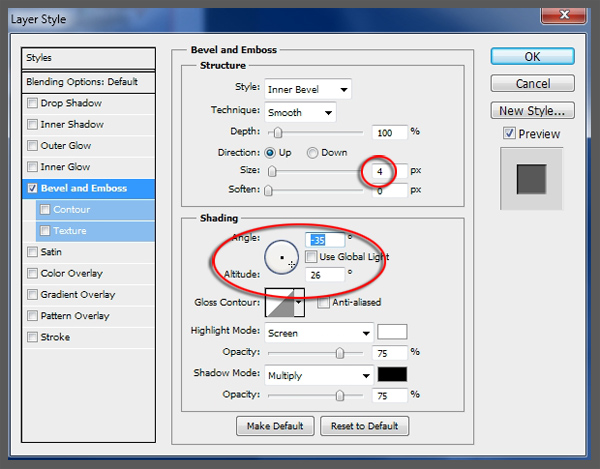
Next, to give the frame some depth, click on Bevel and Emboss and set its options as shown below.

We might as well save the style for later use. Click on the New Style button and name the style “Metal 1″.

Step 19
There is one more piece on the rudder. Use the Selection guide layer to select all the cyan parts of the rudder. Presumably this is the piece which is used to rotate the rudder and steer the ship.

Create a new layer and layer mask above the Rudder frame layer and rename the new layer to “Rudder control”. Give this layer exactly the same treatment as the rudder frame (Step 17) and apply the Metal 1 layer style to it.
When you’re done, the result should look like this:

Step 20
Select the Rudder fin group and Shift+select the Rudder frame and Rudder control layers. Press Ctrl+G/Cmd+G and call the new group “Rudder”.
Next on the menu is the ship’s balloon (I’m sure there’s a better word for it, but it escapes me at the moment). Basically, creating the balloon works the same as creating the rudder fin but it’s a little more fiddly.
First of all, use the Selection guide layer to select the front (red) piece of the balloon.

Turn the Selection guide layer off and create a new layer with layer mask as before above the Rudder group. Rename the layer to “Balloon 1″.
As before, draw a rectangular selection around the area, press Shift+F5 and fill the layer with the Cloth pattern. Press Ctrl+D/Cmd+D to remove the selection. Next, we have to warp the layer. Turn on the Perspective guide layer and unlink the Balloon 1 layer from its layer mask by clicking on the link icon between the layer and the layer mask.
Choose Edit>Transform>Warp from the menu. We’ll distort the cloth in two stages, first move the points on the warp grid so that they follow the horizontal lines of the perspective guide, like so:

Press Enter/Return to apply the warp. Choose Edit>Transform>Warp from the menu once again and this time match the grid points to the vertical perspective lines.

It seems like a laborious way to warp the cloth, but it really is the best way to warp something both horizontally and vertically. If you try to do both directions with one warp operation, it doesn’t work nearly as well.
Step 21
Turn the Perspective guide layer off, set the Balloon 1 layer’s Blend Mode to Overlay and apply the Cloth layer style to it. We need to change a few things in the layer style to make it fit the balloon better. Double-click on the Balloon layer to open the Layer Style dialog. Click on Inner Shadow and adjust its settings as shown below.

Next click on Pattern Overlay and change its settings as follows:

Because we’ll use this layer style for all pieces of the balloon, save it as “Cloth 2″.
Step 22
Turn the Perspective guide layer back on and repeat Step 20 for the remaining three pieces of the balloon. Name the layers “Balloon 2″, “Balloon 3″ and “Balloon 4″ respectively, set each of the layers’ Blend Modes to Overlay and apply the Cloth 2 layer style to each one.
When you’re done, the image and your Layers palette should look like this:

Step 23
The balloon looks way to clean for something that has been flying around in all kinds of weather for years, so let’s make it dirty.
Create a new layer and rename it to “Dirt 1″. Set the foreground color to black and activate the Brush tool (B). Right-click and choose the Drip 02 brush from the preset list.

There’s no need to change the size of this brush. Place the cursor over the second ballon piece from the front and click once.

Choose Edit>Transform>Warp from the menu and warp the drip to follow the shape of the balloon piece.

Ctrl+click/Cmd+click on the Balloon 2 layer’s layer mask to create a selection from it and add this selection as a layer mask to the Dirt 1 layer. This cuts off all the pieces from the drip that fall outside the balloon.

Set the Dirt 1 layer’s Blend Mode to Soft Light and its Opacity to 70%. The image should now look somewhat like this:

Step 24
Repeat Step 23 for the other pieces of the balloon, only this time choose different drip brushes and use the layer masks of the corresponding balloon layers to remove unwanted parts of the drips.
When you’re done the result should look similar to this:

Step 25
Click on the Balloon 1 layer and Shift+click on the Dirt 3 layer. Group the layers (Ctrl+G/Cmd+G) and rename the new group to “Balloon cloth”.
Let’s move on to the nose of the ship.
Select the nose using the Selection guide.

Create a new layer above the Balloon cloth layer and fill the selection with 50% gray. We don’t need a layer mask for this layer because we don’t need to distort it in any way. Set the layer’s Blend Mode to Soft Light.
Press Ctrl+D/Cmd+D to remove the selection. Double-click on the layer to open the Layer Style dialog. Click on Drop Shadow and adjust its settings like this:

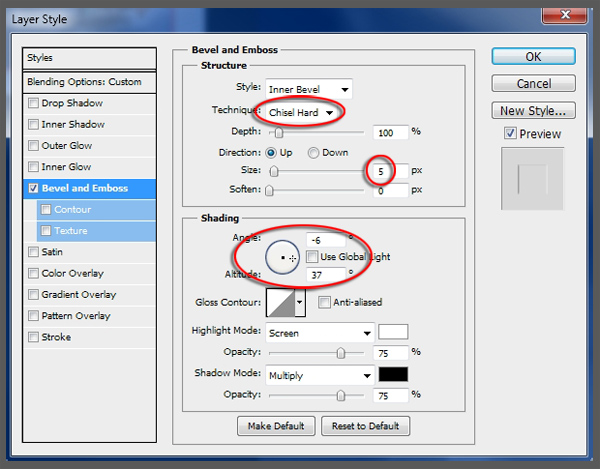
Next, click on Bevel an Emboss and adjust its options as follows:

Click on Contour and set the contour as shown below. If you can’t see this contour in the list, click on the little arrow next to the preset list and choose Contours from the menu

Next, enable Texture and enter the following values:

Lastly, click on Pattern Overlay and set the parameters as shown below.

Save this style as “Metal 2″ so we can reuse it.
Step 26
Next, select all the bands that hold the balloon together, including the top and bottom bands.

Create a new layer above the Nose layer and rename it to “Bands”. Fill the selection with 50% gray. Again, we don’t need a layer mask for this layer. Apply the Metal 2 layer style to it.
It doesn’t look quite right; the bevel is too big, too soft and the highlights are slightly off. To fix that, double-click on the Band layer’s FX icon, open the Bevel and Emboss settings and adjust them as shown below:

Click on the Rudder group and Shift+click on the Bands layer. Group them (Ctrl+G/Cmd+G) and rename the group to “Balloon”. The result so far is shown below.

Step 27
Next up is the ship’s cabin. Select the windows as shown below:

Create a new layer above the Balloon group and attach the selection to it as a layer mask. Rename the layer to “Windows” and set its Blend Mode to Linear Dodge (Add).
Activate the Brush tool (B), select the soft, round brush and set its Size to 150 pixels.

Set the foreground color to a light blueish-green (#03fdae) and click once on the windows as indicated below, making sure you have the layer and not the layer mask selected.

Step 28
Open the Wood image (WoodPlanksBare0009_M.jpg), press Ctrl+A/Cmd+A to select all. Next, press Ctrl+C/Cmd+C to copy the image, followed by Ctrl+Tab/Cmd+Tab to switch back to the airship image and Ctrl+V/Cmd+V to paste the wood as a new layer. Make sure the new layer sits above the Windows layer and rename it to “Cabin wood”.
Next, turn on the Selection guide and select all of the main structure of the cabin, as shown below.

Turn the Selection guide off and reselect the Cabin wood layer. Click on the Add Layer Mask icon at the bottom of the Layer’s palette to attach the selection to the Cabin Wood layer as a layer mask. Set the layer’s Blend Mode to Vivid Light.
As you can see, the wood texture is far too big. To scale it down, click on the link icon between the layer and the layer mask to disconnect the layer mask. Make sure the layer is selected instead of the layer mask and use Free Transform (Ctrl+T/Cmd+T) to scale the texture down so it fits better (shown below) and press Enter/Return to apply the transformation.

Step 29
To finish off the cabin, select the tanks and their pipes at the back of the ship.

Create a new layer, and fill the selection with 50% gray. Rename the layer to Tanks, set it’s Blend mode to Hard Light and apply the Metal 2 layer style. Press Ctrl+D/Cmd+D to remove the selection.
Select all the layers belonging to the cabin (Windows, Cabin wood and Tanks), group them and rename the group to “Cabin”.
So far, the airship image looks like this:

Step 30
Copy and paste the wood image into the airship image once again and rename the new layer to “Deck”. Switch to the selection guide and select all the green deck pieces.

Attach the selection to the Deck layer as a layer mask. Unlink the Deck layer and its layer mask, make sure the layer is selected and use Free Transform (Ctrl+T/Cmd+T) to scale the wood done so it fits the deck.

There would be some light from the windows spilling onto the deck. Create a new layer and rename it to “Reflected light”. Set the foreground color to #69febd, which is a version of the light color you used for the windows, and press B to activate the Brush tool. Use the same brush as you used for the windows (soft round, 150 pixels) and click once on the deck as shown below.

Right now, the light is all over the place. To fix that, Alt+click/Opt+click on the line between the Deck layer and the Reflected light layer. This clips the Reflected light layer to the Deck layer, effectively confining the light to the deck area.

Set the Relfected light layer’s Blend Mode to Soft Light.
Next select all the pieces that belong to the railing.
Create a new layer and rename it to “Railing”. Set the foreground color to a darkish gray (#4d4f4e) and press Alt+Bksp/Opt+Delete to fill the selection with this color. Get rid of the selection by pressing Ctrl+D/Cmd+D and set the Railing layer’s Blend Mode to Hard light.
Select the Deck, Reflected light and Railing layers, group them (Ctrl+G/Cmd+G and rename the new group to “Deck”.
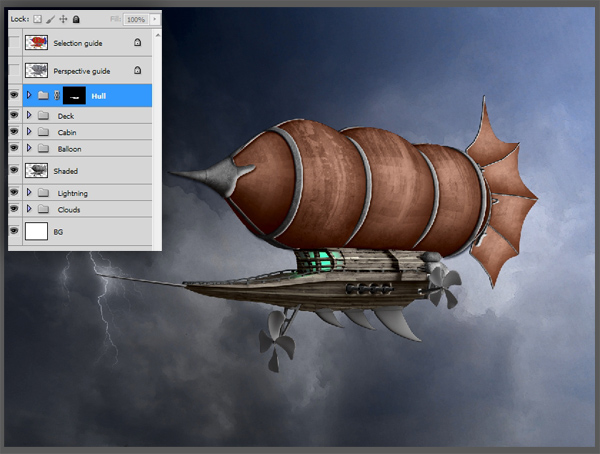
Step 31
Next up is the Hull. Create a new group by pressing on the Create a New Group layer at the bottom of the Layers palette. Rename the new group to “Hull”. Select all the pieces belonging to the hull, including the green areas around the canons.

Attach this selection to the Hull group as a layer mask by selecting the Hull group and clicking the Add Layer Mask icon at the bottom of the layers palette.
Switch back to the Wood image, if it’s not open any more, open it again. Select one plank as shown below and copy and paste it into the airship image.

The new layer should sit inside the Hull group. Rename the new layer to Edge. Click on its eye icon to turn it off temporarily Create a selection of the hull’s edge as shown below. You can either use the Pen tool (P) or the Lasso tool (L) for this, whatever suits you best.

When you’re done selecting, turn the Edge layer back on and attach the selection to it as a layer mask. Disconnect the layer and the layer mask by clicking on the link icon between them. Make sure that the layer and not the layer mask is active and use the Move tool (V) and the Warp tool (Edit>Transform>Warp) to fit the plank of wood onto the edge of the hull.

Set the Edge layer’s Blend Mode to Hard Light.
Step 32
Copy and paste the wood image once more. Make sure the new layer sits above the Edge layer and rename it to “Main hull”. Use Free Transform (Ctrl+T/Cmd+T) to fit the wood onto the hull, like so:

Set the Main hull layer’s Blend Mode to Overlay. Next, warp (Edit>Transform>Warp) the wood so that it follows the line of the hull.

Ctrl+click on the Edge layer’s layer mask to create a selection from it. Press Ctrl+Shift+I to invert the selection and attach it to the Main hull layer as a layer mask.
The hull’s contrast isn’t quite right, so click on the Add New Fill or Adjustment Layer icon at the bottom of the Layers palette and choose curves from the menu. Rename the new curves layer to “Contrast”. Click on the Clip icon at the bottom of the Adjustments palette to clip the Contrast layer to the Main hull layer. Adjust the curve for the Lightness channel as follows;

Go back to the Selection guide and select the green area around the canons. Next, create a new layer above the Main hull layer and rename it to “Port holes”. Fill the selection with 50% grey. Press Ctrl+D/Cmd+D to remove the marching ants.
Double-click in an empty area next to Port holes layer’s name to bring up the Layer Style dialog. In the Advanced Blending section, set Fill Opacity to 0%.
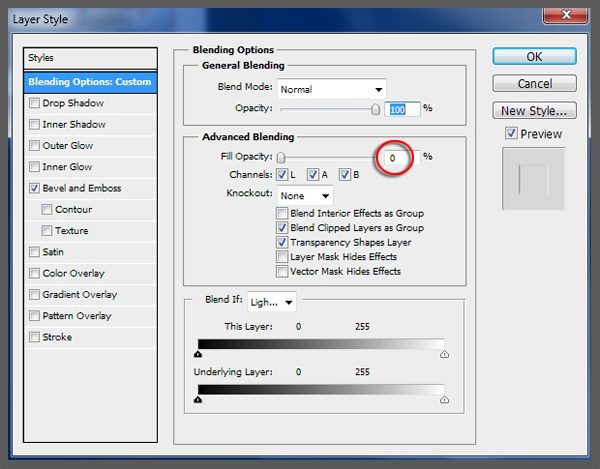
Switch to the Bevel and Emboss options and adjust the parameters like so:
That concludes the creation of the deck and the hull. Your image and layer palette should now look like this:
Step 33
Use the selection guide to select the three keel pieces at the bottom of the hull.

Thanks to our hard work earlier, we can make short work of the keel. Create a new layer above the Hull group and rename it “Keel”. Fill this layer with 50% gray and apply the Metal 2 layer style to the layer. Press Ctrl+D/Cmd+D to get rid of the selection. Set the Keel layer’s Blend Mode to Hard Light.
Step 34
Next we’ll do something about the propellers. Use the selection guide to select the pieces that attach the propellers to the hull.
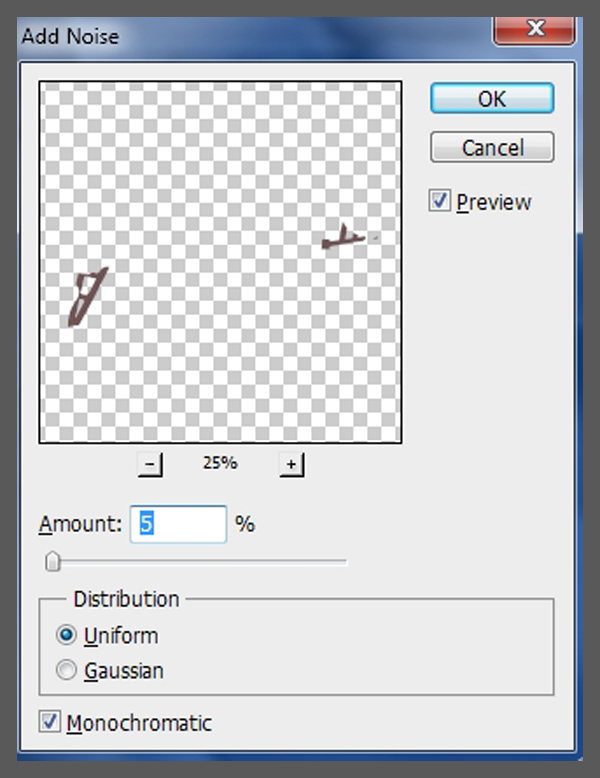
Create a new layer above the Keel layer and rename this layer to “Prop attachments”. Fill the layer with a brown color which matches the hull (#655d4e) and then choose Filter>Noise>Add Noise from the menu. Set Amount to 5% and the Distribution to Uniform, make sure that the Monochromatic box is ticked. Hit Enter/Return to apply the noise.
Press Ctrl+D/Cmd+D to remove the selection and set the Prop attachments layer’s Blend mode to Hard Light.
Next, select the propellers themselves.

Create a new layer above the Prop Attachment layer and rename the new layer to “Props”. Fill the selection with 50% gray and turn off the selection by pressing Ctrl+D/Cmd+D. Apply the Metal 2 layer style and set the Props layer’s Blend Mode to Hard Light.
Well, that doesn’t look quite right. The Bevel is too big and the color is too light. To change this, double click on the Props layer’s FX icon to open the Layer Style dialog. Change the Bevel and Emboss settings as follows:

Next, click on Color Overlay and adjust the settings as shown below.

Select both propeller layers, group them and rename the group to “Props”. We’ve now finished all the main parts of the ship, only the rigging and the anchor remain. So far, the image looks like this:
Step 35
Now it’s time to create some rigging. Create a new layer and call it “Rigging”. Draw some lines on the front of the ship using the Pen tool (P) as shown below.

Set the foreground color to a dark brown (#261d1d). Select the Brush tool (B), right-click and choose the hard round brush. Set its Size to 5 pixels.

Switch to the Paths palette and, with your path selected, click the Stroke Path icon at the bottom of the palette.

Click in an empty area on the Paths palette to deselect the path and switch back to the Layers palette. With a small hard eraser (E) remove all the rigging where it intersects the ship but shouldn’t. Below is an indication as to where that might occur.

To give the rigging some depth, double-click in an empty space on the Rigging layer. When the Layer Style dialog opens, click on Bevel and Emboss and adjust the settings as shown below.
Save this layer style as “Small bevel”. We’ll use it again in a moment.
Step 36
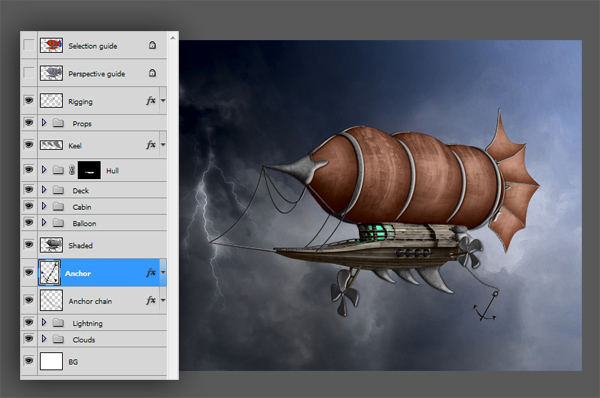
The last piece of the ship to be created is the anchor. It needs to come from behind the ship, so click on the Lightning group but don’t open it. Create a layer above it and rename the layer to “Anchor chain”.
Draw a path with the Pen tool (P) similar to the one shown below.

Change the foreground color to dark gray (#2d2c2c) and press B to select Brush tool. Right-click and choose the chain brush from the presets. Set its Size to 25 pixels.

Next, stroke the path with the chain brush in the same way as you stroked the rigging and apply the Small Bevel layer style to the Anchor chain layer.
Open the Anchor.psd image which you can find in the Assets folder you downloaded. Copy and paste the anchor into the airship image and make sure it sits above the Anchor chain layer. Rename the new layer to “Anchor”.
Use Free Transform (Ctrl+T/Cmd+T) to scale and position the anchor as shown below.

Again, apply the Small Emboss layer style.
All pieces are now in place and the image and this is the result:
Step 37
There are a few more things we have to do before finishing up. First of all we need to group the airship and apply a layer mask to the group to clean up the errant pieces of layer style which fall outside the airship. To do this, Ctrl+click/Cmd+click on the Anchor chain layer’s thumbnail, followed by Shift+Ctrl+clicking/Cmd+Shift+clicking on the Anchor, Shaded and Rigging layers in turn. This creates a selection of the whole ship.
Next, click on the Anchor chain layer and Shift+click on the Rigging layer and press Ctrl+G/Cmd+G to group all airship layers. Add the selection to the group as a layer mask and rename the group to “Airship”.
Your Layers palette should now look like this:

Next, turn off all layers and groups, including the BG layer, but not the Airship group. You should now only see the airship on a transparent background. Press Ctrl+A/Cmd+A to select all, followed by Ctrl+Shift+C/Cmd+Shift+C to send a merged copy of the Airship to the clipboard.
Make sure the Airtship group is selected and press Ctrl+Shift+V/Cmd+Shift+V to paste the merged layer above the Airship group. Rename this new layer to “Outline”.
Next press Ctrl+Shift+U/Cmd+Shift+U to desaturate the Ouline layer, followed by choosing Filter>Stylize>Find edges from the menu.
Your image and Layers palette should now look as shown below.

To finish off, set the Outline layer’s Blend Mode to Multiply and its Opacity to 65%. Turn both sky groups, Clouds and Lightning back on.
And We’re Done!
You can view the final outcome below. I hope that you enjoyed this tutorial and would love to hear your feedback on the techniques and outcome.
Member File Download
Download the original .psd file for this tutorial here:

 Members Area Tutorial: Create A Fantasy Mushroom House Photo Manipulation
 Members Area Tutorial: Learn How to Create the Spectacular Photo Manipulation ‘Still Life’
 Members Area Tutorial: Create an Amazing 3d Text Effect

Leave a comment
0 Comments:
No comments have been posted yet. Be the first!
Leave a Comment: