
Members Area Tutorial: Design a Complete Ecommerce Website (Part 2)
Resources Used In This Tutorial
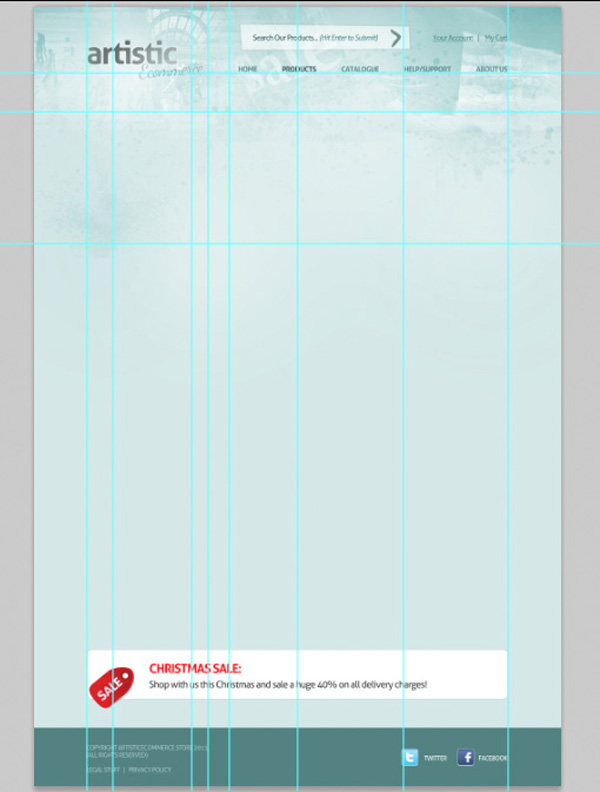
Final Image
Here is a preview of the image that we are going to be creating:

Step 1
Start by opening up the .psd for our ecommerce design homepage. This can be downloaded in Part 1 of this tutorial series:
Members Area Tutorial: Design a Complete Ecommerce Website (Part 1).
Resave this file under a new name, as we’ll be using this new file as our first subpage template.

Step 2
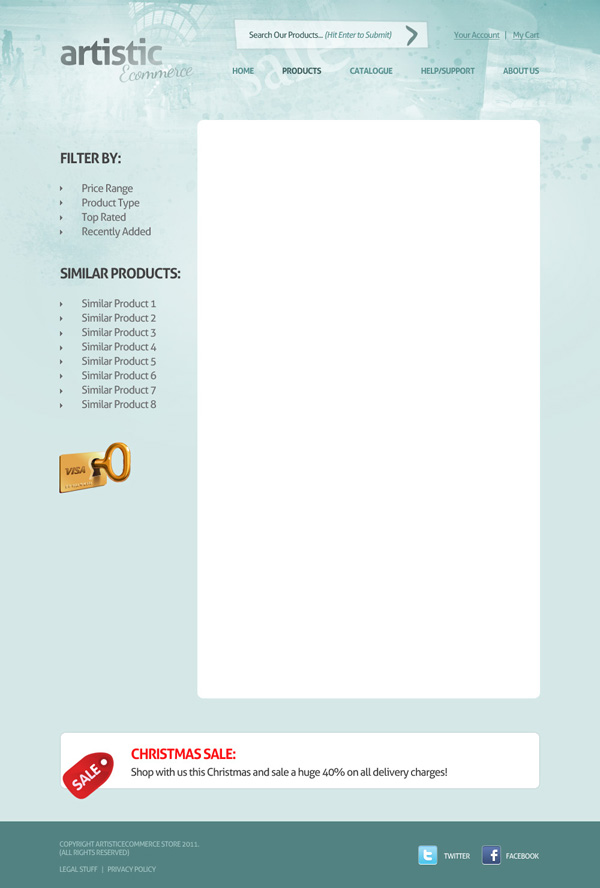
Like all our member files, the layers have been organized into handy layer groups/folders. Start by deleting all relevant layers/layer groups for your middle section.
You want to leave your header/footer in tact, but simply leave a large space for your middle area:

Step 3
You may have noticed that I change the active menu link to ‘PRODUCTS’ as we’re going to be creating our products page first.
To change active menu links in this design simply change the text color from non-active (558f8f) to the darker active state color (446566).

Step 4
Turn on your canvas guides. You’ll see the guides from our original document remaining. We’re going to add a few more guides for our subpage layout.
In total, you should have the following guides over your canvas:
Vertical Guides:
100px. 150px, 300px, 330px, 370px, 500px, 700px, 900px
Horizontal Guides:
125px, 200px, 450px
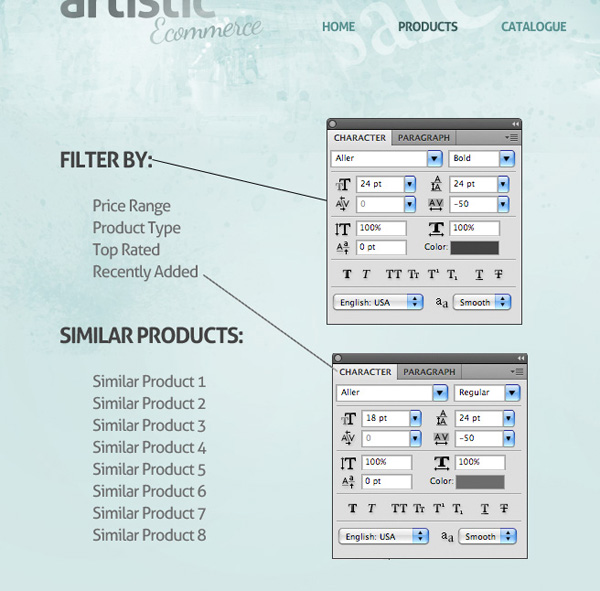
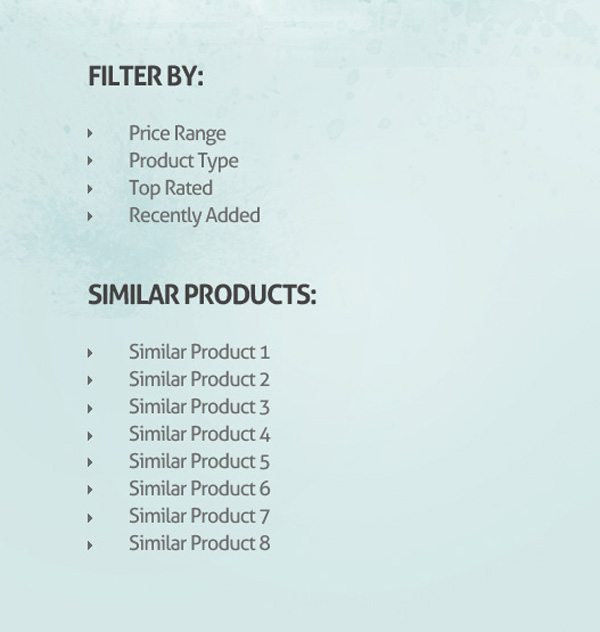
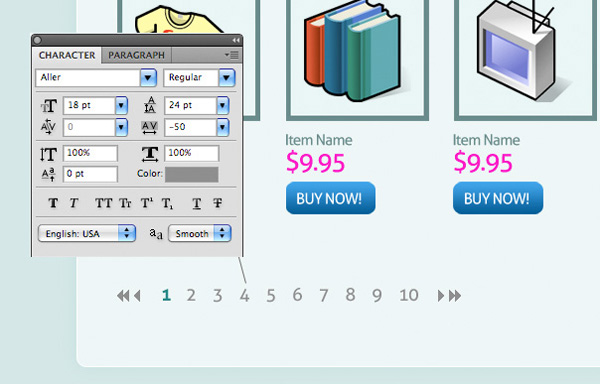
Step 5
Using your guides apply some text to the left area of your canvas.
Heading Text Settings:
Font Face: Aller
Styling: Bold
Size: 24pt
Kerning: -50
Color: 444444
Sub Menu Text Settings:
Font Face: Aller
Styling: Regular
Size: 18pt
Kerning: -50
Color: 6d6d6d
Step 6
Create a new layer called ‘bullet’.
Use your lasso tool to create a smaller arrow shaped bullet point to the left of your first sub menu item. Fill your selection with: 6c6c6c.
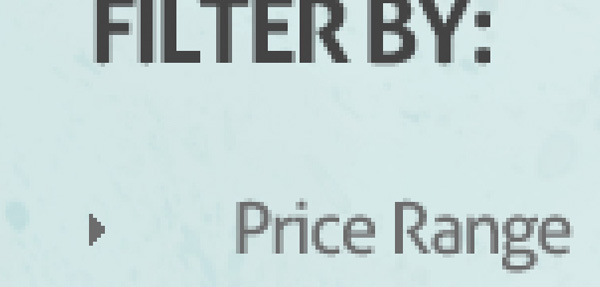
Then duplicate your bullet layer multiple times, lining up each duplicate bullet with a sub menu item.
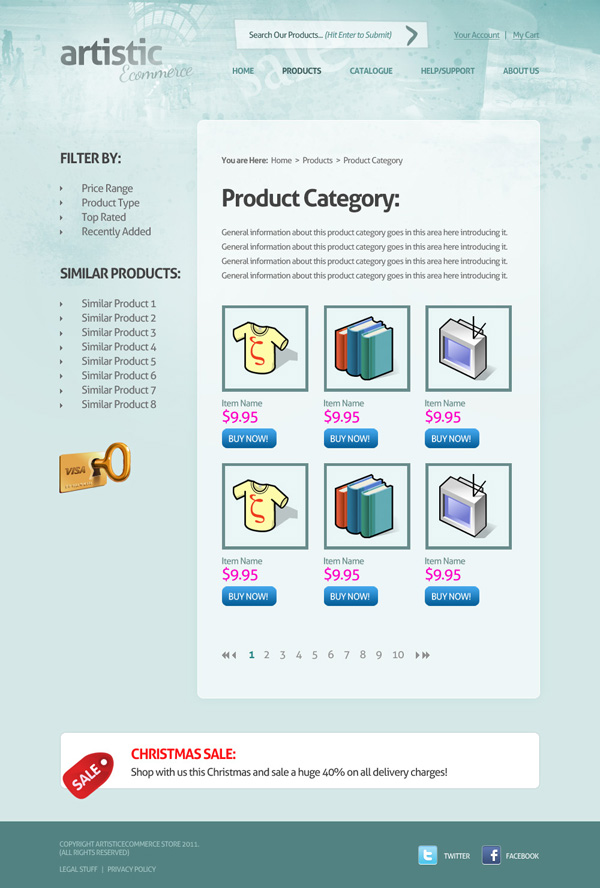
Step 7
Download the secure payment icon from the resources for this tutorial.
Paste the icon to sit underneath your left side menu:

Step 8
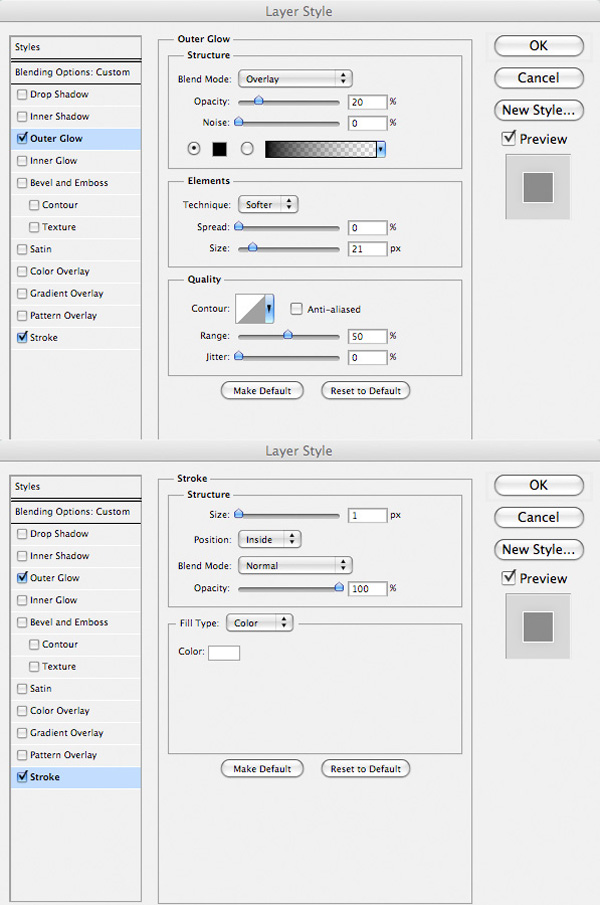
Using your guides create a new layer called ‘content area’ and drag out a white rounded rectangle (10px radius):
Now reduce this layer’s FILL opacity to 60%, keeping the main layer opacity at 100%.
Apply an outer glow and stroke blending option:
Outer Glow Blending Option Settings:
Blend Mode: Overlay
Opacity: 20%
Color: 000000
Spread: 0%
Size: 21px
Stroke Blending Option Settings:
Size: 1px
Position: Inside
Blend Mode: Normal
Opacity: 100%
Fill Type: Color
Color: ffffff
Step 9
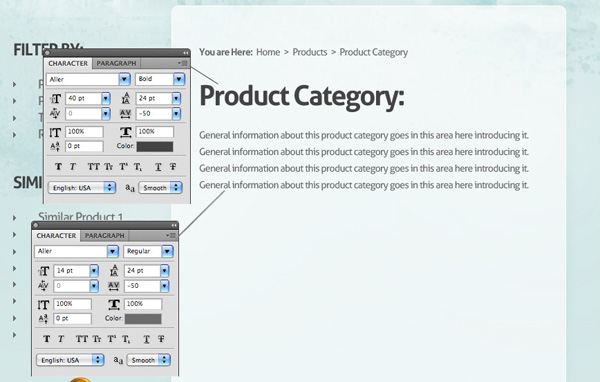
Apply some text to your content area.
Start by adding a navigational thread showing the users location within the site’s structure.
Then add a large text heading, followed by an introductory paragraph to the page:
Large Heading Text Settings:
Font Face: Aller
Size: 40pt
Kerning: -50
Color: 434343
Smaller Text Settings:
Font Face: Aller
Size: 14pt
Kerning: -50
Color: 6c6c6c
Note how the heading text is just slightly darker than the smaller text. This is to give it a subtle emphasis on the page, whilst not standing out too much and detracting from the surrounding design:
Step 10
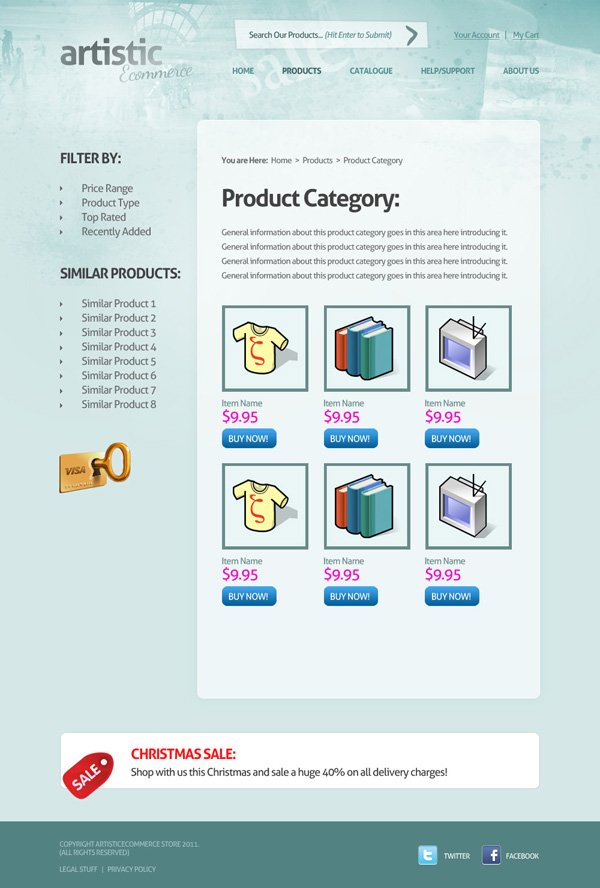
Copy and paste in the rows of products from your original document. You can either do this layer by layer, copying the various layer styles across also, or the far easier method is to simply retain the original layers from your original document, and hide their visibility until you need them.
Generally when I’m working from a homepage template like this, I hide all layers that I no longer need, rather than delete them, just incase I need to bring back any details or images from my homepage template design.
Step 11
Finally, add a pagenation area to the bottom of your content area.
Create arrows using your lasso tool, much like your did your with sidebar bullet points.
Then type out a series of page numbers. Notice how I used a teal text color for the active page.
Pagenation Text Settings:
Font Face: 18pt
Styling: Regular
Kerning: -50
Color: 8e8e8e
Step 12
And there we have it! One subpage done, with very little work on your part.
You can see how using the original homepage template really speeds up your workflow, and allows you to quickly and easily design subpage templates around this foundation:
Step 13
Time to produce some more subpages!
The good news is that once you’ve setup your main subpage template, you can create further subpages with very little effort!
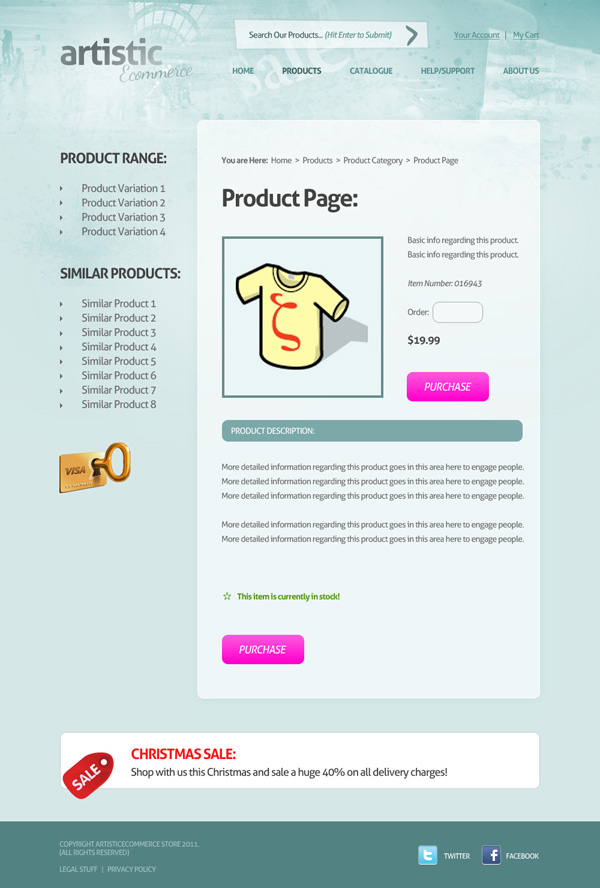
We’re going to start by creating an individual product page.
Remain on your first subpage document, but RESAVE this document, thereby creating a new document to work within.
Keep your layout exactly the same, but simply change the text a little.
You want to alter your sidebar text heading to read ‘PRODUCT RANGE’, and then change your main header to ‘Produce Page:’.
Then simply recycle elements from your product listings page. For example the ‘purchase’ pink button is simply taken from the ‘buy now’ button o the previous subpage.
I’ve included a diagram demonstrating the new subpage layout below:

Step 14
You can view the completed product page below:
Step 15
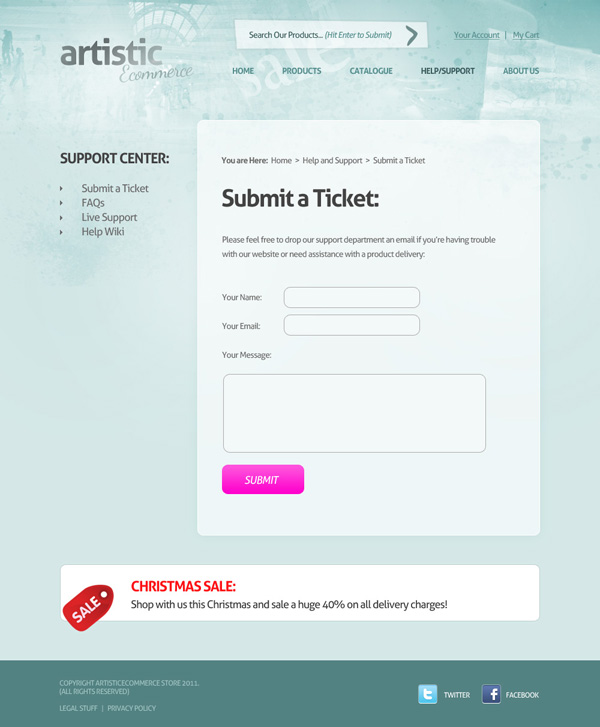
Finally, let’s construct a third subpage that has nothing to do with products – help and support!
Start by changing the text again, this time reducing the number of sidebar sub links, and changing the heading/smaller text. Keep the pink button, but change it’s wording to ‘submit’ to sit at the bottom of your support form:
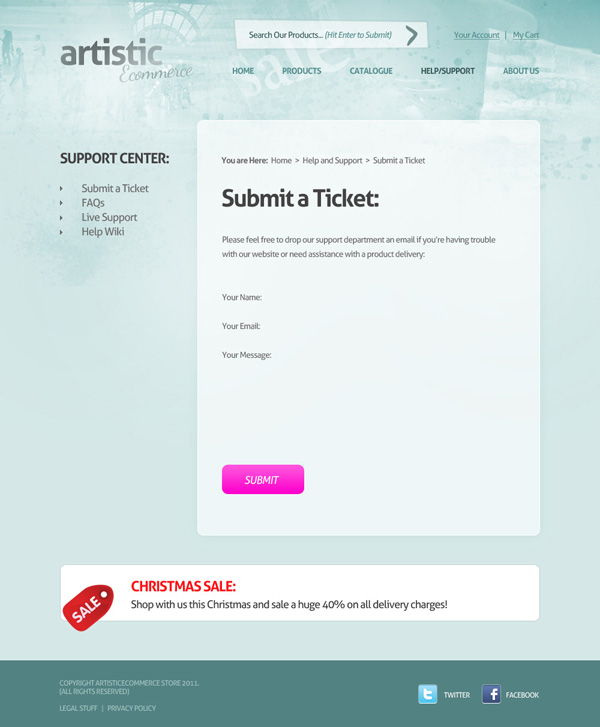
Step 16
You may have noticed that there is no support form setup yet!
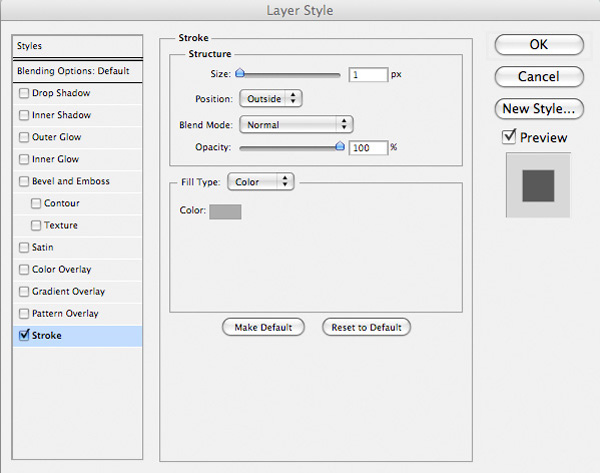
To create the input fields for your form simply drag out a series of white rounded rectangles (10px radius). To define these areas we’re going to use a 1px stroke blending option:
Stroke Blending Option Settings:
Size: 1px
Position: Outside
Blend Mode: Normal
Opacity: 100%
Fill Type: Color
Color: acacac
Step 17
You can see your finished support page, complete with elegant form below:
And We’re Done!
You can view the final outcome below. I hope that you enjoyed this tutorial and would love to hear your feedback on the techniques and outcome.
VIP Download
Download the original .psd file for this tutorial here:

 Members Area Tutorial: Design a Complete Ecommerce Website (Part 1)
 Members Area Tutorial: Design a Multi-Page Portfolio Website
 Members Area Tutorial: Design a Professional Ecommerce Website

Leave a comment
0 Comments:
No comments have been posted yet. Be the first!
Leave a Comment: