
Members Area Tutorial: Design a Complete Ecommerce Website (Part 1)
Resources Used In This Tutorial
Final Image
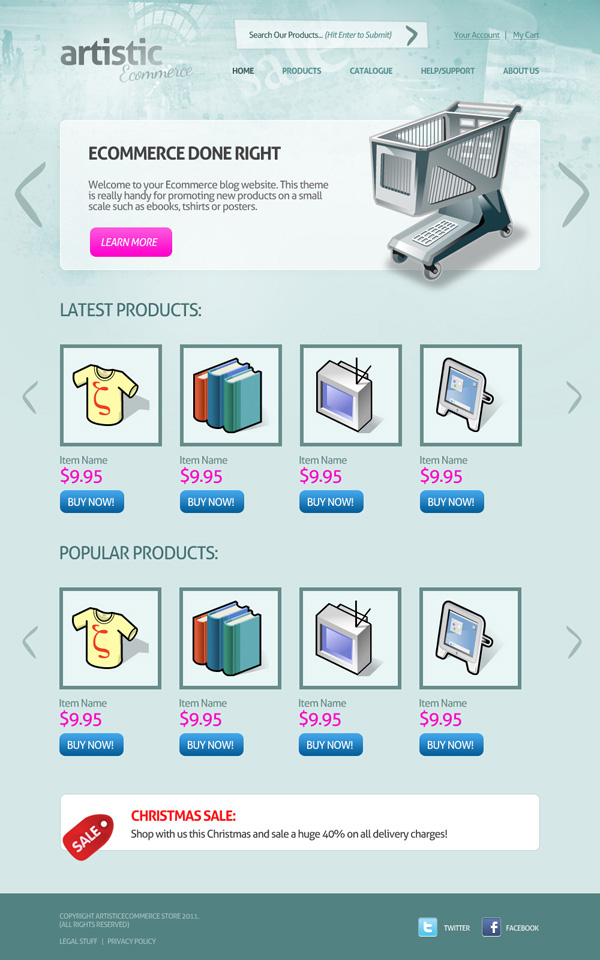
Here is a preview of the image that we are going to be creating:
Laying Out Guides:
Laying out canvas guides is always a big help later on, so try to get into the practice of doing so.
Create a new document (1000X1600px).
Create the following content guides:
Vertical Guides:
100px
150px
300px
500px
700px
900px
Horizontal Guides:
125px
200px
450px
1490px

Step 1
Fill your canvas with d5e8e8.

Create a new layer called ‘header top’.
Drag down a black to transparent linear gradient from the top of your canvas:

Change the blend mode of your ‘header top’ layer to ‘overlay’:

Step 2
Create a new layer called ‘watercolor background’.
Download the FanExtra watercolor brush set from the resources for this tutorial.
Apply several brushes from the set over the top of your background using a black paintbrush.

Change this layer’s blend mode to ‘overlay’ and reduce it’s opacity to 50%.

Step 3
Paste your ‘shopping crowd’ photo into the header of your website. Be sure to desaturate it (image>adjustments>desaturate).

Apply a layer mask, and use a large, soft black paintbrush to mask off the edges of your photo, blending it smoothly into your background.
Then reduce this layer’s opacity to around 40% and change it’s blend mode to ‘overlay’:

Repeat this technique, adding the other photos from the resources section for this tutorial to your website’s header:

Step 4
Time to add some lighting to your background.
Create a new layer called ‘light spots’.
Select a soft white paintbrush and apply several ‘light spots’ over your background.

Change this layer’s blend mode to ‘overlay’ and reduce it’s opacity to 30%. This should create a subtle light effect:

Create a new layer called ‘dark spots’. Repeat the technique that you used for your light spots, this time reducing this layer’s opacity to 15%:


Finally, create a new layer called ‘light behind logo’. We want to apply a final subtle highlight in the top left of our canvas to help our logo to stand out.
Select a soft, 50% opacity white paintbrush and click over where you plan to put your logo:

Step 5
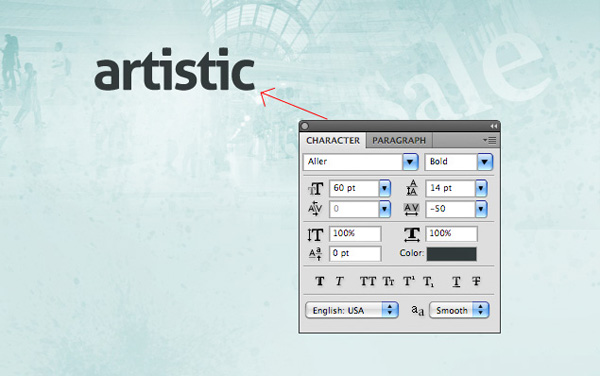
Now apply logo text to the top left of your canvas.
Logo Text Settings:
Font Face: Aller
Size: 60pt
Styling: Bold
Kerning: -50
Color: 323a3a
Apply a layer mask and use a low opacity, soft black paintbrush to mask off some parts of your text. You want to give a rough edges look to your text, fading some parts of letters into your background to create an artistic outcome:

Now use the same technique to apply some artistic looking text under your main logo text:
Further Logo Text Settings:
Font Face: Dancing Script
Size: 36pt
Kerning: -50
Color: a3a3a3

Step 6
Type out some menu text to the right of your logo area.
Menu Text Settings:
Font Face: Aller
Size: 14pt
Kerning: -50
Color: 55908f

Step 7
Create a new layer called ‘search form’.
Use your lasso tool to create an abstract polygon shape for your search form. Fill your selection with white and reduce this layer’s opacity to 60%:

Apply a stroke blending option to your form layer:
Stroke Blending Option Settings:
Size: 3px
Position: Outside
Blend Mode: Normal
Opacity: 5%
Fill Type: Color
Color: 000000


Now apply some text over your search form, and some account related text to the right of it. Use the same text settings as for your menu, but use ‘normal’ styled text, not bold.

Step 8
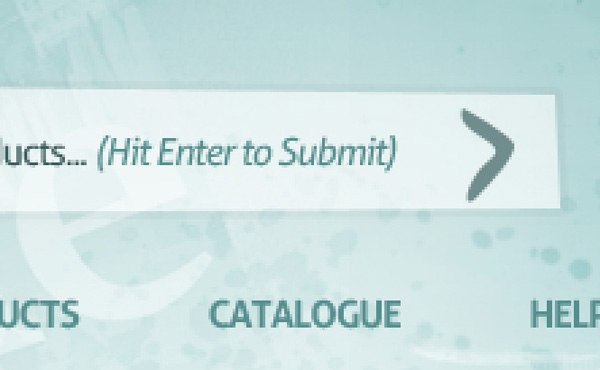
Use your pen tool to create an abstract arrow shape for the right part of your search form.
With your path in place, go to your paths palette and right click on it, choosing ‘convert to selection’. Fill your selection with 6f8d8d for a cool abstract submit arrow for your search bar.
Step 9
Using your guides set out a white rounded rectangle shape (10px radius).
Keep this layer’s main fill opacity at 100% but reduce it’s fill opacity to 60%. This will allow you to add blending options at full opacity, but will reduce the opacity of your rounded rectangle to allow some of the background details to show through.

Apply an outer glow and stroke blending option:
Outer Glow Blending Option Settings:
Blend Mode: Overlay
Opacity: 20%
Noise: 0%
Color: 000000
Spread: 0%
SIze: 21px
Stroke Blending Option Settings:
Size: 1px
Position: Inside
Blend Mode: Normal
Opacity: 100%
Fill Type: Color
Color: ffffff

Below you can see a close up of the effect of applying these blending options:

Step 10
Repeat the pen tool technique that you used to construct your abstract search form arrow and create a new set of arrows either side of your welcome area.
Reduce the opacity of these arrow layers to 50%:

Step 11
Use your rounded rectangle tool (10px radius). Create a button shape at the bottom left of your welcome area.
Apply a gradient overlay to your button layer.
Gradient Overlay Blending Option Settings:
Blend Mode: Normal
Opacity: 100%
Gradient: ranging from ff00cc to ff55dd
Style: Linear
Angle: 90
Scale: 100%

Now apply some text to the left of your welcome area:
Headline Text Settings:
Font Face: Aller
Styling: Bold
Size: 30pt
Kerning: -50
Color: 444444
Welcome Text Settings:
Font Face: Aller
Syling: Normal
Size: 18pt
Kerning: -50
Color: 6c6c6c
Learn More Text Settings:
Font Face: Aller
Size: 18pt
Kerning: -50
Styling: Italic
Color: ffffff
TIP: Notice the subtle touches applied to the content. The ‘learn more’ text stands out as being italics and the white text has good contrast against the bright pink button. The main welcome text is lighter than the headline text, creating effective visual hierarchy, as our eye goes first to the darker, larger, bolder heading, and then down to the more subtle welcome text.

Step 12
Download the shopping cart icon from the resources for this tutorial and then paste it into the right half of your welcome area. Resize it to fit as neccessary.
TIP: Notice how the cart goes outside the edges of our welcome area box. It can be good to break the content grid, and make your layout seem less rigid. Try to experiment with having visual elements break the bounds of content areas when you can!

Step 13
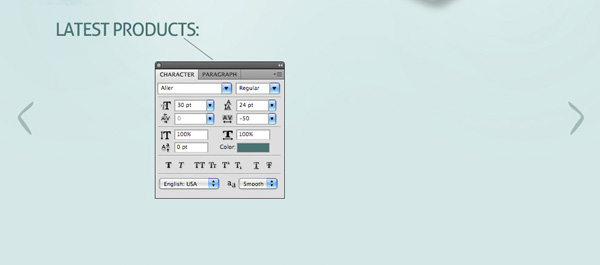
In the area beneath your welcome area apply some text reading ‘LATEST PRODUCTS’.
Latest Products Text Settings:
Font Face: Aller
Size: 30pt
Kerning: -50
Color: 497272
Also duplicate the abstract arrows either side of your welcome area. Move the arrows down to be either side of your latest products area.
Reduce the size of each arrow to 50%.
Step 14
Now using your guides, create a series of 170X170px boxes (fill each box with 698c8c)..
With each box contract your selection and fill the inner box with e9f5f5.

Step 15
Now paste in some icons from the ‘beos icon set’ from the resources for this tutorial. These will act as sample products for now.

Now create a call to action button beneath your item box.
Use your rounded rectangle tool (10px radius) and create a button shape beneath your first item. Apply a gradient overlay blending option to this layer:
Gradient Overlay Blending Option Settings:
Blend Mode: Normal
Opacity: 100%
Gradient: ranging from 065e98 to 3fa3e8
Style: Linear
Angle: 90
Scale: 100%

Now apply some text for your item details.
Item Name Text Settings:
Font Face: Aller
Size: 18pt
Kerning: -50
Color: 698c8d
Price Text Settings:
Font Face: Aller
Size: 30pt
Kerning: -50
Color: fd1cc6
Buy Now Text Settings:
Font Face: Aller
Size: 18pt
Kerning: -50
Color: ffffff

Step 16
Now group the layers comprising your item details area into a layer folder. Duplicate this folder 3 times, moving each duplicate to sit under an item box:

Step 17
Now group all the layers/layer folders relating to your ‘latest products’ area into a single layer folder. Duplicate this layer folder and move it down beneath the latest products area. Change the heading text of this new area to ‘popular products’. The other details can remain the same. You will of course replace item photos and details when you make the site live.

Step 18
Using your guides draw out a white rounded rectangle (with a 10px radius) area in the bottom of your canvas:

Apply a stroke blending option to your bottom content area layer.
Stroke Blending Option Settings:
Size: 1px
Position: inside
Blend Mode: Normal
Opacity: 11%
Fill Type: Color
Color: 000000

Step 19
Download the sale icon from the resources section for this tutorial. Paste it over the left edge of your bottom content area.
This is another example of ‘breaking the grid’ as the sale icon breaks the edges of this content area.
Also paste in some text detailing a current sale or offer you have on.
Christmas Sale Text Settings:
Font Face: Aller
Styling: Bold
Size: 24pt
Kerning: -50
Color: fe1417
Main Text Settings:
Font Face: Aller
Styling: Regular
Size: 18pt
Kerning: -50
Color: 3d3d3d

Step 20
Create a new layer called ‘footer’.
Select the bottom of your canvas. Fill this area with 538282.

Finally to finish, add some footer text and a couple of social media icons:
And We’re Done!
You can view the final outcome below. I hope that you enjoyed this tutorial and would love to hear your feedback on the techniques and outcome.
VIP Download
Download the original .psd file for this tutorial here:

 Members Area Tutorial: Design a Clean, Engaging Church Website
 Members Area Tutorial: Design a Super Sleek Web Layout
 Members Area Tutorial: Design a Multi-Page Portfolio Website

Leave a comment
0 Comments:
No comments have been posted yet. Be the first!
Leave a Comment: