
Members Area Tutorial: Create a Realistic Eye Shadow Case From Scratch in Photoshop
Today I’ll teach you how to create a realistic eye shadow case entirely from scratch using only Photoshop.
Resources Used In This Tutorial
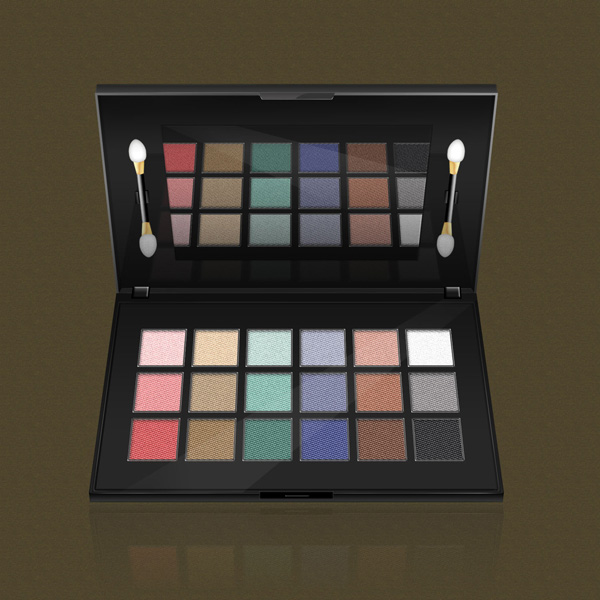
Final Image
As always, this is the final image that we’ll be creating:
Step 1
Create a new document with size 1500×1500 px. and fill the Background with any color. Then take Rectangle Tool (U) with settings: Shape Layers, Fixed Size – 1000x500px, Color: #1e1d1d and draw a rectangle. Rename this layer “Lower part”.


Go to Edit > Transform > Perspective and collapse upper part of rectangle. Duplicate the new shape and paint with a lighter color – #282727. Press Ctrl+T, to activate Free Transform option and holding down Alt + Shift, drag a corner of the shape and bend slightly inward.


Open Layer Style > Bevel and Emboss and make this settings:

Step 2
Now we will create the front part of the Eye Shadow. For this purpose, take again Rectangle Tool (U) in mode Shape Layers and draw a rectangle with black color. Name this layer “Front Part”. Using Free Transform > Perspective, shrink a little the lower part of rectangle. Then add a Layer Style > Gradient Overlay with settings shown below.


Step 3
Creating the Upper Part. Duplicate “Lower part” and rename the copy “Upper Part”. Then turn it vertically – Edit > Transform > Flip Vertical. Change the color with this – #272727 and fit the lid, as shown in the picture below:

Now add a Layer Style> Stroke with these settings:


Step 4
Here the lower part of the edge we do not need. To get out it will be necessary to separate style from the layer. For this purpose, go to Layer > Layer Style > Create Layer. Take the Polygonal Lasso Tool (L) and select what is needed, then press Delete.

Now take Pen Tool (P) in mode Shape Layers, color #484747 and create a shape like the image below:

Step 5
With Rectangle Tool (U) create the top part of lid. Draw a rectangle like in the picture bellow, then activate Free Transform option by pressing Ctrl+T and shrink a little upper two corners of the shape. Finaly color with #272727.

Once you are finished, rename the layer “Top”. Open the Layer Style > Gradient Overlay and set the following settings:

Step 6
Go to the next part – working out of the walls of the lid. Will make them again with Pen Tool (P). Color that I used is # 080808. Also put the layer Opacity 23%. Start with the left wall. Then duplicate and flip horizontal the copy. Place as shown in the picture below. Opacity and color remain the same.

Step 7
Now let’s start working on the eye shadow section. Take the Rectangle Tool (U) and make a square 110×100 px. Duplicate the square (Ctrl + J) and move right 130px. This is done by holding down Shift and press right arrow key 13 times on the keyboard. Duplicate the copy again and move it 130px right. Repeat this step until you get a total of 6 pieces square. Then place them in a group (Ctrl + G). Rename it “Tier 1″. Right click on the “Tier 1″ from the dropdown menu and select Duplicate Group. Rename your copy of “Tier 2″. Now move the “Tier 2″ 120px down. To get the third row of shadows duplicate “Tier 2″ and move the copy 120px. down. Accordingly, rename the third group “Tier 3″. You should get a result like mine:

Now place the “Tier 1″, “Tier 2″ and “Tier 3″ in a single group called “Eyeshadow”. Make sure “Eyeshadow” is selected, then go to Edit > Transform > Perspective and replace the Eye shadows compared box:

Step 8
Activate the first box and put it the following Layer Style:

Select Color Overlay, to put a color:


For all other boxes put the same settings. Just change the color in the Color Overlay. Feel free to choose any colors for your shadows. Here are the colors that I chose:
Tier 1 – #fdd7d7, #ecd4b6, #c9ded8, #b7b9c9, #dbac9e, #ffffff
Tier 2 – #eda4a4, #c1aa8b, #97c5b8, #888ca9, #b98269, #a29f9f
Tier 3 – #d76969, #a68962, #568779, #5b6398, #865f4d, #3d3c3c

Step 9
Now we’ll add a few effects for more realism in our Eye Shadow. Make a copy of the group “Eyeshadow” (right click > Duplicate Group), then press Ctrl + E, to rasterize the group. Name this layer “Eyeshadow Copy”. Now go to Filter > Noise > Add Noise and add a slight noise. You can play around with the settings.

So far, so good, but still our Eye shadows are not so realistic. Give them a little creases and it will be made with an appropriate pattern. Download the patterns pack from the resources section for this tutorial. I used a pattern “Small Angled Mesh” with Blend Mode: Soft Light. Experiment!

Now add a suitable outline around the Eye shadow. Create a new layer and name it “Stroke”. Hold Ctrl and click on “Eyeshadow Copy”, to load a selection. Then grab one of the tools for selection and right click on it. From the drop-down menu, select Stroke. In the menu Stroke put the following settings – Width: 4px, Location: Inside. Then press OK.

On the layer “Stroke” put the following settings:


Step 10
Skip to the next step, namely the establishment of the two screws that hold the lid with the base. Now grab the Rectangle Tool (U) and make a small rectangle. Using Free Transform Tool (Ctrl + T) give it perspective. Then duplicate the copy (Ctrl + J) and scale it a little bit. Finally, add a Layer Style Bevel and Emboss and Gradient Overlay. The settings are shown below:


Place two layers of screws in a group called “Left Screw”. Duplicate the group and flip it horizontally. Call the new layer “Right Screw”. Then Fit as shown in the picture below:

Step 11
Let’s continue with buckles.
We’ll begin with the top. Take the Pen Tool (P) in mode Shape Layers and create a shape as shown below. Paint it with color #353434. Then hold Ctrl and click on the the layer to load selection. Create a new layer and pick up some of the tools for selection. Then right click on it and from the drop down menu, select Stroke. In the dialog box, insert the following settings – Stroke: 2px, Color: white, Location: Outside. Then click OK.

Reduce the Opacity of this layer around 70%. Now add a mask by clicking the Add Layer Mask icon, located at the bottom bar of your layers panel. Choose a soft brush with black and carefully erase the top part of the resulting contour.

For a more realistic, add a glow. To do this, create a new layer and select buckle layer. Fill the selection with white to transparent gradient, then set around 18-25% Opacity. To cut out part of the glare, take the Elliptical Marquee Tool (M) and create a circle where they want to access delete, then press Delete.

Step 12
For the lower buckle we will use Rectangle Tool (U). Make a small rectangle with black, then add Layer Style > Inner Glow with these settings:

Now take Line Tool (U) with Weight: 1px, white color and make a small ruler in the middle of the black rectangle. Then add Layer Style > Bevel and Emboss with these settings:

Step 13
Before you make a mirror, you will need to add finishing details on the bottom of Eye Shadow. Create a new layer. Find “Lower part copy” layer in your layers panel and load a selection from it. Then go to Select > Modify > Expand with Expand By: 4px. Make sure your new layer is selected, then take any of selection tools and add a Stroke with Width: 1px, Color: White, Location: Center. Set the layer Opacity around 34%. Add a mask on this layer by clicking on the icon Add Layer Mask, located at the bottom of the Layers Palette. Then with a soft brush, black color, erase parts of the resulting contour.

Now find “Lower Part” layer and load a selection of its. Make a new layer and add a Stroke with Width: 1px, Color: White, Location: Center. Add a layer mask again and delete everything except the front wall of the eye shadows. See the picture below:

Step 14
Now let’s add a shadow coming from the top of Eye Shadow. To do this, select the “Lower Part” layer again. Make a new layer and fill it with black to transparent Linear Gradient. Set the Opacity around to 46%.

You’ll need to darken a little bottom of the lid. Create a new layer and load a selection of “Upper Part” layer. Fill the new layer with black to transparent Linear Gradient. Set the Opacity around to 59%.

Step 15
Now we will make a reflection in the mirror. To do this, place all layers of the lower part of Eye Shadow in one group (Ctrl+G) and call it “Lower Part”. Right click on the newly created group. From the dropdown menu, select Duplicate Group. Then rasterize the group by pressing Ctrl + E.

Rasterized layer will need to make reflection in the mirror. Now let’s get to it. I decided to do it by duplicating “Upper Part” layer and relatively little shrink copy with Free Transform (Ctrl + T). From the picture below you can see that the mirror layer is located below the “Shadow” layer

Add a Layer Style > Bevel and Emboss with these settings:


In the layers panel discover the rasterized layer with the lower part of eye shadow (Lower part copy 2) and duplicate it. Make the copy invisible for now, we will need it later. Activate the visible layer, using Free Transform turn it vertically. Then move the layer just above mirror layer.

Use again Transform > Perspective, to create illusion of reflection. Also, you will need to shrink a little layer. Try to get a result like this:

Hold Alt and click between the two layers to apply a Clipping Mask. In this way the reflection of Eye Shadow will be visible only in the mirror layer.

Step 16
Go back on invisible layer and make it visible. Again using Transform > Perspective create an illusion of reflection on the cover of the eye shadows. This layer should be placed under the mirror and shadow of the cover. Try to get a result like mine:

Set Blending mode Overlay and Opacity: about 27%.

Step 17
Next we will make a glow on the mirror. Using the Polygonal Lasso Tool (L) make a selection like the image below. On a new layer fill it with white and set Opacity 13%.

Use the same method to make glow in the bottom of Eye Shadow:

Step 18
Let’s make the applicators! With Rectangle Tool (U) create a small rectangle, then add Layer Style > Gradient Overlay with these settings:

Now take Add Anchor Point Tool and add an additional nodal point between the lower and upper two (See the picture below). Then with Direct Selection Tool (A) withdraw a bit inside:

Step 19
With Pen Tool (P) draw a shape as shown below, then add Layer Style > Gradient Overlay and Satin. This layer should be placed in the front.

Duplicate the last made layer and turn it vertically.

Step 20
Using Pen Tool (P) create the applicator. Then add a Layer Style > Inner Glow:

Step 21
Now try to make small holes on the sponge. To do this, create a new layer. Select applicator layer and fill selection with color # f2f0f0 (may a little darker). Set Blending Mode: Dissolve and Opacity: 8-15%, depending on how thick you want to be dots. Finally, hold Alt and click between the applicator layer and holes layer to make a clipping mask.

Merge the applicator and holes layer in one (Ctrl + E), then duplicate the new layer and turn it vertically. Fit, as shown below:

Put in a group all the layers of the applicator (Ctrl + G), then press Ctrl + E, to rasterize it. Using Free Transform rotate applicator to the slightly left:

Step 22
Now we will make holders of the applicator. Actually this step is quite easy and fast. You have to make a small rectangle using Pen Tool (P), then add a Layer Style > Gradient Overlay and Drop Shadow.


Rasterize the layer, duplicate it and flip the copy horizontally. Fit the same way:

Step 23
And now, as you might guess, we will need another applicator for the right side of the box. We already have one, so that we will simply duplicate it. In this case, you must merge all components of the applicator in a single layer. Duplicate it and turn the copy horizontally. Fit and that’s it! It only remains to add reflection and we are ready!

Step 24
Merge in one layer all components of Eye Shadow. Duplicate the new layer and turn it vertically. Adjust the manner shown in the image below.

Add a mask on this layer and fill it with black and white Linear Gradient. Finally put about 20-25% Opacity.

And We’re Done!
You can view the final outcome below. I hope that you enjoyed this tutorial and would love to hear your feedback on the techniques and outcome.
Click the image below to see the full-sized outcome:

VIP Download
Download the original .psd file for this tutorial here:

 Members Area Tutorial: Create a Vintage Gun From Scratch Using Photoshop
 Members Area Tutorial: Create an Amazing 3d Text Effect
 Members Area Tutorial: Create Super Realistic Hand-Sketched Text

Leave a comment
0 Comments:
No comments have been posted yet. Be the first!
Leave a Comment: