
In this tutorial I am going to show you guys how to create a key art quality movie poster for a medieval fantasy based film. I have been producing key art for several years now for television, film and entertainment companies so I am sure that you will find something to take away from this extensive and in-depth tutorial. If you are ready to get rocking then fire up Photoshop and let’s get started.
EDITORS NOTE: Usually our tutorials use exclusively free images. Several of the images used in this tutorial are from Shutter Stock (a premium photo stock site). You are absolutely free to find suitable free image replacements for these, and should still be able to follow along with the tutorial no problem, and learn plenty of great techniques. Premium images were used here, as Eric regularly has to work with images of this quality and high-resolution, within his professional work. This tutorial shows you a true professional workflow, and therefore professional grade images have been used. Again, you should be able to follow along well using free image alternatives. Enjoy!
Resources Used In This Tutorial
- Death in the hood concept from Shutterstock
- Human skull on a black background from Shutterstock
- Medieval knight in the armor with the sword from Shutterstock
- Portrait of a courgeous ancient warrior in armour with sword from Shutterstock
- Fractal starburst illustration from Shutterstock
- Vector set of decorative horizontal floral elements, corners, borders, frame from Shutterstock
- Rainy Landscape STOCK by wyldraven on deviantART
- Castle on a Hill PNG by EveLivesey on deviantART
- Burning Embers of Hell 1 by FantasyStock on deviantART
- Red Sky Texture by muffet1 on deviantART
- Custom Lens Flares Pack from Media Militia
- Powder Blue10 by faestock on deviantART
- Flames stock pack – I by MD-Arts on deviantART
- 18 Electrifying Lightning Strikes by pstutorialsws on deviantART
Final Image
Let’s take a look at a preview of the image that we are going to create in this tutorial:

Step 1
Once you’ve opened Photoshop, go ahead and set up a New Document that is 11” x “14” and 300 dpi as shown below:

In your New Document, fill the Background layer with a solid black color.

Step 2
The next thing we are going to do is open up our first image – the dark, mysterious hooded being.
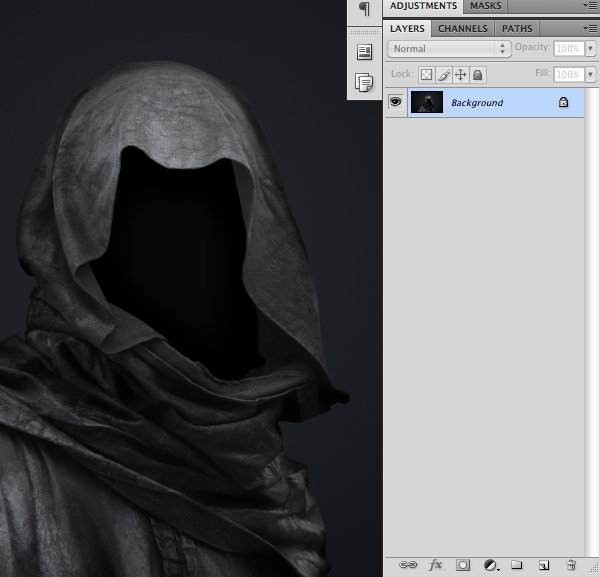
Select the Background layer of this image and press Command/Ctrl + J to duplicate the image onto a new layer.

With your duplicate layer selected, go to the Image Menu and choose Calculations as shown in the image below:

You will then be prompted with a dialog box that looks very much like this:
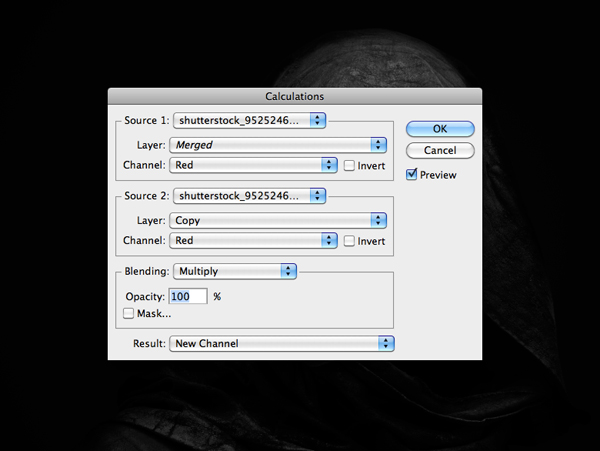
Here, all you have to do is change the Channel to the one that gives you the highest amount of contrast – in most cases this will be the Red Channel.
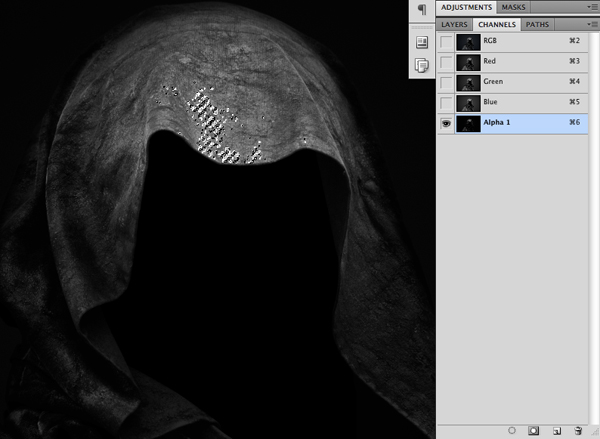
Now, if you take a look at your Channels Tab you will notice that there is a New Channel simply called Alpha 1 at the bottom of the panel. Make sure that you are working on this ‘layer’ and press Command/Ctrl + L to bring up the Levels.
Bring the right slider over towards the left to boost the highlights and try to get even more contrast out of the channel.

Hold down the Command/Ctrl Key and click on the thumbnail icon of the Alpha 1 Channel. Although you won’t see a perfect selection around the shape of the figure, you are actually selecting all of the light areas in this particular channel.
Press Command/Ctrl + C to copy this selection.
Return to your Layers Tab and then press Command/Ctrl + V to paste your selection on top of the original image.

Step 3
Duplicate your Channel Layer by once again pressing Command/Ctrl + J and change the Blending Mode of the layer to Overlay set to about 80%.
Here I have added a solid black layer between the original image and your Channel Layers so you can see what it looks like:

Select the Copy of your original image and move it above the black layer. Then, select the Copy along with both of the Channel Layers and place them into a Group Folder by selecting all three layers and then pressing Command/Ctrl + G to. You can name this folder anything you like.

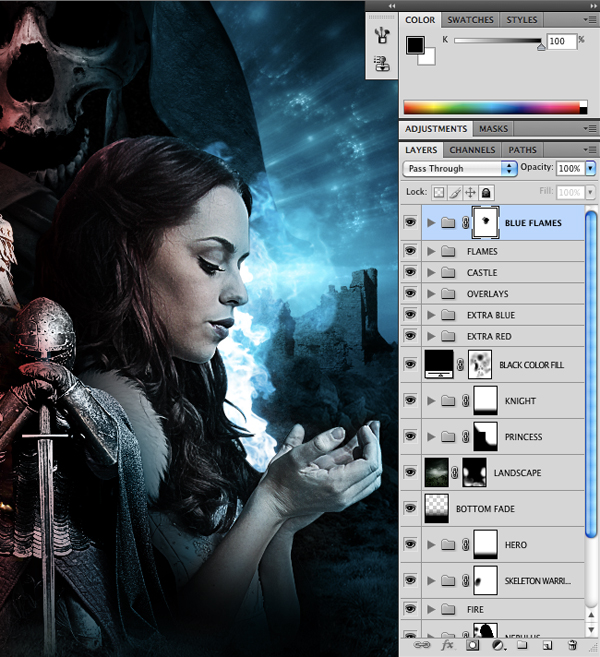
Your Layers Panel should now look like this:

Step 4
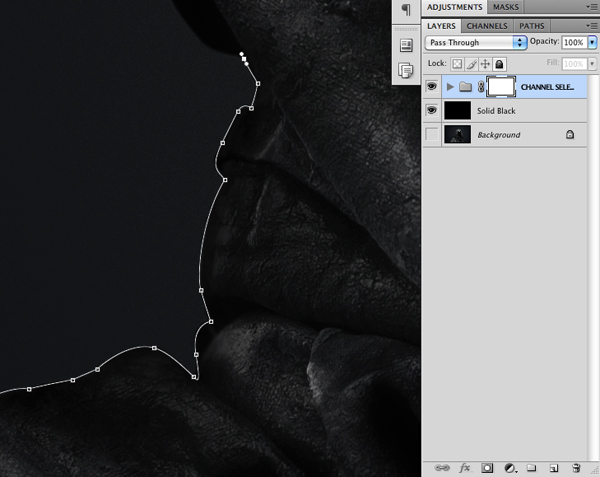
You can see that I’ve added a Layer Mask to the Group Folder, which can be done by simply clicking on the Layer Mask Icon at the bottom of the Layers Palette.
After that, begin tracing around the outside of the figure using the Pen Tool (P).
Once you have finished tracing around the image, close your shape and then hold down the Control Key and click anywhere along your path. This will reveal the following dropdown menu where you want to choose ‘Make Selection’ to create a selection from your shape.
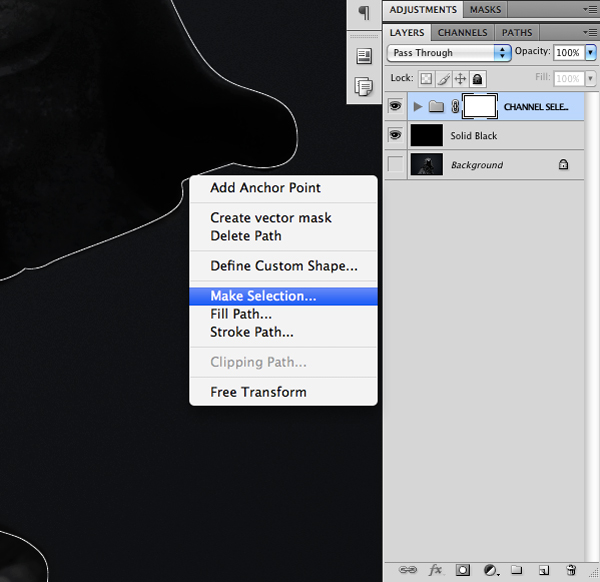
When the next dialog box appears, just make sure that the Feathering option is set to 0 and then press OK or hit the Enter Key.

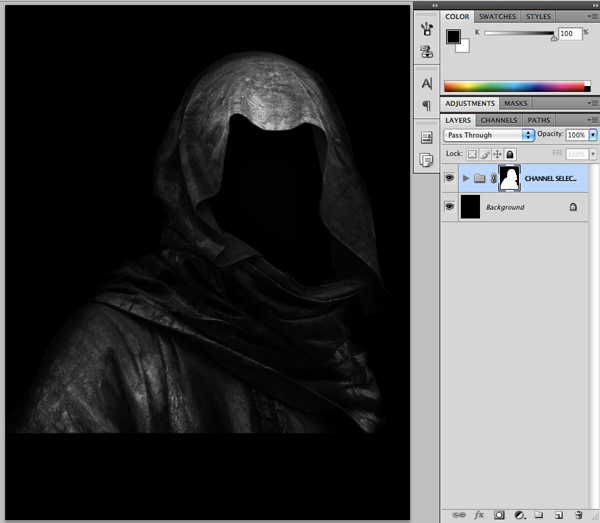
You should now see the marching ants around the figure, indicating your active selection area. Press Command/Ctrl + Shift + I to invert the selection. Make sure that you select the Layer Mask on the Group Folder and then fill the area with solid black to isolate the figure from it’s background.

At this point you will no longer need the original image. You can also remove the solid black fill layer so that you are only left with your hooded figure. You should now have something like this:
Step 5
Hold down the Control Key and click on the Group Folder. Once the dropdown menu appears choose the option that says ‘Convert to Smart Object’ as shown below:

This will take the contents of your Group Folder and merge them into one layer. We don’t want any background to be included in this, so that is why we removed the black fill layer from the folder before we created our Smart Object.
One of the reasons I do this as opposed to simply merging the folder is so that we can play with the scale of the image without worrying about a loss of quality. If you scale a raster image up and down a few times there is a noticeable loss of quality in the image, but with Smart Objects that is not the case.

Once you have done that, bring your new Smart Object into our main Photoshop Document.
Step 6
Switch to your Brush Tool (B) and select a large, soft round brush with an opacity setting of around 15-20%.

Select your Smart Object and apply a Layer Mask to it by clicking the icon at the bottom of the Layers Palette. Proceed to brush out some of the bottom of the image by going over it with black. Try to make the fade look soft and gradual – this is why we want to use a softer brush so we don’t have any hard edges in our fade.

Step 7
The next thing we want to do is open the skull image. As long as there is a good amount of contrast and you are using a straight on shot of a skull, it will be easy for you to silhouette the image. Here you can use the Magic Wand Tool (W) as we won’t really be seeing the outer edges of the skull anyway.
Once you have isolated the skull by itself your image should look like this:

Hold down the Control Key and click on the isolated skull before turning this into a Smart Object as well.

From here, bring the skull into your main document and turn the visibility of the layer off for the moment.
Step 8
What we need to do now is create a selection inside of the hood, where we will be placing the face or skull of our character. Because the hooded figure is so dark we will need to duplicate the layer a few times just so we can make it easier on ourselves to define the edges of this shape.
Select your hooded figure Smart Object and press Command/Ctrl + J about three or four times. Don’t worry – we will be getting rid of these copies afterwards.
Create a new layer and begin to trace around the inner shape of the hood where the skull will be placed. Once you have closed the shape, hold down the Control Key and click anywhere along the path to bring up the menu. Choose ‘Make Selection’ as shown here:
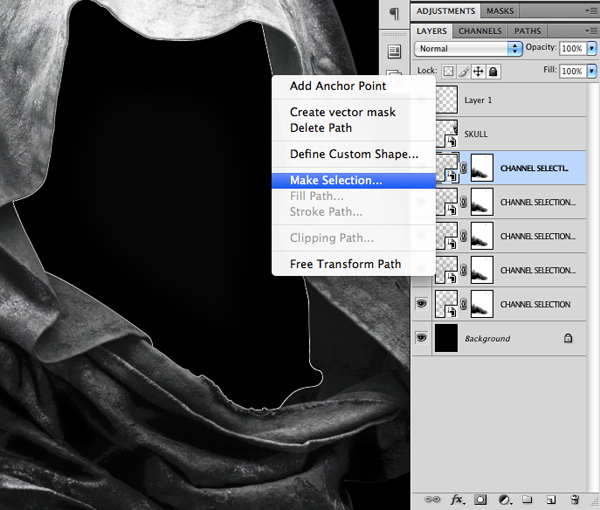
Again, just make sure that the Feathering is set to 0 and then proceed by hitting OK or by pressing the Enter Key.

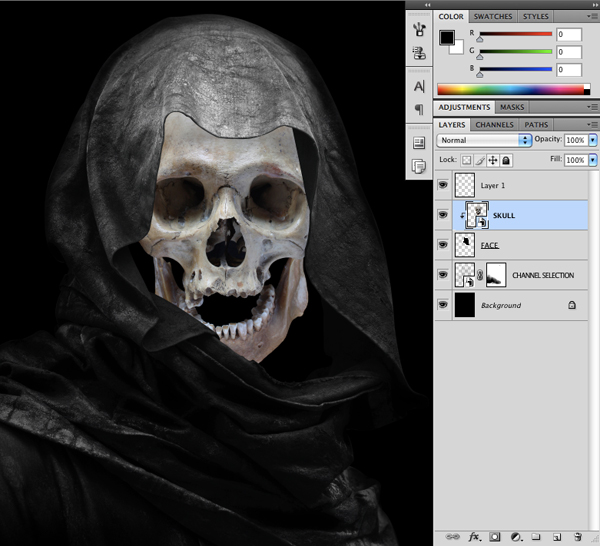
With your selection active, go ahead and fill your new layer with solid black. This will give us a clearly defined area for the placement of the skull.

Turn the visibility of the skull back on and place it just above the new shape layer. Hold down the Control Key and click on the skull layer to reveal a dropdown menu. Once the menu appears, we want to select the option that says ‘Create Clipping Mask’ as shown in the image below:

This will make it so that the skull is only visible within the shape layer that we created. From here you can then get rid of the extra copies of the hooded figure that we used in the previous step to help us define the shape inside of the hood.
Step 9
Now that we have applied a Clipping Mask to the skull, it should only be visible inside of the shape below it. You will also notice a small arrow icon on the layer, indicating the Clipping Mask.
With the skull layer selected, go to the Adjustment Layer Icon at the bottom of the Layers Palette and click on the icon while holding down the Alt/Option Key. From the list we are going to then choose ‘Black & White’ as shown here:

Go ahead and make this layer a Clipping Mask as well, and then change the Blending Mode to Overlay.

Select the skull layer once more, and this time apply a Hue/Saturation Adjustment Layer. Reduce the Saturation all the way to -100.

Next, place a Levels Adjustment Layer above the skull and move the left slider in towards the right so that it is set to about 88 as shown here:
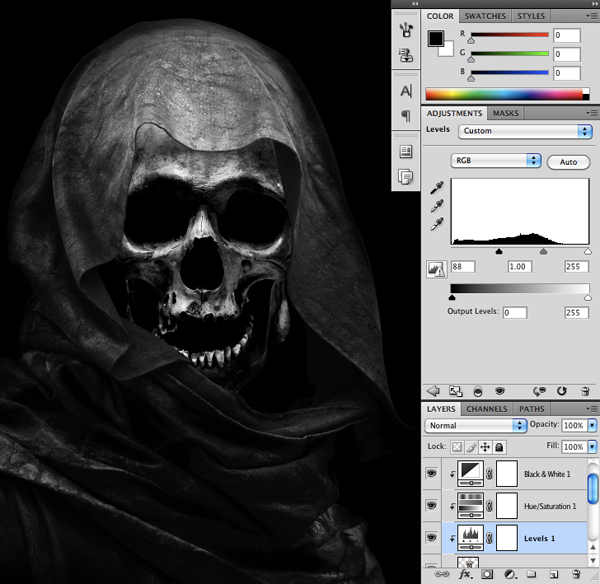
This will really bring out the contrast in the image to reflect a more intense and dramatic light source.
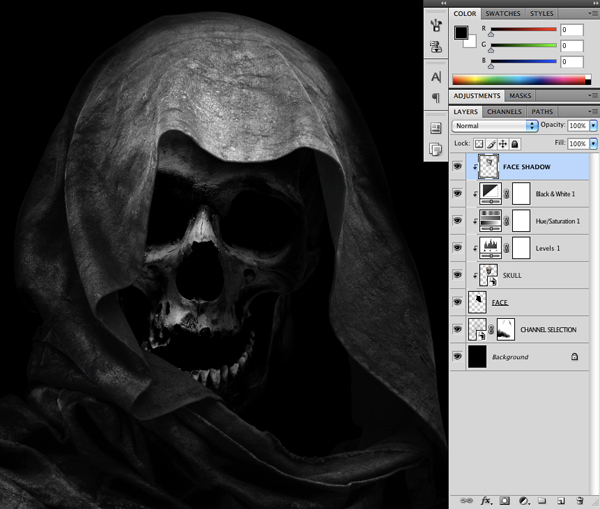
What we want to do from here is simply add another layer with a Clipping Mask and place it on top of all three of the previous Adjustment Layers. From here, switch to your Brush Tool (B) and using a soft, low opacity round brush, begin to paint in some extra black around the edges of the skull to create some shadows.
Step 10
Select the skull layer and then select the shadow layer from the previous step while holding down the Shift Key. You should have all of these related layers selected simultaneously before placing them into a Group Folder by pressing Command/Ctrl + G.

In case the Channel Selection Layer got moved into the Group Folder, make sure that it’s on it’s own, just below the Group Folder.
Step 11
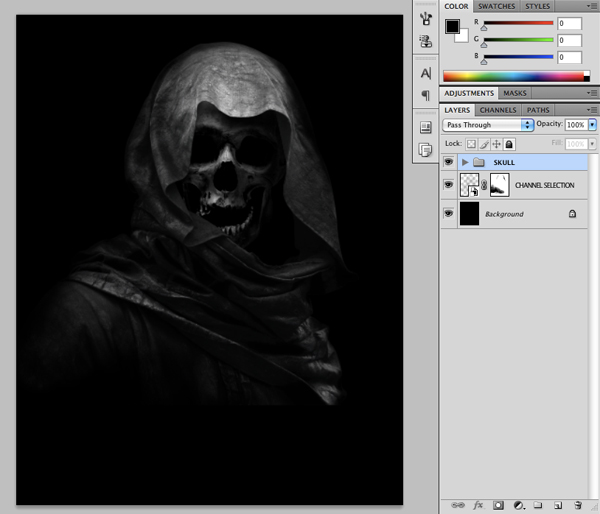
Hold down the Command/Ctrl Key and click on the layer thumbnail icon of the Channel Selection Layer to activate a selection around it. Then, create a new layer and fill your selection with solid black.
Reduce the opacity of the layer to 50% and place it just beneath the Skull Group Folder.

Select the black fill layer and press Command/Ctrl + J to duplicate it. Move this layer inside of the Skull Group Folder and place it on top of the layers with a Clipping Mask. Reduce the opacity of this fill layer to about 20% as shown below:

After adding this extra black layer, I went back and change the opacity of the first fill layer from 50% to about 30% as it felt a little more natural. Now we can select all of these layers except for the background and place them into one more Group Folder, which I have named ‘Skeleton Warrior’ just so we can keep track of our layers.
Step 12
Next, open up the image of the knight kneeling on the ground. Make a copy of the layer by pressing Command/Ctrl + J and then add a Layer Mask.

Zoom in and begin to trace around the knight with the Pen Tool (P) making sure to get a good selection around the edges.

After completing your trace, hold down the Control Key and click anywhere along the path to reveal a dropdown menu. When the menu appears, choose the option that says ‘Make Selection’ as shown here:

Make sure that the Feathering is set to 0 and click OK to activate the selection.

Fill the background with solid black and you will be left with the silhouetted knight as seen here:

Step 13
Bring the knight into your working document and click the layer while holding the Control Key. When the dropdown menu appears we are going to choose the ‘Convert to Smart Object’ option.

After you have done this, go to the Filter Menu and choose Sharpen > Unsharp Mask.

Use the following settings for the Unsharp Mask Filter:

After applying the settings hit OK to sharpen the knight. Then, press Command/Ctrl + F – this will apply another instance of the most recently used Filter with the same settings we used before. It essentially sharpens the image twice. You will be able to see all of the Smart Filters that are being used on the Smart Object.
This is actually one of the other great things about using a Smart Object – you can always go back and modify the Filter Settings that you have applied, unlike a regular raster image where once you apply the settings you are kind of locked in and you can’t go back to change it.

Step 14
Select the ‘Masked Knight’ layer and then click on the Adjustment Layer Icon at the bottom of the Layers Palette while holding down the Control Key. Choose the ‘Black & White’ option from the menu that pops up.

Check off the option that says ‘Use Previous Layer to Create Clipping Mask’ as seen here:

Then, change the Blending Mode of the Adjustment Layer to Overlay like we did earlier when we applied it to the skull.

Next, apply a Hue/Saturation Adjustment Layer and place it below the Black & White Adjustment Layer. For the settings we want to reduce the Saturation to about -42.

Step 15
Return to the original image of the knight and make a (fairly) rough selection around the curved light coming from the bottom of the sword. Press Command/Ctrl + J to duplicate the selection onto a new layer.

Bring the light into your document and place it above the knight layer. Change the Blending Mode of the light layer to Screen and then apply a Layer Mask to it. Use a low opacity soft brush to fade out the edges.

Step 16
Select the light layer and then the knight layer while holding down the Shift Key.

With all of these layers selected, press Command/Ctrl + G to place them into a Group Folder called ‘Knight’ as shown below:

Step 17
Next, open the Knight Group Folder and select the knight layer along with the Adjustment Layers that are attached to it. Drag all of these layers down to the New Layer Icon at the bottom of your Layers Palette to duplicate them.

With the duplicated layers selected, press Command/Ctrl + E to merge them together.

With your newly merged layer selected, go to the Filter Menu and choose Other > High Pass.

When the dialog box appears, apply a Radius of about 10 pixels and press the Enter Key to apply the changes.
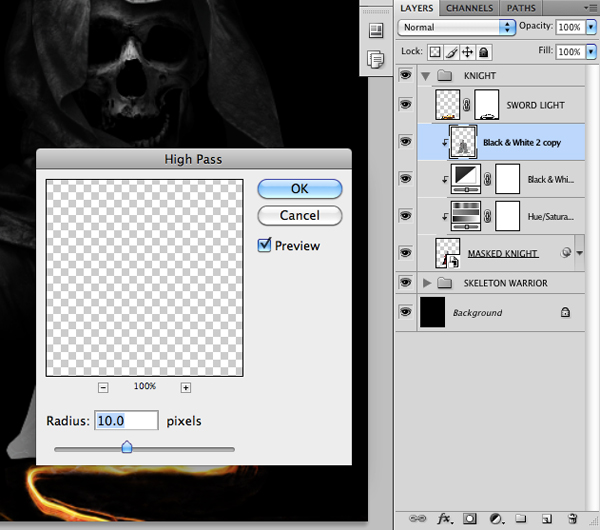
From here, change the Blending Mode of the High Pass layer to Hard Light.

Step 18
Create a new layer just above the background and switch to your Gradient Tool (G). Make sure that you have a Radial Gradient selected that fades from solid white to transparent as shown below:

Click and drag your mouse outwards from the center of your canvas to create the gradient.

What we will need to do next is click on the thumbnail layer icon of the 30% black layer inside of the Skeleton Warrior Group Folder. Doing this will give us a selection around the shape of the hooded figure.
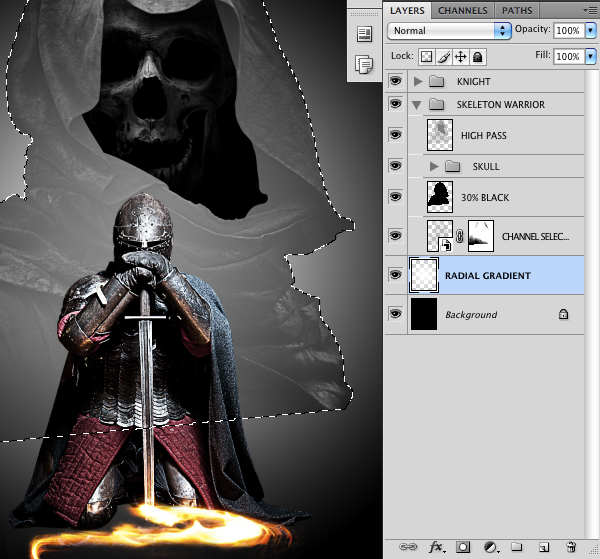
With the selection active, add a Layer Mask to the Radial Gradient Layer and it should then look like this:

From here, you can either use a low opacity soft brush or a black Linear Gradient to fade out the bottom as well.

The light is still pretty bright at this point so now we are going to simply reduce the opacity of this layer to 40% as shown below:

Step 19
Create another new layer above the previous Radial Gradient Layer and then select a vibrant orange color – here I am using #FFBA34.

Create another Radial Gradient using the orange color and change the Blending Mode of the layer to Linear Burn. We will need to use the same masking technique to make sure that the color only appears on the background behind the Skeleton Warrior.

Select both of these light layers and place them into a Group Folder called ‘Background Light’ or something similar.

Add another new layer above the Skeleton Warrior Group Folder and switch back to the Gradient Tool (G). This time, use a Linear Gradient that fades from solid black to transparent and click and drag your mouse from the bottom upwards to create a fade at the bottom. Reduce the opacity of the layer to around 70-80%.

Step 20
Open the image of the fire texture as shown below:

Bring the texture over to your document and place it behind the Skeleton Warrior Group Folder before changing the Blending Mode of the layer to Soft Light.

Step 21
Switch back to your Gradient Tool (G) and select a Linear Gradient that fades from solid black to transparent.

Add a Layer Mask to the fire texture and then use your Gradient Tool (G) to fade out the right side of the texture as shown here:

Press Command/Ctrl + J to duplicate the texture layer and then use a Free Transform (Command/Ctrl + T) to flip the texture horizontally so that it becomes a mirror image.

From here click on both layers while holding down the Shift Key so that you have them selected at the same time.

With both of the fire layers selected, press Command/Ctrl + E to merge them together.

Press Command/Ctrl + J to duplicate the newly merged fire texture layer and apply a Layer Mask to it. Begin brushing out the edges of the texture so that you are only really left with the middle behind the Skeleton Warrior since we will want the center area of our image to remain the brightest.

Next, select both of the fire layers and place them into a Group Folder of their own.

Step 22
Open the image of the princess and make a copy of the layer by pressing Command/Ctrl + J.

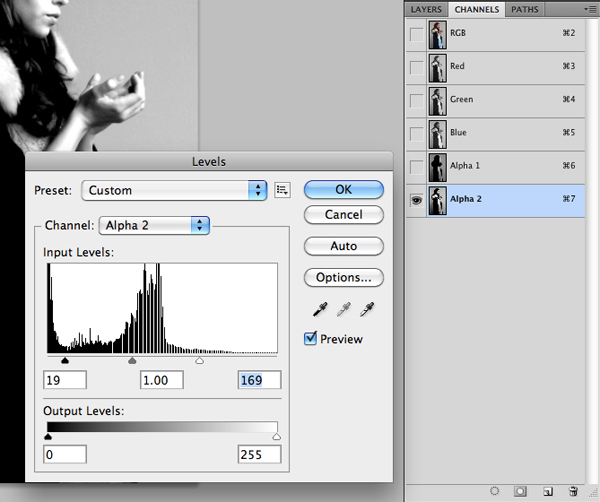
With the duplicate layer selected go to the Image Menu and choose Calculations.

Change the Channel to Red as this will provide us with the most contrast.

Go to the Channels Tab and select your new Alpha Channel. From here, press Command/Ctrl + L to bring up the Levels Dialog Box. Move each of the sliders in towards the center to try and get even more contrast from the image.
Step 23
Switch over to the Pen Tool (P) and begin to trace around the lighter areas such as the face and forehead. These are the colors that are too similar to the background so they become a bit harder to separate by simply using the Levels Adjustment.

After you have traced around all of the lighter areas, close the shape and then hold down the Control Key and click along the path to reveal the dropdown menu. From this menu we are going to once again choose the option that says ‘Make Selection’ like we did earlier on.

When the next dialog box appears just make sure that Feather Radius is set to 0 and then press OK to activate the selection.

Make sure that your Foreground Color is set to solid black and then press Alt/Option + Delete to fill your selection with black.
Once you have done that, you will need to hold down the Command/Ctrl Key and click on the thumbnail layer icon of your Alpha Channel to activate a selection. By default you will have the background selected, so we need to invert the selection by pressing Command/Ctrl + Shift + I on the keyboard.

After that, switch back to your Layers Tab and click on the Layer Mask Icon at the bottom of the Layers Palette and you should now have a silhouette of your princess!

Step 24
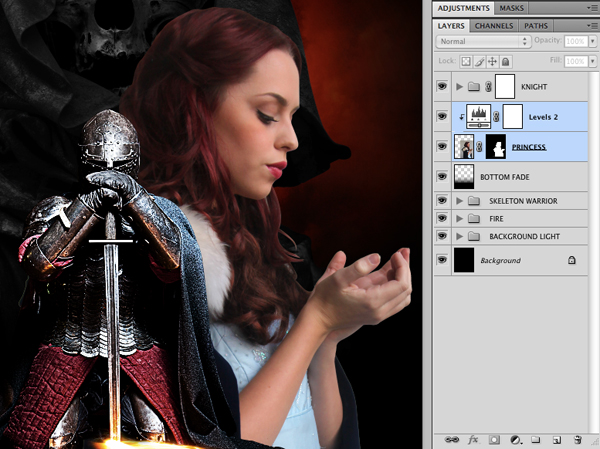
Bring your isolated princess into your working document and place her above the Skeleton Warrior, but behind the knight.
Add a Levels Adjustment Layer with a Clipping Mask to your princess. Once you have added that, bring the left hand slider over towards the right so that it’s set to about 12 as shown here:

Next, click on the princess layer and then hold down the Shift Key and select the Levels Adjustment so that both layers are highlighted.
Hold down the Control Key and click on either of the two layers to reveal a dropdown menu. From this menu we are going to choose ‘Convert to Smart Object’ as shown here:

You will now have a merged Smart Object. Try to match the size and placement of the princess to the image below:

Step 25
Next, select the Smart Object and apply another instance of the Unsharp Mask like we did earlier to sharpen the image a bit so that it fits with everything else.
Add a Black & White Adjustment Layer with a Clipping Mask just above the princess. Change the Blending Mode of the layer to Soft Light and then reduce the opacity slightly to somewhere around 75%.
Select the Adjustment Layer as well as the princess layer below and place them into a new Group Folder called ‘Princess’ or something similar.

Add a Layer Mask to the newly created Group Folder and then use a Linear Gradient fading from black to transparent to fade out the princess as shown here:

Go into the Group Folder itself and then add a Hue/Saturation Adjustment Layer between the princess and the Black & White Adjustment Layer. For the settings we are just going to move the Saturation slider to the left so that it’s set to about -10.

Step 26
Select the princess layer along with both Adjustment Layers above and then drag all three layers down to the New Layer Icon at the bottom of your Layers Palette to duplicate them.

With your three duplicate layers selected, press Command/Ctrl + E to merge them into one. From here, go to the Filter Menu and choose Other > High Pass.

When the dialog box appears, apply a Radius of about 10 pixels and then hit OK or press the Enter Key to apply the High Pass Filter.

Next, change the Blending Mode of the layer to Hard Light.

You may have noticed a pattern here as we have been silhouetting our characters, making them into Smart Objects, applying some Adjustment Layers, and then making copies of them that we can merge and apply the High Pass Filter to. We do this to achieve a certain level of similarity between our images, as we will want our whole composition to feel unified at the end.
Step 27
This next step will be similar to the process we went through when bringing the princess into our document. We want to isolate our hero, bring him into the document and then convert the layer into a Smart Object. From here you can apply the Unsharp Filter and then add a Black & White Adjustment Layer with a Clipping Mask above.

Your layers should now look like this:

What we do next is select the hero and the Adjustment Layer simultaneously, dragging them both down to the New Layer Icon and then merging the duplicate layers together by pressing Command/Ctrl + E.
With your merged layer selected, return to the Filter Menu and choose Other > High Pass once again.

We want to keep things pretty consistent so apply a Radius setting of 10 pixels and then press the Enter Key. Remember that once you apply the High Pass Filter that you will need to also change the Blending Mode of the layer to Hard Light.

Next, select all three of these layers together and place them into a Group Folder of their own. You can call it anything you like, but for the sake of simplicity I’ve just named it ‘Hero’ as shown here:

Step 28
At this point our composition is mostly in place and we have all of our main characters in the document. Now we want to work on blending things together a bit more to get them to feel more cohesive.
One of the first things we will need to do here is to further fade out the princess. You can use the Layer Mask that is attached to the Princess Group Folder and use the Linear Gradient Tool (G). Make sure that you have a setting that fades from solid black to transparent and then click from the lower left towards the upper right like this:

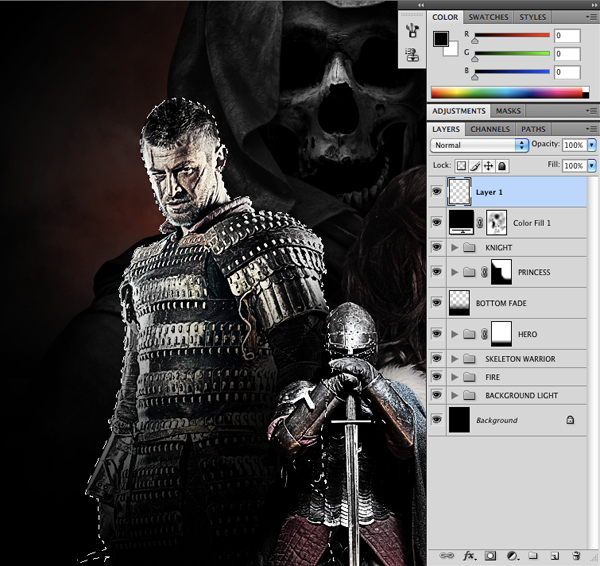
Next, select the very top layer, which should be the Knight Group Folder. Go down to the Adjustment Layers Icon at the bottom of the Layers Palette and choose the Color Fill option. We are going to fill the layer with solid black and then change the Blending Mode of the layer to Color.
Doing this will make everything below this layer in the design black and white, but not for long. While we want to have a slightly desaturated look, we don’t want to remove all of the color. To rectify this we will use the Layer Mask that is attached to the Color Fill Adjustment Layer.
Take a low opacity soft round brush and begin to paint over the faces with black. You will also need to make a few passes over their costumes as well as the background to bring some of the color back in.

Next, go into the Hero Group Folder and add a new layer with a Clipping Mask at the top of the layer stack. Using the same low opacity brush, paint in some extra shadows on the right side of the hero to add some sense of separation between him and the knight in the foreground. This will also help to create a more believable sense of depth in our composition.

Step 29
Create a new layer at the top of the Layers Palette. From here, hold down the Command/Ctrl Key and click on the layer thumbnail icon of the silhouetted hero. Doing this should give you an active selection around the character like this:
Next, select a vibrant red color – here I am using #BB0F0F.

Fill the new layer with red using your Paint Bucket Tool (G) or by pressing Alt/Option + Delete on your keyboard. After that, change the Blending Mode of the red fill to Multiply.
Once you have done that you will notice that there is some overlap where the red appears on top of the knight. In order to fix this we will need to first create a selection around the knight. Go into the Knight Group Folder, and then hold down the Command/Ctrl Key and click on the thumbnail layer icon indicated by the red box below:

Notice that even though the selection area is around the knight, my red fill layer is the one that is actually selected in the Layers Palette.
Once you have an active selection around the knight, press Command/Ctrl + Shift + I to invert the selection and then click on the Layer Mask Icon at the bottom of the Layers Palette. You should now only see the red on top of our hero like the image below:

From here we are going to use our low opacity black brush to fade some of the color out so that it’s mostly on the lower and left side of the hero. We want the fade to look pretty natural which is why we are keeping a low opacity for our brush setting. We can always use white to bring some of the color back in if we need to. You should now have something like this:

Step 30
Create another new layer and then click on the layer thumbnail icon of the Skeleton Warrior to activate a selection around him as shown here:

With the new layer still selected, use the same red color to fill the layer and change the Blending Mode to Multiply.
This time, add a Layer Mask and then press Command/Ctrl + Shift + I to invert the mask. This will make all of the color disappear for the moment. You will notice that the mask icon attached to the layer is also completely blacked out.

What we are going to do here is paint the color back in with a soft white brush. Use your brush to paint over the top and left of the hood as well as some of the left side of the skull.
When you are happy with the way that the color is looking, duplicate the red layer by pressing Command/Ctrl + J and change the Blending Mode of the layer to Color Dodge.

Select both of the red layers for the skull and place them into a Group Folder called ‘Red Skull’ or something along those lines.

From here, add a Layer Mask to the Red Skull Group Folder to further fade and remove some of the red color until it looks more natural and not quite as intense and vibrant.
You will also want to make sure that the red doesn’t overlap the hero, so you will want to make a selection around the hero and then paint with black into the Red Skull Group Folder Layer Mask.

Step 31
Create another new layer and this time we will make a selection around the knight. Fill the new layer with red and change the Blending Mode to Multiply before adding a Layer Mask.

Using the same low opacity brush, paint with black to remove the red on the right side of the knight. As you can probably tell, we only want the red coming from the left side of our image.

Step 32
From here we want to do the same thing with the princess although she won’t have much red on her at all. Create another new layer, fill it with our red color, change the Blending Mode to Multiply, and then add a Layer Mask to the layer.
After that, hold down the Command/Ctrl Key and click on the thumbnail icon of the knight layer to activate a selection around the knight. With your newly created red layer still highlighted in the Layers Palette, fill the attached Layer Mask with solid black to ensure that the red doesn’t spill over.

We want to paint out pretty much all of the red that appears on the princess except for some of the color on the top of her head.

Select all of the red color layers that we have added in the last few steps and then place them into a new Group Folder of their own. I have named my folder ‘Extra Red’ as shown below:

You will notice in the image above the highlighted area where the red appears on the head of the princess. This is pretty much all the red we want on her as we are going to introduce a second color into the design.
Step 33
Next, create a new layer at the top of your Layers Palette and select a cyan color such as #0E8BB9 as shown here:

Now use the Gradient Tool (G) to add the blue color to the right side of the canvas. After that, change the Blending Mode of the layer to Color.

Add a Layer Mask to the Color Layer and then use a low opacity black brush to fade out certain areas. In the image below you can see that I have removed most of the blue color from the face of the princess except for areas around the edges and the hands as well as the background and over the right side of the Skeleton Warrior.

I decided to bring some of the blue back around the head and face before placing it into a Group Folder of its own simply called ‘Extra Blue’ as seen here:

Step 34
Go inside of the Princess Group Folder and add a new layer to the top of the stack. Hold down the Command/Ctrl Key to activate a selection around the princess and then fill the new layer with solid white.

While the selection is still active, go to the Select Menu and choose Modify > Contract.

When the dialog box appears, we want to contract the selection by about 20 pixels. Hit OK or press the Enter Key to contract the selection and then press the Delete Key to get rid of all of the white except for a border around the edge of the princess.

Change the Blending Mode of the layer to Overlay before going to the Filter Menu and choosing Blur > Gaussian Blur as shown below:

Use a blur setting of about 10-15 pixels and then apply the filter by pressing the Enter Key or hitting OK.

Next, press Command/Ctrl + J to duplicate the layer. Place both of these layers into a Group Folder and then activate a selection around the princess before adding a Layer Mask to make sure that the ‘Rim Light’ layers are only visible within this area.

You may wish to paint out a little more of this outer rim light effect, especially on the lower areas. We mostly want the light on the top and sides of the princess.

Step 35
While you have the Princess Group Folder still open, add a new layer with a Clipping Mask just below the Rim Light. Then, use the Linear Gradient Tool (G) to add some extra black behind the knight. This will help to give some extra contrast and separation between the knight and the princess. Remember, all of these little tweaks and fixes will add up.

Step 36
Next, open up the space nebula image and bring it into your document.

Change the Blending Mode of the layer to Screen and move it all the way to the bottom, just below the Fire Group Folder as shown here:

Press Command/Ctrl + J to duplicate the layer and then change the Blending Mode of this layer to Overlay.

Select both the Screen and the Overlay layers and place them into a Group Folder.

Add a Layer Mask to the Group Folder and then activate a selection around the Skeleton Warrior. With the Layer Mask selected, fill the area with solid black to make sure that the nebula doesn’t overlap any of our characters.

Use a soft round low opacity brush to paint out a bit of the bottom and any other areas that seem distracting. There is a weird floating circle to the left of the hero that I have also painted out. Your image should now look something like this:

Step 37
Next, open up the image of the cloudy landscape and bring it into your document.

Change the Blending Mode of the layer to Screen.

Move the layer just below the Princess Group Folder and then apply a Layer Mask. We are going to mask out most of the landscape except for the areas on the bottom as well as the left and right sides next to the hero and the princess.

Because we have lightened up the left side of the image a bit, I now noticed that there is an odd looking shape to the left of our hero, created by what I discovered to be the shoulder of the Skeleton Warrior.
To fix this we are going to add a Layer Mask to the Skeleton Warrior Group Folder. Paint over this area with a solid black brush to remove it.

We will also need to add a Layer Mask to the Background Light Group Folder to paint over this same area.

Step 38
After removing the odd shoulder shape I decided to bring in some more of the red that we added so we don’t have this light gray area. To do this we can simply go into the Extra Red Group folder and use a soft white brush to bring back some of the red in our background and a little bit of extra color on our hero.

Step 39
Create a new layer at the top of the Layers Palette and switch over to your Gradient Tool (G). Make sure that you have a Radial Gradient selected that fades from solid white to transparent and then click and drag your mouse outwards to create a small-to-medium sized gradient on your canvas.
Place gradient to the left of the hero as shown below:

Next, change the Blending Mode of the layer to Overlay.

Duplicate the Overlay layer and move it over to the right side of the canvas, just to the right of the princess as indicated below:

Step 40
Next, open the isolated image of the castle and bring it into your document. Use the image below as a guide for scale and placement:

Change the Blending Mode of the layer to Multiply.

Click on the layer thumbnail icon of the hero to activate a selection around him.

With your castle layer highlighted, invert the selection by pressing Command/Ctrl + Shift + I and then add a Layer Mask by clicking the Layer Mask Icon at the bottom of the Layers Palette.

Step 41
Duplicate the castle layer and delete the Layer Mask. Move the layer over to the right side, still leaving the Blending Mode set to Multiply.
Add a new Layer Mask and mask out any areas that overlap the princess so that you can only see it in the background.

Once you have done that, select both of the castle layers and place them into a new Group Folder.

Select the castle layer on the right and then add a Black & White Adjustment Layer to it with a Clipping Mask.

Repeat this step with the castle layer on the left. Your layers should now look like this:

Step 42
Things are definitely starting to come together with our design and at this point I am just taking a step back to look at the overall image. To me, it seems that the light coming from the knight’s sword is pretty distracting, so although we have kept it in until this point I think it has got to go.
Turn the sword light layer off, and then add a Layer Mask to the Knight Group Folder. From here, use the Linear Gradient Tool (G) to fade out the bottom of the knight. You don’t want to fade it out too much, so click just below the knight and drag upwards slightly so that it looks more natural and shadow-like.

I have also duplicated one of the Overlays from Step 39 and placed it over the skull to help bring out some more of the details in this area. I feel that making these two little changes have already improved the overall piece.
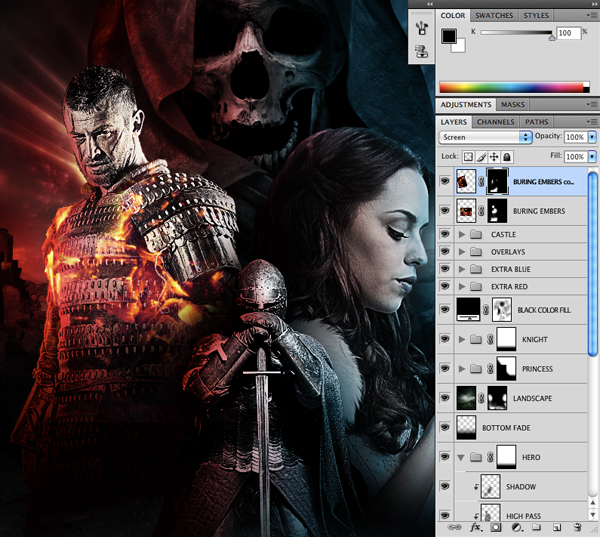
Step 43
Next we will be adding some cool, fantasy type effects to the image. To start, open up the image of the burning embers and bring it into your document placing it at the top of your Layers Palette.

Click on the thumbnail layer icon of the hero to activate a selection around him. With the burning embers layer still highlighted, click on the Layer Mask Icon at the bottom of the Layers Palette to add a mask.

Change the Blending Mode of the embers to Screen and then use a soft round brush with a low opacity setting to remove some of the flames inside the hero. The goal here is to just have a few random flames on top of him like the image shown here:

Make a copy of the burning embers and delete the Layer Mask. Flip the image horizontally and vertically to reposition it before adding a new Layer Mask so the embers are only visible on the hero. Once again, use the low opacity brush to paint out some of the flames.

After experimenting with the placement of the images I now have this as a result:
Step 44
Open an image of the isolated flame (the one that resembles a curved horn shape) and bring it into your document placing it on top of your Layers Palette. Change the Blending Mode of the flame layer to Screen as shown below:

Add a Layer Mask to the flame layer and then activate a selection around the hero by clicking the thumbnail layer icon for that layer. Fill the selection with solid black using your Paint Bucket Tool (G) to make it appear as though the flame is behind the hero.
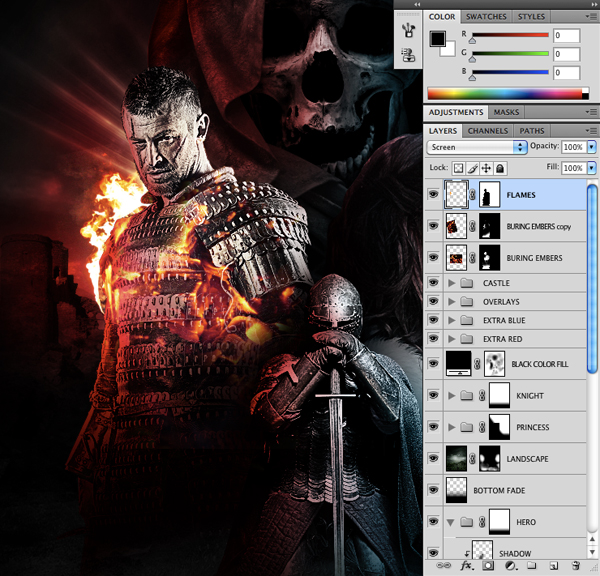
Grab another image of the fire and repeat this step to add more flames behind the hero.

If you like you can do this one more time to build up more random flames and add visual interest to the hero. After spending a few more minutes experimenting with the flames this is my result:

When you are happy with the size and placement of the fire, select all of the flame layers and the embers and place them into a Group Folder.

Step 45
Make a copy of the first flame layer we used in the previous step and place it over the back of the head of the princess as shown here:
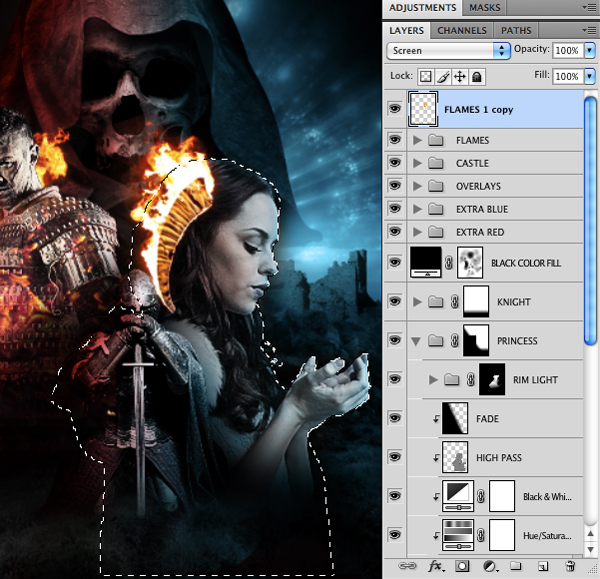
Make a selection around the princess and then invert the selection by pressing Command/Ctrl + Shift +I and then clicking the Layer Mask Icon at the bottom of the Layers Palette.
Hold down the Alt/Option Key and click on the Adjustment Layer Icon at the bottom of the Layers Palette. From the menu we are going to choose Hue/Saturation.

When the following dialog box appears, make sure to check off the ‘Use Previous Layer to Create Clipping Mask’ as shown in the image below:

Shift the Hue Slider so that it closely matches the blue of the background.

Repeat this process a few more times to add extra flames behind the princess like we did with our hero in the previous step. When you are happy with the blue flames, select them all and place them into a Group Folder and name it ‘Blue Flames’ or something similar.
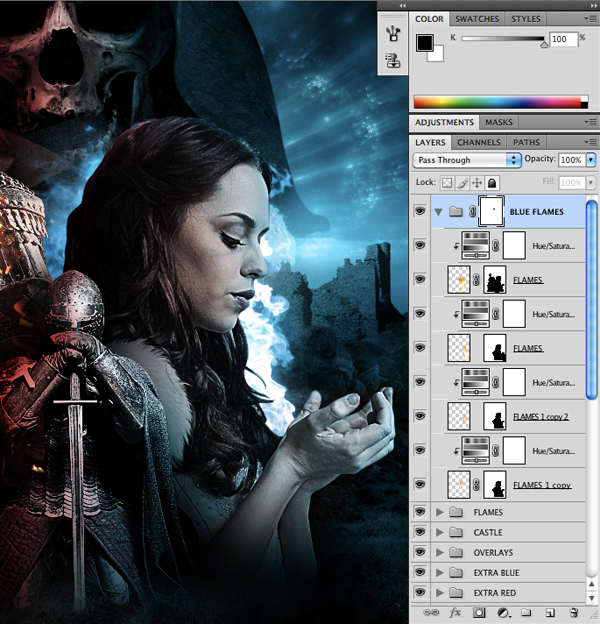
Add a Layer Mask to the Blue Flames Group Folder and remove some of the flames behind the head of the princess. At this point, most of the flames should be around the top and front of the princess as shown here:
I encourage you to experiment with this step to see what you like best – you don’t have to use the exact same fire image or place it in the exact same way as long as you use the same techniques.
Step 46
Open one of the images of the lightning strikes and bring it into your document. Change the Blending Mode of the layer to Screen and place it over the princess as shown here:

With the lightning layer selected, hold down the Alt/Option Key and click on the Adjustment Layer Icon. When the menu appears we want to choose Hue/Saturation.

Once again, check off the box that says ‘Use Previous Layer to Create Clipping Mask’ to ensure that the Hue/Saturation Adjustment Layer only effects the layer directly below it.

Move the Hue Slider to somewhere around -108 as shown below:

Press Command/Ctrl + T to initiate a Free Transform Command and then hold down the Control Key and click on the lightning image to reveal the dropdown menu. When the menu appears, select the ‘Flip Horizontal’ option and then press the Enter Key to apply the changes.

From here, add a Layer Mask to the lightning and activate a selection around the princess before filling the area with black. This will ensure that the lightning only appears behind the princess, much like we did with the flames.
After that, switch to the Gradient Tool (G) and select a Linear Gradient that fades from solid black to transparent. Click your mouse at the top of the canvas, above the lightning strike and drag downwards to fade it out along the top. You should now have something like this:

Grab the lightning layer along with the Hue/Saturation Adjustment Layer above it and drag them both down to the New Layer Icon at the bottom of the Layers Palette to make copies of both of these layers above the originals.

Next, select all four of these layers and press Command/Ctrl + G to place them into a new Group Folder.

Step 47
Now it is time for us to add some type to our design, but I feel like we need to add some more space to the bottom of the canvas so that it’s not too crammed in.
To do this we will go to the Image Menu and choose Canvas Size.

When the dialog box appears, click on the top middle box of the grid where it says ‘Anchor’ on the bottom. This will make it so that we only extend the canvas on the bottom.
For the values, change the height from 14 to 17 inches as shown below:

After extending the canvas you may need to add a solid black fill layer to fill in any areas on the bottom where the background is showing through. We want to make sure that the bottom of the design is completely filled in without having any gaps in color.

Step 48
Add a new layer to the top of your Layers Palette and using an Old English style font, type out the word ‘Armageddon’ as shown below:

In this case I am using a typeface called Germanica. Make sure that the type is solid white and extends across the bottom of the canvas.
Add another new layer and in a smaller, sans serif font, type out a subhead – here we will use the phrase ‘The End Is Near’ as shown in the image below:

For the sans serif typeface I am just using Gotham in a Bold style. Space the letters out by pressing Command/Ctrl + A to select all of the text, and then hold down the Alt/Option Key and use the > key to add space between the characters.
Double click on the subhead type layer to bring up the Layer Styles. From here, check off the Color Overlay option.

For the fill color we will use a dark shade of gray such as #4B4B4B. Press OK or hit the Enter Key to apply the changes.

Next, double click on the Armageddon type layer to bring up the Layer Styles for the title. Check off the Inner Glow option and use the settings below:

Check off the Bevel and Emboss option and apply these settings next:

Check off the Contour option just below the Bevel and Emboss setting:

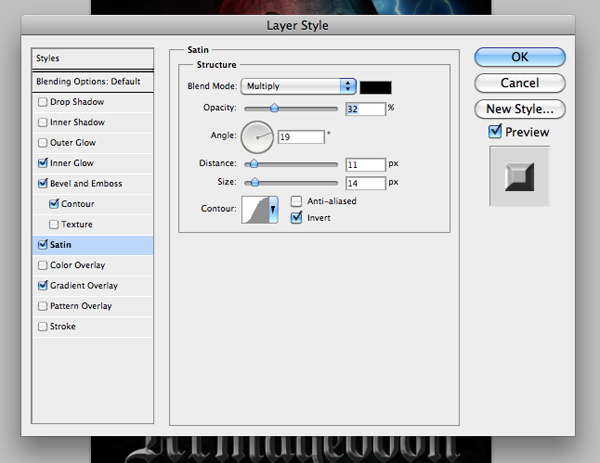
Next, check off the Satin option and use the following settings:
Then check off the Gradient Overlay option as shown below:

The image below shows how I have set up the gradient only using white and a medium-to-light shade of gray.

After you have applied all of the effects, hit OK or press the Enter Key to apply the changes.
Step 49
In this step we are just going to bring in some Lens Flares and set the Blending Mode to Screen. Add Layer Masks to them to hide any hard edges and use the image below as a guide for the placement of the flares.
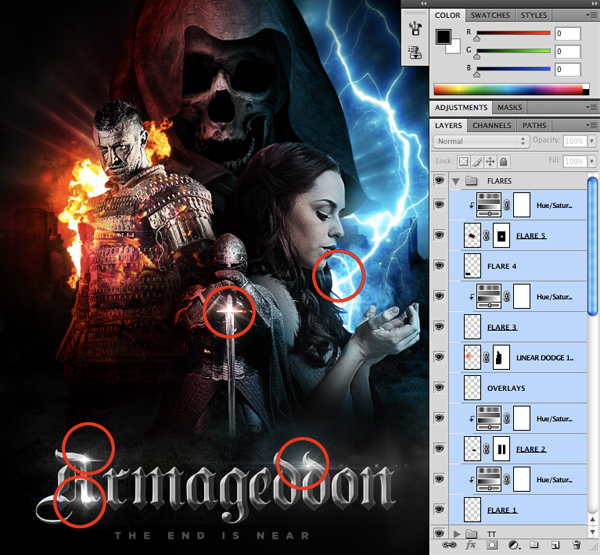
Once you are happy with the size and placement of the flares, select them all and place them into a Group Folder. I have also added some Hue/Saturation Adjustment Layers to some of the flares in order to desaturate them so they are white. All together I am only using about five flares but this step is also not an exact science. It helps add a bit of polish and sheen to your image so feel free to experiment with different sizes and colors as you see fit.
Step 50
Next, we are going to make our design feel even more like a movie poster by adding some decorative elements. I grabbed a few vector borders online to use here, but don’t feel that you need to use the exact same ones. You can try out different things but I would suggest not using anything that is overly complex.
I’ve placed a geometric corner border in each of the four corners, and then made them the same color as the subhead type – This is easily done by double clicking on each of the vector border layers to bring up the Layer Styles, and then checking off the Color Fill option and filling it with the same gray color.
Use another vector element or border beneath the type, just to add another nice detail to the title treatment. You can quickly copy the Layer Style from another layer by holding down the Control Key, clicking on the layer you want to copy the style from, and then selecting ‘Copy Layer Style’ from the dropdown menu. You can then hold down the Control Key and click on the layer you want to apply the effects to, and when the dropdown menu appears choose ‘Paste Layer Style’ instead of manually going in and applying the same settings each time. You can also paste the same Layer Styles to several layers at the same time.

After that I have just added some smaller type at the bottom to look like the film credits or cast although it’s really just a place for you to promote your website ?
Once you have added your borders and copy, select them all and place them into a new Group Folder.
Then, select ALL of your layers and place them into a Group Folder called ‘All Layers’ so that everything is contained in one main Group Folder as shown here:

Step 51
Create a new layer at the top of your Layers Palette and fill it with solid black. Then, go to the Filter Menu and choose Noise > Add Noise.

For the amount, use a setting of about 118% and also check off the Gaussian and Monochromatic options as shown here:

Press OK or hit the Enter Key to apply the filter. Change the Blending Mode of the layer to Soft Light and reduce the opacity to 10%. This will add a bit of subtle graininess to the overall image.

Step 52
Select the ‘All Layers’ Group Folder, which now contains all of the other folders in our design. From here, press Command/Ctrl + Alt/Option + Shift + E. This will merge all of the visible layers onto a new layer at the top of the Layers Palette.

With the newly merged layer selected, go to the Filter Menu and choose Sharpen > Unsharp Mask.

For the settings, use an Amount of 50% and a Radius of 1 pixel as shown below:

Press OK or hit the Enter Key to apply the sharpening effect to the merged layer. This will give a final, overall layer of sharpness on the whole image. At this point our design is complete and is full of great details and effects. Be sure to save your work frequently as you go and remember that these techniques can be used on just about any type of image you work on.
Let’s take a last look at our final movie poster design:
I hope that you have enjoyed this lesson and hopefully you have picked up some new tricks along the way. Thank you for following along with me!
And We’re Done!
Well done, you’re all finished! As always, we’d love to see your version of this outcome, and if you get stuck please let us know, we’re here to help.
You can view the final outcome below. I hope that you enjoyed this tutorial and would love to hear your feedback on the techniques and outcome.
Download the Source File for This Tutorial
Download the original .psd file and accompanying resources you need to complete this tutorial:

 Create an Epic Storm at Sea Scene in Photoshop
 Members Area Tutorial: Design an Action Packed Movie Poster
 Members Area Tutorial: Create a Music Event Poster by Following a Professional’s Workflow

Leave a comment
0 Comments:
No comments have been posted yet. Be the first!
Leave a Comment: