
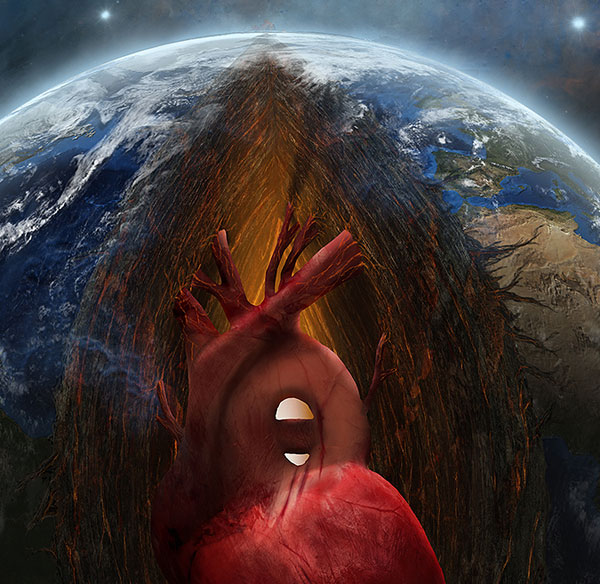
Recreate The Breathtaking Photo Manipulation ‘Earth’s Bleeding Heart’
Do you ever think “I know my way around Photoshop, but something’s stopping me creating the same standard of work as the real masters?”
The truth is, Photoshop, like any skill takes a whole lot of practice to get awesome at.
However, the beauty of tutorials is that you can follow along with every step of a true master’s workflow. You can replicate every technique, every brush stroke and every layer style. Because of this, it’s a way for all you intermediate users to use your knowledge of Photoshop’s standard tools and apply them to create a piece that is truly world class.
What You’ll Be Creating
Take a look at what you’ll learn how to create in today’s lesson. By the end of this lesson you’ll be able to say ‘I designed that!’.
It’s not going to be quick or easy, but stick with it, and you’ll learn a whole lot and produce something you can be proud of.

This is a photo manipulation in the very truest sense of the term.
We’ll be creating our own brushes, using some digital painting and texturing techniques, and warping and blending images into something vastly different from the starting point.
In short, this lesson will show you how to totally transform regular boring images into an awe-inspiring outcome.
Take a look at the starting images and try to guess how they’ll be used to create our outcome:

And here’s a look at some of the incredible detail in the final result. Every tiny detail has been given careful thought and attention, and you’ll learn how to achieve this kind of focused design by following along.
Want to learn how to create this epic photo manipulation? Let’s get started!
Resources Used In This Tutorial
Download the Source Files for This Tutorial
Download the original .psd file and accompanying resources you need to complete this tutorial:

1.PLANET SETUP
Step 1
OK to start things off lets make a new document, with a nice big size for our illustration, a height of about 4000 px will serve right. Then open up the images ‘EARTH SURFACE’ and ‘NIGHT LIGHTS’, select them all and copy paste them on to new layers.


Step 2
Select both layers and scale them down equally, so we keep them aligned.


Step 3
Now create a circular selection as far to the edge of the images as you can; you can use the transform selection to be sure you get the most of the images, and then copy from one of each of the layers to end up with two circular chunks of planet for both the night and day images.


Step 4
Now for each of the layers we will load the selection once again
By using command click (mac) on the layer thumbnail and then we will apply a spherize filter twice as shown here.


Step 5
We end up with two perfectly aligned sections of the planet that now have the appearance of 3d depth.


Step 6
The night layer you can move it on top and change its blending mode to linear dodge. Then lets duplicate the base layer.


Step 7
Next we will need to make a huge elliptical selection as shown here, so its better to zoom out so we have enough space. Then we will inverse the selection and simply create a layer mask.


Step 8
Repeat the process with the duplicate layer so we end up with a big cut centered in the planet as shown here.


Step 9
Now we will start painting the section where we made the cut representing the layers of the earth going down to the core; and we will use this brush to do that. Depending on your brush library, you may want to try and find a brush with a rough, rocky texture to it.


Step 10
And of course select the brush tool and a deep brown color


Step 11
Start filling in the space as shown here, and then change the color to black to start suggesting a bit more variation on these deep cut of the earth.


Step 12
Then sample between the black colors and the brown to dial in a new shade; this is the process we will go through several times building up our base until we have realistic layers of earth going down to the core.
Yet for now our base its setup and we can finalize this section of the tutorial.


2.HEART BASE
Step 1
Now lets start by sketching up the heart base, and for that we can use medical sketch such as this one here or any other guide that you like that represent the real shape of the heart. If you are good at sketching and human anatomy you can do it without guide of course. If you use a sketch, just copy it to a new layer and invert the image as shown here.


Step 2
Scale the image as shown here and set the layer mode to screen so we only see a bit of the shape to guide us.


Step 3
Perfect, now make a new layer and lets select a deep reddish color for the heart.


Step 4
Now pick up the brush and a chalky tip such as this one here.


Step 5
Then the process its to start blocking in the sections and overall shape of the heart, and whenever needed change the color to a brighter red or lighter shade to block in the different sections.


Step 6
We continue filling up with color as shown here and then finally we turn off the sketch image, so we have the base of the heart setup.


3.EARTH LAYERS & DETAIL
Step 1
OK lets start this stage by increasing the detail on the layers by going back to the painted base layer and grabbing the rocky brush once again.


Step 2
Then with a black color lets start painting in and suggest the individual layers of earth going down as shown here.


Step 3
Keep painting until you reach this level of detail, and then open up the texture image shown here.


Step 4
Copy the image on to a new layer and scale it down as shown here. Then rotate it 90 degrees clockwise.


Step 5
Scale it and position the layer as shown here and then make a duplicate so it covers the entire section. Then use the eraser a bit to blend the two images and finally merge the two layers into one so we can manipulate it.


Step 6
Now use the distort command as shown here and then apply just a bit of the spherize filter as indicated.


Step 7
Next we will use the warp tool as shown here to match the texture to the curvature of the earth; and finally just duplicate the result and flip it to cover the other side.


Step 8
Merge the two sections on to one layer, then set the mode to overlay, then duplicate and scale the resulting layer as shown to cover deep into the cut section.


Step 9
Drag the smaller copy below the other, and then make a group of all the layers that make up the planet.


Step 10
Make a duplicate of the earth group and hide the original for safe keeping. Then go into the duplicated group and first merge the layers that make the surface, then merge the layers that make the cutout so you end up with only two layers in the group.


Step 11
Scale down this resulting group as shown here:

Step 12
OK perfect, now lets drag a circular marquee around the planet, adjust it using the transform selection command if needed.


Step 13
Once you have the selection in place make a new layer and fill it with black, then make sure its centered over the planet.


Step 14
Great!, now we will apply these settings to the layer style, creating both an inner and outer glow as shown.


Step 15
Then reduce the fill of the layer to 0 and we end up with a nice round atmosphere for the planet


Step 16
Rasterize the layer style and create a mask as shown.


Step 17
Mask off the lower half of the planet as shown here.

Step 18
And then we create a levels layer clipped to the planet surface layer and adjust it as shown here.


Step 19
Then mask off the top of the planet so the darkening effect of the levels only affect as indicated in the red circle.


Step 20
Lets make a duplicate on top of those two surface layers, and disable the levels layer.


Step 21
Merge the two layers, then desaturate the resulting layer, so you end up with a black and white version of the surface.


Step 22
OK great, now apply these levels adjustment directly and then invert the image.


Step 23
Next lets apply some emboss filter to the image as shown here.


Step 24
Set the layer mode to overlay and we end up with a nice effect of increased bump in the surface.


Step 25
Now we will add some clouds on our planet by using exactly the same steps as the planet surface. Bring in the image make a circular selection and spherize in the same way, then just set the layer mode to screen and mask off softly from the cutout section so there are still some clouds spilling in.

Step 26
Lets continue by selecting this light brown shade and grab the brush tool again.


Step 27
Select the rocky brush tip and make it about only 4px. Then start painting in some highlights on the rocks as shown below.


Step 28
And there we have it, increased level of detail for our planet ready to move on to the next stage.

4.MAGMA
Step 1
OK as we know our planet insides have layers of liquid magma all the way to a central core, we will start painting by sampling from this nice image that we will also use for texturing. So copy it to a new layer and scale it down as shown.


Step 2
Then again with our rocky brush at about only 1px size and sampling a medium shade of orange from the image start painting layers of magma on the sides of the crust.


Step 3
Continue painting as shown here increasing the amount closer to the center.

Step 4
Then sample a lighter orange from the image and paint in warmer sections as shown here.


Step 5
Continue all over until you have reached the center as shown here.

Step 6
Now sample a darker red from the image and add to the sides of what we have painted already.


Step 7
Now we have a nice inner surface that its not only rock but has quite a bit of mixed magma sections.

Step 8
OK now lets grab the image that has provided us all those color samples and rotate it as shown here. Then grab the clone tool.


Step 9
Use the clone tool to cover all the cutout section as shown here, then set the layer mode to soft light and reduce the opacity to about 48%


Step 10
We end up with a nice textured section that is deeper in shading; so lets add to it by creating a new layer and set its mode to overlay.


Step 11
Select this light orange color and with a big soft brush paint in some lighter glow going on to the center. And we have successfully finished yet another stage in or tutorial.


5.HEART FINAL LOOK
Step 1
OK so lets finalize our heart. First we need to prepare or drawing for it and we need to block in all of its shape; so with the help of a blue layer below the heart sketch we can see where we are missing some color.


Step 2
Select the brush tool with this chalky brush tip as shown here.


Step 3
Sample color from the sketch itself and look for sections missing color where you can see the blue color peeking through.


Step 4
Once you have covered all of the sketch and refined the edges, use the magic wand to make a selection of it.


Step 5
Make a new layer below the heart and fill it in with a dark red color so we are sure our heart layer will be solid.


Step 6
And select both layers and merge them together.


Step 7
Now lets start shading our heart, you can either lock the pixels on the layer, or make a new layer clipped to it. Then select a very soft brush as shown here, and start sampling dark color from the heart sketch.


Step 8
We will use dark and lighter color to shade the corresponding sections of our heart as shown here, creating volume on our sketch.


Step 9
Then from the lighter sample of our sketch we will make it even lighter as shown here to paint in the areas exposed mostly to the light from above.


Step 10
Then we will make the same for our dark sections by choosing a darker shade of red and paint in the shadows accordingly changing the diameter of the brush as needed.


Step 11
Great! now we are ready to setup texture over our painting by using this image, so copy it on to a new layer and adjust its levels as shown here.


Step 12
Extract it from the background and make two copies of the same as shown here.


Step 13
Scale it down and reduce the opacity at about 56%


Step 14
Then rotate and warp the image as shown here so it fits the lower section of the heart, and follows the shape as much as possible.


Step 15
Set the layer mode to overlay and return the opacity to 100. Then repeat the steps with another of the heart textures, this time covering the rest of the heart.


Step 16
Now lets clip both texture layers to the heart base and hide the smaller section.


Step 17
Then lets look for sections where the texture its not doing much or its just missing and with the help of the clone tool fill in those sections as shown here.


Step 18
Now enable the other smaller texture layer and make a mask for it.


Step 19
With a very soft brush mask off as shown here, and reduce the opacity to about 81%


Step 20
Great! our heart its looking nice, so now create a new layer also clipped on top and set its mode to soft light.


Step 21
Then select this bright orange and with the soft brush paint in highlights as shown below.


Step 22
And now lets create a new layer below the heart layers, set its mode to multiply and grab a dark shade of orange as shown here.


Step 23
Paint in some soft shadows with a soft brush as indicated here.

Step 24
Create a mask for the heart base and select the brush tip shown here.


Step 25
Then mask off the edge of the arteries as shown here so the fit the surface of the side walls better.


Step 26
OK lets create even one more layer and sample color from one of the bright sections of the magma.


Step 27
Lets use this chalk brush tip and make it 1px. Then start painting in from that magma so it connects to the heart arteries.


Step 28
Move the layer on top the heart stack and paint in so that the magma turns into veins creeping up the heart.


Step 29
And there we have it one more stage finalized and our heart all setup and looking quite good over the earth.

6.SPACE!
Step 1
Lets start building up our space background with a new layer below all the other active layers. Next grab the gradient tool and select the gradient shown here from the gradient file found in the resources section for this tutorial.


Step 2
Drag a large gradient from the center of the planet as shown and then reduce the opacity to about 48%


Step 3
Now lets make a new document to create some brushes so about 2500px square will be nice, then open up the image shown here and make a square selection of an interesting section as shown here.


Step 4
Copy and paste twice on a couple of layers and hide one of them. Then desaturate the layer.

Step 5
Then proceed to invert the layer and adjust the levels as shown here.


Step 6
Now make a white back layer and grab the eraser tool.


Step 7
Select a very soft tip and make it about 740px, then make sure you enable transfer and pen pressure in the brush palette.


Step 8
Brush off the edges as shown here so the content its only on the center.

Step 9
Then select all, and go to define brush preset from the edit menu.


Step 10
Name the brush, and go back to our main document and create a new layer for testing.


Step 11
Now every brush you create its loaded at the bottom of the list, so select it and stamp a couple of times to test it.


Step 12
I find that its a bit to “thick” so lets go back to our brush document and adjust the levels as shown here.


Step 13
Then define a new brush preset.


Step 14
Name it and test it again back in our document. Much better definition of the details.


Step 15
Now select this other section of the other layer, desaturate it and invert it; and then adjust the levels as shown here.


Step 16
Erase off the borders as shown and create yet a new brush preset.


Step 17
Go back to our document and test this new brush. You can see how different sections and different levels affect the brush look quite a bit; so feel free to make as much brushes as you see fit, I prepared several brushes for you included in the brushes file and I also included the .psd file where those brushes where made. From the Hubble website you can choose the images you like and have some fun building up your brush library.

Step 18
OK once you are done with your brushes lets continue; you can choose exactly the brushes I will use or use your own, its just a matter of building up a nice look for our back. So select this brush here and the bright blue color suggested.


Step 19
Lets stamp a couple of times in a new layer as shown here, I prefer to make a new layer each time I stamp a new section so what I have so far its not affected and I can edit each new stroke as needed. Then change to another brush and go to a new layer and stamp a couple of times.


Step 20
Now I made about 5 layers of different sections of the background and then I group them together on to a group. It is much a matter of trying out the brushes to create a look that you like. Then just make a duplicate of the group and merge it into one layer; then hide the original group for safe keeping just in case.


Step 21
OK now we will keep painting on this layer, yet we will change the color to a bright orange, and set the brush mode to overlay and stamp in a couple of times with a different brush.


Step 22
Now change the color to this deep blue and change the brush once again and add to the center as shown here.


Step 23
Then select yet another different brush, change the color shade once again and add a couple of more strokes.


Step 24
Great, once you are satisfied with the base overall, make a levels layer clipped to the nebula layer and adjust the settings as shown here.


Step 25
Make a layer mask for the nebula.

Step 26
Grab this brush here and make sure you enable shape dynamics on the brush palette so each time you stamp you get a slightly different shape.


Step 27
Then mask of sections of the nebula to make it more interesting as shown here. Yet again this is a creative process where you need to keep an eye on the look until you get the image you like.

7.STARS
Step 1
OK now we will be adding some nice stars to the image on a new layer and with the brush shown below.


Step 2
Then select this bright blue color and in the sections shown below add some stars as shown. This brush has color dynamics enabled, so be sure to turn that off.


Step 3
Continue adding more stars as shown here, just be sure you don’t overdo the whole thing. Then change the color to a bright yellow and add some other stars as shown.


Step 4
Now lets add a hue saturation layer for our nebula and adjust the settings as shown here.


Step 5
Now just make a duplicate of the stars layer so they are more intense, and that is it we have finish adding our detailed stars.


1.CRACKS AND FISSURES
Step 1
OK time to refine the edge of our cutout section, so lets add a new layer clipped to the earth layer as shown here and select the chalk brush as indicated.


Step 2
Now we will start sampling from the image a dark color as shown and start making the base for the cracks going a little into the surface.


Step 3
We will reduce the brush size to detail the fissures into the landscape all over the edge, both on the darker sections and the top. If needed you can turn off the adjustment layers to see the image better.


Step 4
Next we will zoom in closer and add a bit of lighter detail again by sampling from the image.


Step 5
Then to merge with the magma that is present overall we will also add this detail going into the cracks as shown here.


Step 6
Then lets do the same on the shaded section taking care of closer detail as shown here. So we end up with a higher level of detail making our image integrate even further and reach the end of another stage in our tutorial.


1.FINAL DETAILS.
Step 1
We are on the final stage of the tutorial, we will add some nice final detail to spice up and refine the image. Lets start by grabbing this brush here and rotating its axis a bit in the brush palette.


Step 2
Sample some bright orange from the magma and stamp as shown here, then sample brighter almost yellow and stamp once more. Then add a bit of emboss on the layer style as shown below so we have some bloody magma spilling into space.


Step 3
Make a duplicate of the earth group and merge it together, then add a new clipped layer to it and set the mode to overlay.


Step 4
Now before proceeding any further lets add a curves layer below the earth to adjust the background, so go ahead and adjust the curves as shown here.


Step 5
Now grab the brush tool with a very big soft tip and black color.


Step 6
Mask off the central portion of the image so that the curves layer affect only the outer edge, effectively creating a bit of vignette.

Step 7
Lets go back to the overlay layer clipped to the planet and select a deep blue color.


Step 8
And now we just paint in with our soft brush some color spill coming from the background off the bottom. Then we sample from the bright yellow stars and paint in a bit more on to the side as shown here.


Step 9
Lets now create a new layer on top and select the brush shown below.


Step 10
Sample color from the section shown and add a stroke over the original magma spill.


Step 11
Now select a much brighter yellow and add almost on top of the previous stamp as shown.


Step 12
Then simply sample color from the ocean, reduce the size of the brush a bit and paint over to suggest some water also spilling on to space.


Congratulations, You’re All Done!
Awesome job making it this far! You should be proud of what you’ve created. Show it off to your friends and colleagues and get some feedback.
You can also comment here with your version, or any questions you had about the techniques used. We love to see what you guys create and we’re always here to give helpful feedback and tips to help you to improve.
Download the Source Files for This Tutorial
Download the original .psd file and accompanying resources you need to complete this tutorial:
 Members Area Tutorial: Creating the Photo Manipulation ‘Birth of a New Era’
 Members Area Tutorial: Recreate a High-End Photo Shoot On a Limited Budget
 Create the Emotional Photo Manipulation Firing Heart

Leave a comment
0 Comments:
No comments have been posted yet. Be the first!
Leave a Comment: