
Members Area Tutorial: How to Create A Serene Lake Scene Photo Manipulation
In this tutorial our resident photo manipulation expert Jenny Le will show you how to create a serene lake scene.
You’ll learn a variety of manipulation techniques, such as blending, adjusting color, retouching, using brush as well as detailing to achieve a realistic outcome.
Beyond this, you’ll learn some practical techniques such as using the displacement filter to create an artificial water surface and how to combine adjustment layers and complex, layered masking to produce some beautiful results.
Let’s get started!
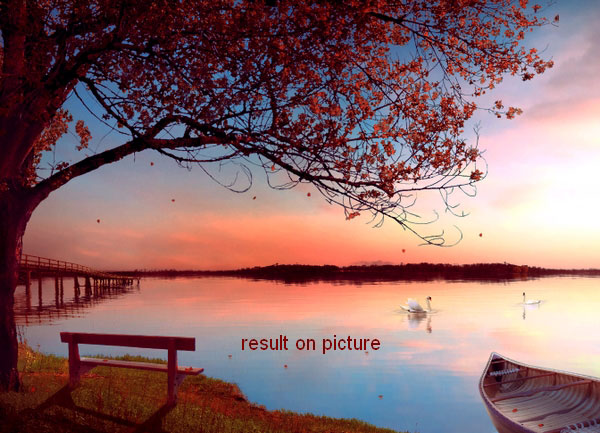
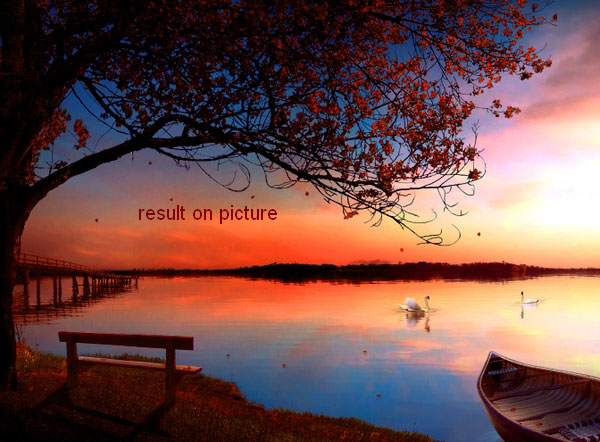
Final Image
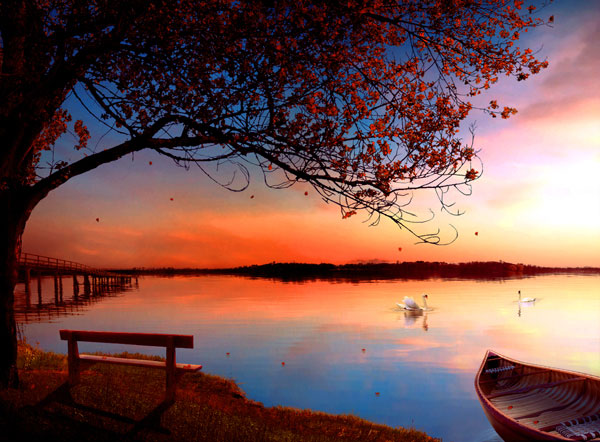
As always, this is the final image that we’ll be creating:
Resources Used In This Tutorial
Step 1
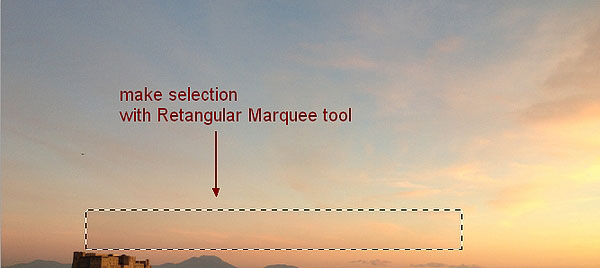
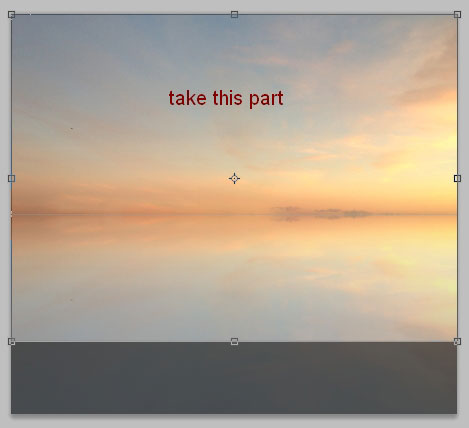
Open sky stock. Use Crop Tool (C) to take the sky part only. If you use your own image, remember to choose the one with horizon.

Step 2
On background layer (sky), use Retangular Marquee Tool to make a selection on sky part:
Press Cmd/Ctrl+J to duplicate this selection then move it to the left to hide the top of castle. Click the second button at the bottom of Layer Pallete to add layer mask to this one. Use soft black brush to remove hard edge and blend this selection with sky:
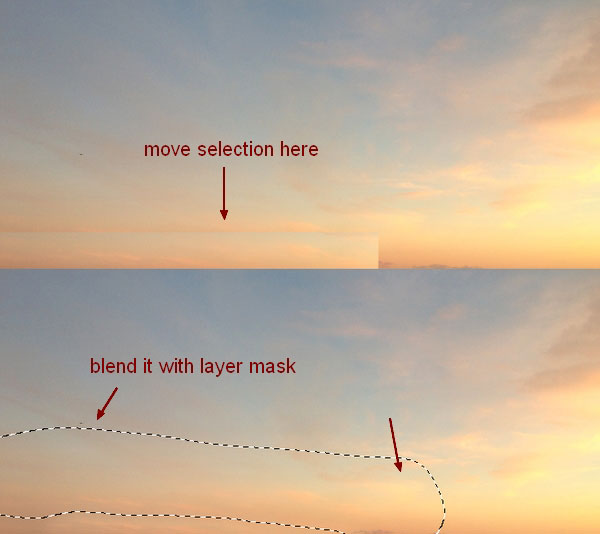
I name this layer as “remove castle”.
Step 3
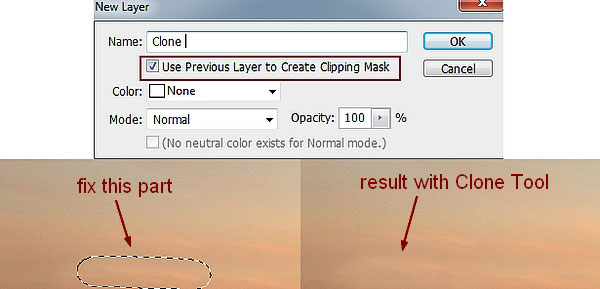
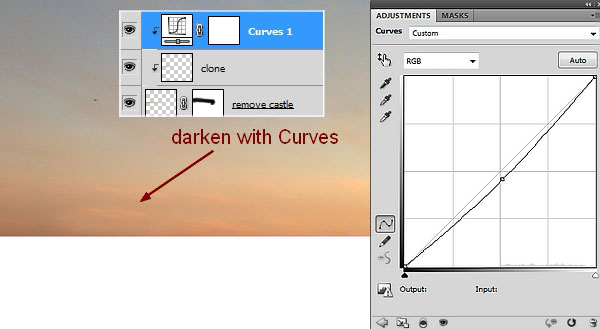
Make a new layer with Clipping Mask for this layer. I found something I don’t like after previous step so I use Clone Tool (S) to fix it:
Go to Layer-New Adjustment Layer-Curves to darken this part a little:
Step 4
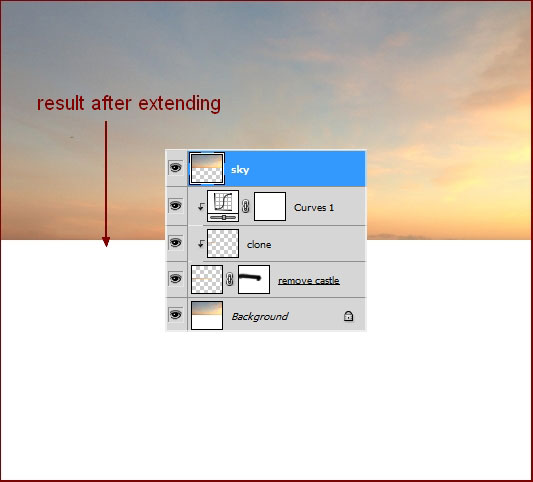
Hit Cmd/Ctrl+Alt/Option+Shift+E to merge all visible layers (background, remove castle, clone and Curves). I rename this layer as “Sky”. Choose Image-Canvas Size , extend the bottom (I double the height):

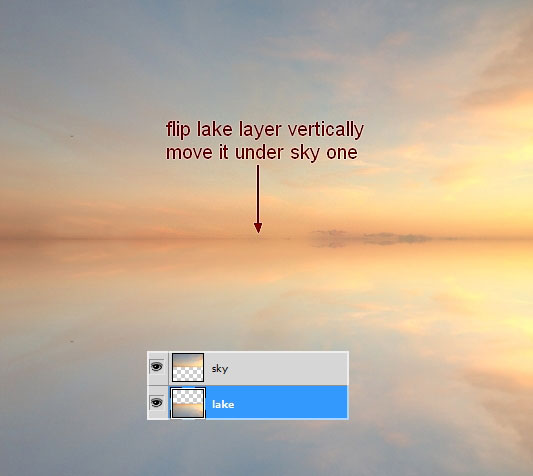
Duplicate sky layer. I rename the upper layer “sky”, under layer “lake”. On lake layer, choose Edit-Transform-Flip Vertical then move it under sky layer.
Step 5
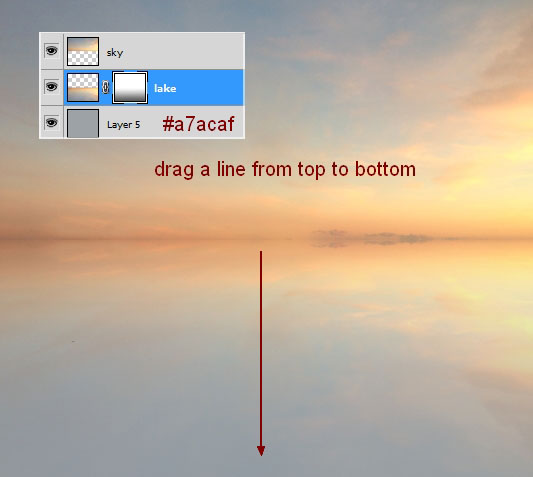
Make a new layer under the lake one. Choose Edit-Fill with a light cyan color picked from the top of sky (#a7acaf). This layer will be a base of the water. Then add layer mask to the lake one. On layer mask, hit G to active Gradient Tool. Choose Linear Gradient Tool with default colors (black and white):

Drag a line from the top to bottom of the lake to make sky reflection faded into the water:
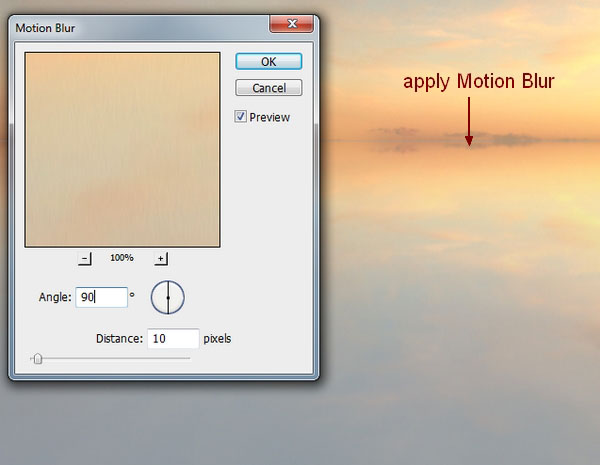
On lake layer, choose Filter-Blur-Motion Blur:
Step 6
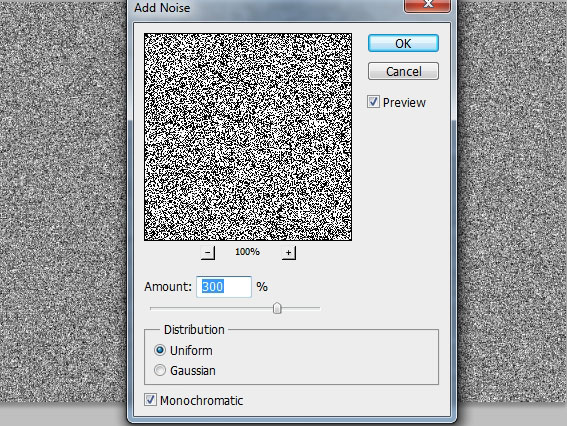
Now we’ll make a ripple texture that will be using to make reflection. Press Cmd/Ctrl+N to create a new document with 2000×1000 px and fill it with white. It’s better to work on the large size (depends on your document) as it will be cropped later. On background layer, go to Filter-Noise-Add Noise:
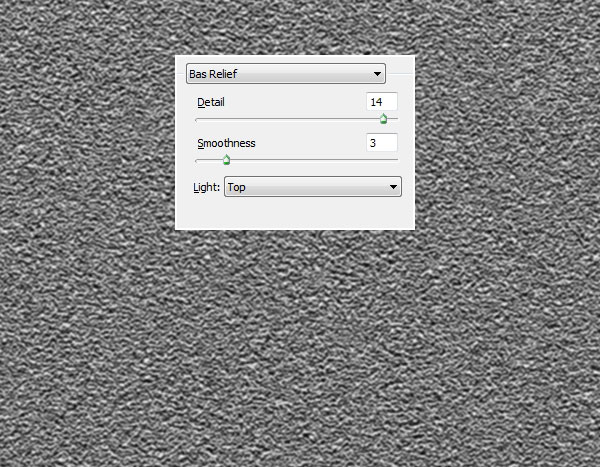
Make sure that foreground and background are set to black and white (so texture will be easier to see). Choose Filter-Sketch-Bas Relief:
Filter-Blur-Motion Blur to smooth the lines:

Duplicate this background layer then use Cmd/Ctrl+T to transform it:
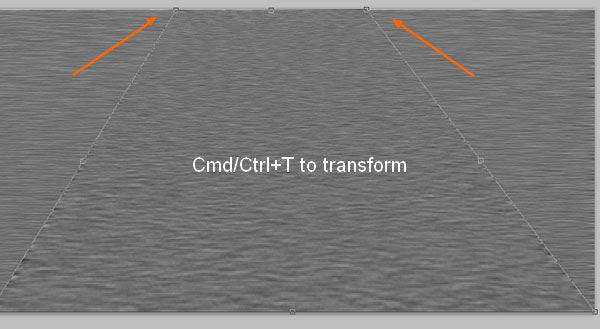
Then use Crop Tool to get a result below:
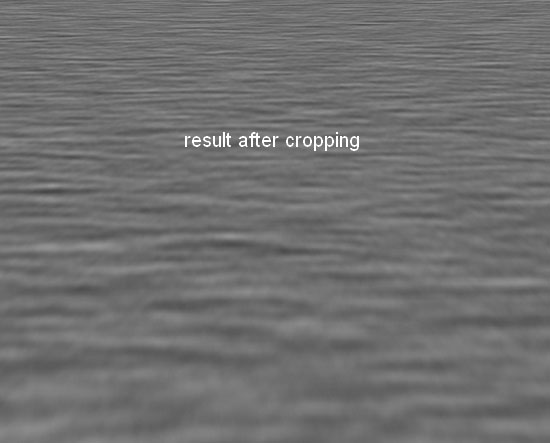
Save this file as a PSD and name it “ripple-texture” or whatever you want.
Step 7
Come back to our lake file. We’ll use Displace filter to make reflection. Hold Cmd/Ctrl while clicking lake thumbnail layer to load its selection (it’s very important, if you don’t choose, the result will look different).
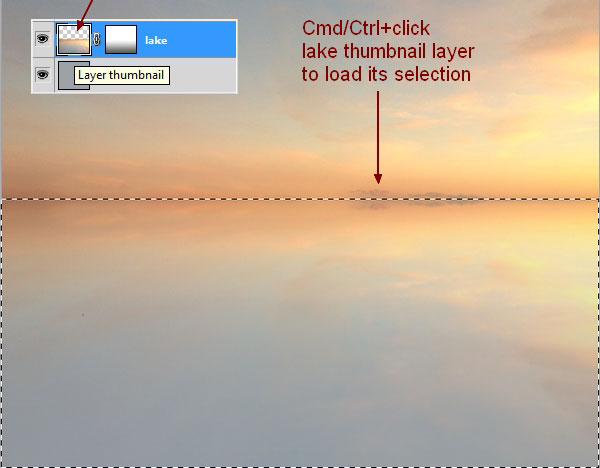
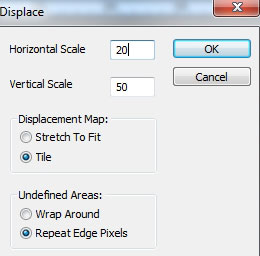
Go to Filter-Distort-Displace with settings like in screenshot below (if you want to ripple more your lake, increase the values) then browse the ripple-texture file:
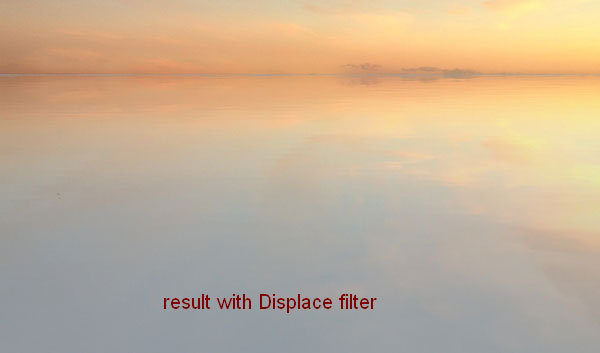
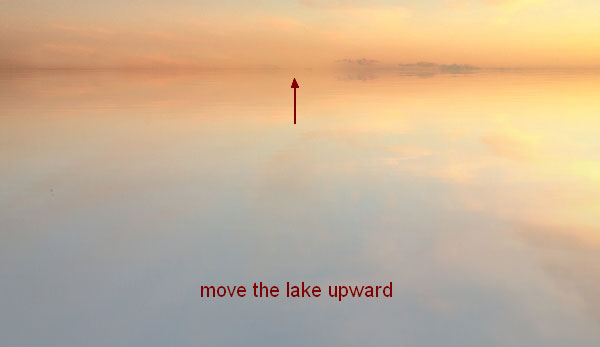
I move the lake upward a little to hide a cyan horizon line after this step:
Use Crop Tool to delete the bottom of the lake as we don’t need it anymore:
Your custom lake is done! Now you can add anything you want there.
Step 8
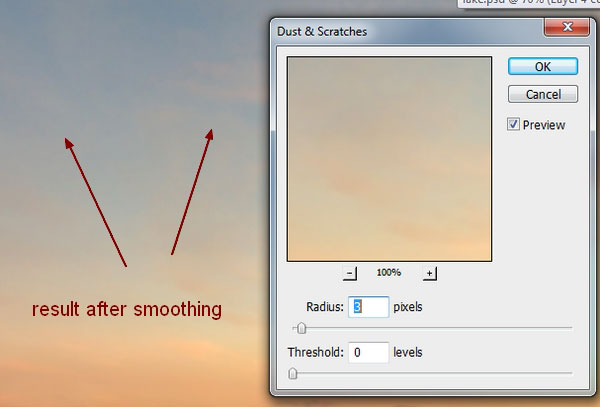
I want to reduce noise of sky so on sky layer, choose Filter-Noise-Dust & Scratches:

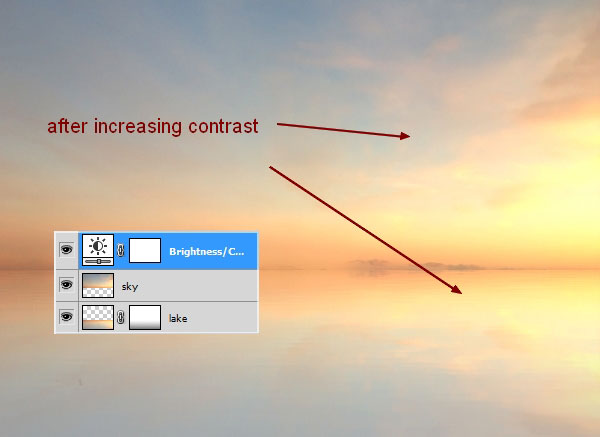
Step 9
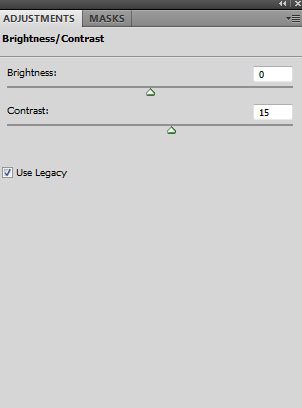
To increase the contrast of the picture, I choose Layer-New Adjustment Layer-Brightness/Contrast:
Step 10
Open bush stock. Extract the bush part only and move it into the left of horizon of the lake:


Duplicate this layer, apply Flip Horizontal (Edit-Transform-Flip Horizontal) then move it to the right. Use layer mask to remove the part below:

Name these layers “bush 1″, “bush 2″.
Step 11
Make a new layer and active Clone Tool. Choose grass brush, number 256 (bush one) to clone a part of the left as I don’t want the bushes at the two sides look similar:

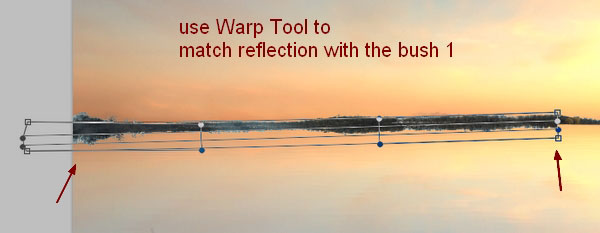
Step 12
In this step we’ll make reflection for the bushes. Duplicate bush 1 and clone layer and flip them vertically. Move them under bush 1 one and merge them. Use Warp Tool (Edit-Transform-Warp) to match the reflection with the bush 1:
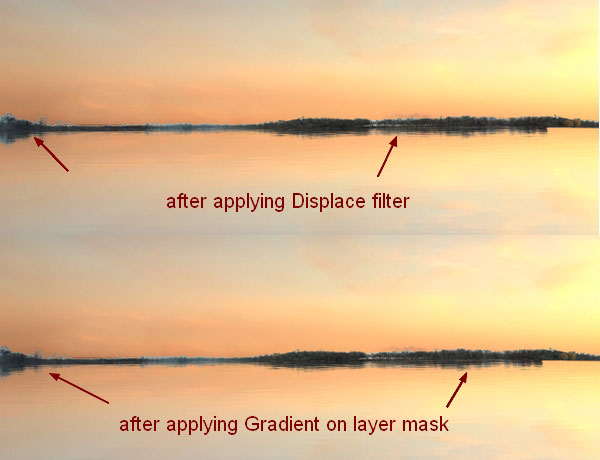
Apply Motion Blur as done with the lake. Load its selection, then go to Select-Modify-Expand and fill the number 15. Click to active any selection tools (Retangular Marquee Tool, Lasso Tool, Magic Wand Tool) then you can move this selection downward:


Apply Displace filter as done in a previous step but with Horizontal and Vertical Scale are 10 and 30. Apply Linear Gradient on layer mask:

Step 13
Do the same to make reflection for bush 2. Then use layer mask to get the result below:

Step 14
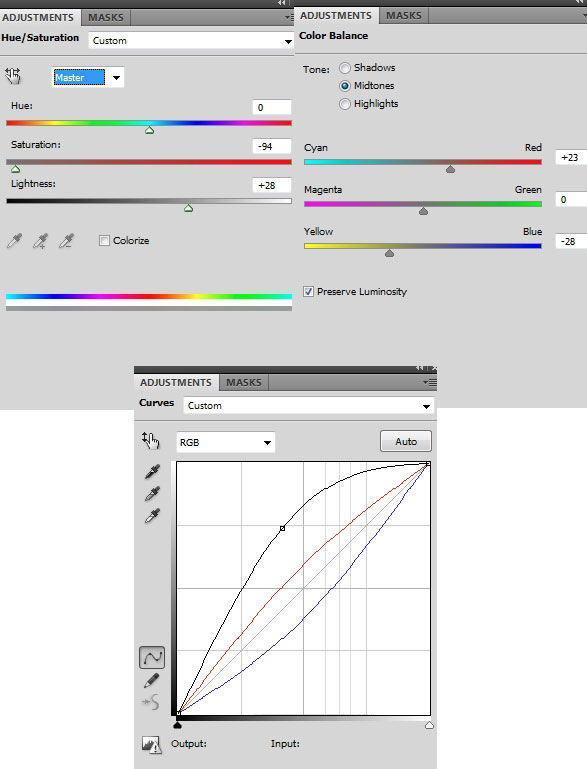
Make all bush layers and clone one selected, then hit Cmd/Ctrl+G to make group for them. Change the mode of this group from Pass Through (default group mode) to Normal 100%. Make some adjustment layers within this group (Hue/Saturation, Curves and Color Balance):

Because the mode of this group changed to Normal 100% so these adjustment layers only affect the bush and their reflection ones.

Step 15
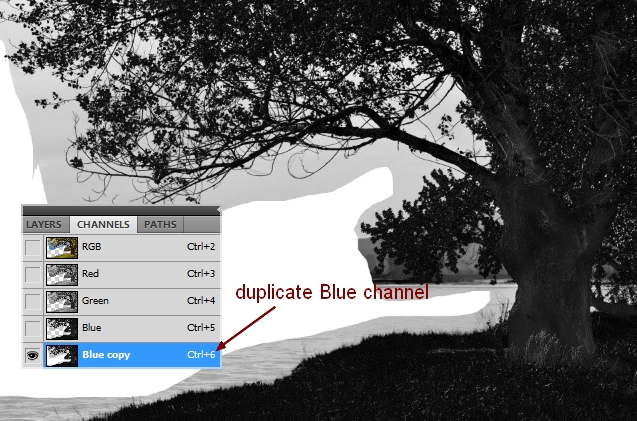
Open tree stock. First I use Lasso Tool to make selection around tree part (don’t need to be precise), then press Cmd/Ctrl+J to duplicate this selection:

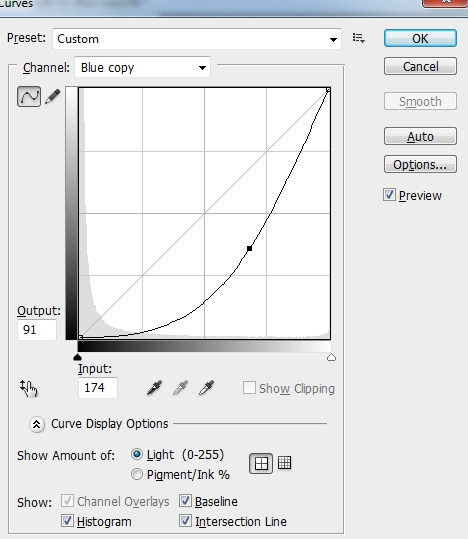
Hide background layer. Choose Channels on Layer Pallete, then right click Blue Channel, choose Duplicate Channel :
Press Cmd/Ctrl +M to open Curves window and down the lightness:


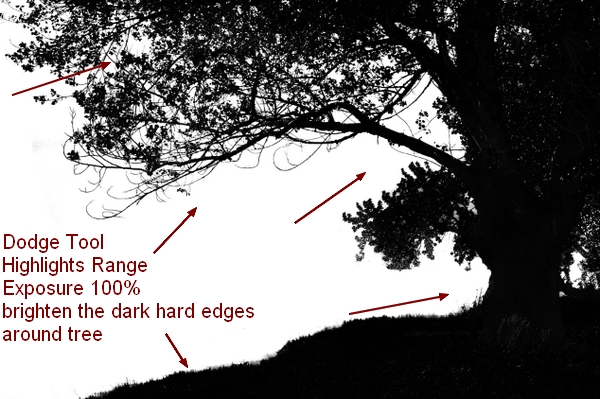
Now active Dodge Tool with Highlights Range, Exposure 100% to brighten the dark hard edges around the tree. Decrease brush size when you come close to and between tree edges:
Open Curves window and down the lightness again:
Use Dodge Tool to remove any dark edges remained and here is my result:

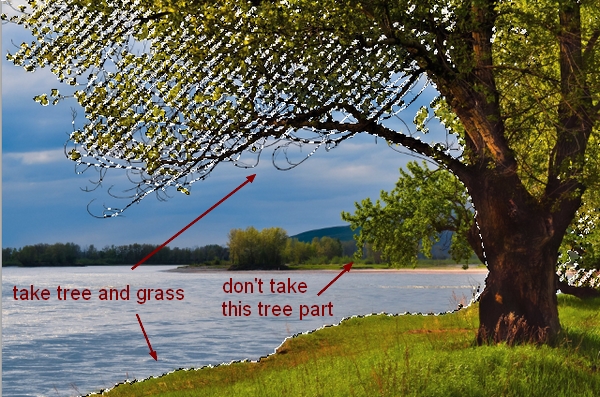
Hit Cmd/Ctrl+Alt/Option +6 to load blue channel copy selection then choose RGB channel. Hit Cmd/Ctrl+I to invert this selection then choose feather for this as 0,5. Press Cmd/Ctrl+J to get an extracted tree:


Move the tree +grass (you can see I don’t take the whole tree) and place it into our lake file, flip it horizontally and move to the left corner:

Step 16
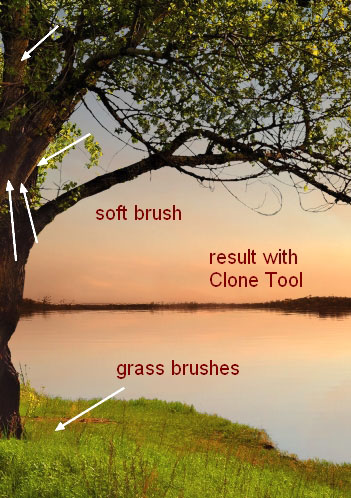
There is something wrong with light and shadow on the tree that don’t match with our main light source (from the right of sky) so I make a new layer (Clipping Mask) and use Clone Tool to fix them. For the part beside the tree root I use grass brushes (number 360, 354), for the parts on the branches I use soft brush:

Step 17
Open tree stock again. Copy a part from the trunk there and paste it into our lake document to fill a part below then use layer mask to blend it with the rest:

Step 18
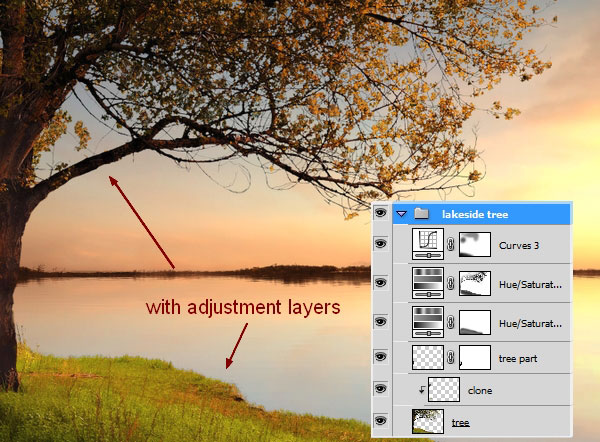
Make group for the tree and clone one as done with the bushes. I create two Hue/Saturation layers and a Curves one to match the color and brightness of the tree and grass with the background:

On the first Hue/Saturation layer mask I use soft black brush with opacity and flow 50% to erase the grass part as I don’t want it reddened:

On the second I use soft black brush with opacity and flow varied from 60 to 100% to blur or remove dark effect on the tree and grass edges which get the light from sky:

On the Curves layer mask I erase the right part of the tree and grass part near foreground:

Step 19
Extract the bridge from original stock and place it at the left side of the lake. I set this layer under the tree group:

Step 20
Make reflection for bridge as done with another subjects, but I lower opacity to 90%:

Step 21
Make group for lake and its reflection then I use a Curves layer to add some red-orange tone and brighten them. I use brush to reduce this effect on some parts of the bridge:

Step 22
Make a new layer (within this group), I use brush with color #fffca8 to paint on the top of bridge to brighten them more (you should load bridge selection before doing it) and set the mode to Overlay 100%:

Step 23
Cut out the swan 1 and move him/her onto the lake surface and use layer mask with black brush, hardness about 80-90% (don’t use soft brush in this case) to blend him/her with the water:

Make reflection for swan 1:

Step 24
To add more light to swan 1, I use Layer Style. Double click swan 1 layer, choose Inner Shadow:


Right click swan 1 layer, choose Copy Layer Style then right click swan 1 reflection, choose Paste Layer Style:

Step 25
Add swan 2 to the right of the lake, place him/her further from lake shore, make refection for him/her:

Step 26
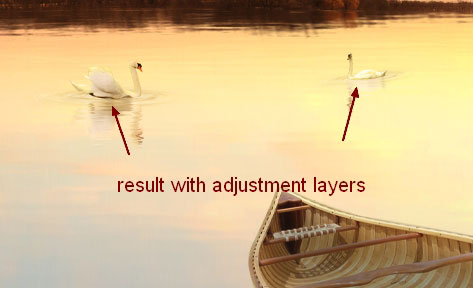
Make group for swans and their reflections. Change color of them with Color Balance, Photo Filter and Curves:

I erase the swan 2 on Curves layer mask:

Step 27
Make a new layer (within this group), I use brush with color #fff09b to paint on swans and change the mode to Color 100%. This step is to add some bright yellow to the swans:

Step 28
Isolate the boat and position it at the right corner of our picture then make reflection for it:

Step 29
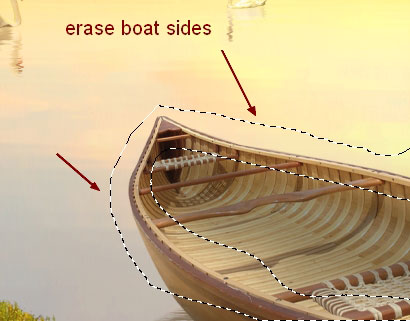
Make group for boat and its reflection. Use Hue/Saturation and Curves to change their color and brightness:

I erase the sides of the boat as they should be brighter (catch light from sky):
Step 30
On a new layer within this group, I use soft brush with color #fffca8 to brighten the boat sides. Put the mode of this layer to Overlay 100%:

Step 31
Drag ripple image into our canvas and set this layer under tree group. Use Cmd/Ctrl+T to transform and position it under swan 1. Use layer mask to remove rough edge then duplicate it, make it smaller. Hide unwanted parts to get the result below:

Make ripple for swan 2:

Step 32
Group all ripple layers and use Hue/Saturation, Color Balance and Curves to make color and brightness blended with the water:
Name this group “ripples 1″.
Step 33
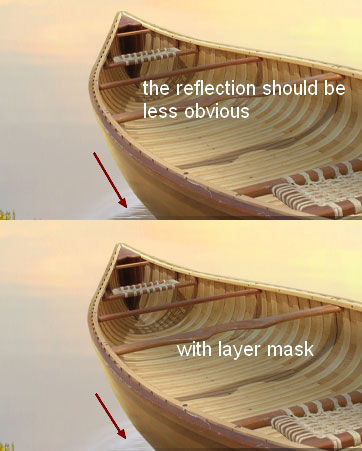
In this step we’ll make a subtle ripple for the boat. I don’t add it to ripples 1 group as color of the water under the boat is different from the water under swans. Place ripple stock above ripple group and transform it to fit the movement of the boat, then change the mode to Screen 100%. Use layer mask to remove hard edges:

The boat reflection under the ripple should be less obvious so I add layer mask to this layer and use black brush to blur it:
Step 34
Make some adjustment layers (Hue/Saturation, Curves) with Clipping Mask for the boat ripple:


Step 35
Cut out the bench and position it near the tree and use grass brushes to blend it with the grass:

Step 36
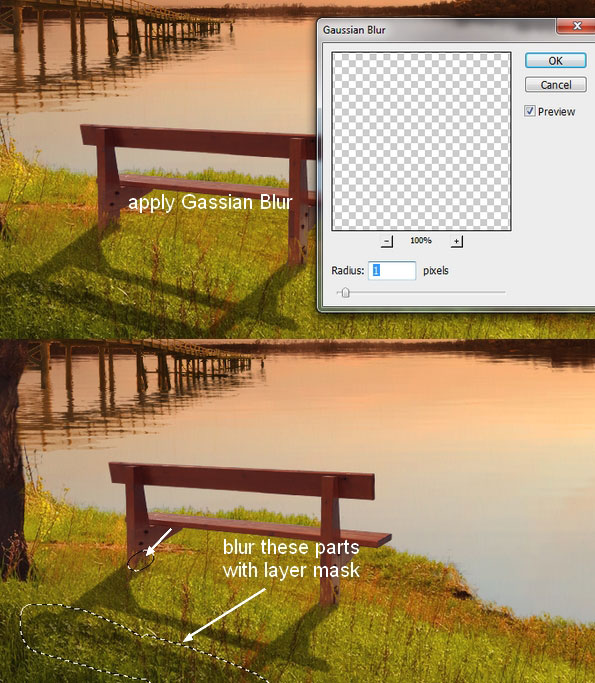
Make a new layer under the bench one. Load bench selection then fill it with black. Flip it vertically, use Cmd/Ctrl+T to transform and move it under the bench feet then lower opacity to 40%:

Go to Filter-Blur-Gassian Blur, choose radius as 1 px then use layer mask to blur the top of this shadow and the left edges:
Step 37
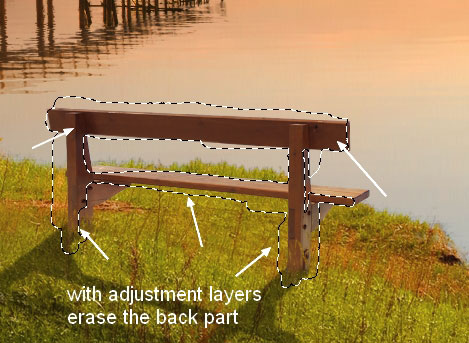
Use Hue/Saturation and Curves (Clipping Mask) to reduce saturation and brighten the bench:

I remove bright effect of the back part of the bench as it’s hidden from the light (on Curves layer mask) and create a nice contrast for it:
Step 38
Create a new layer (Clipping Mask) and use brush with color #f0c194 to paint on the front of the bench. I change the mode to Overlay 100%:

Step 39
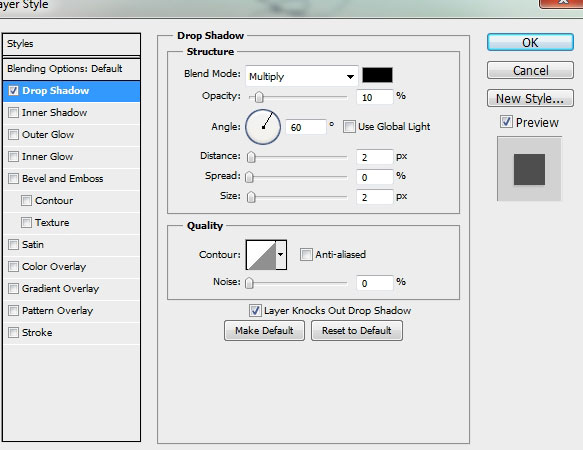
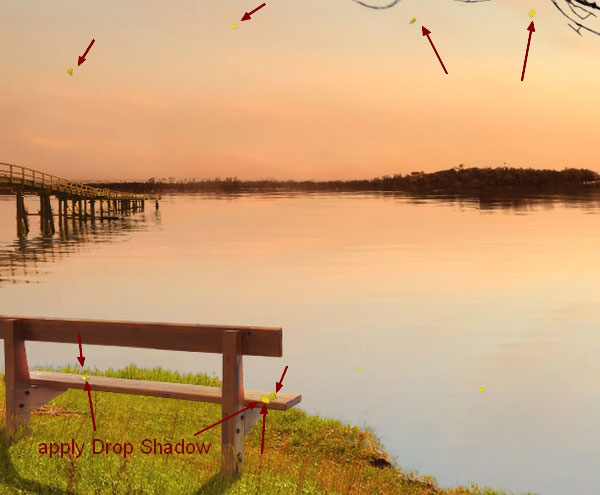
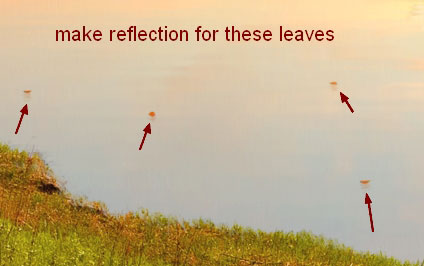
Open tree stock. Copy some leaves from this tree and position them on the water, bench, in the boat, near the tree root or make them look like falling, use Cmd/Ctrl+T to transform if needed. You should choose the bright leaves to work with. With the leaves on the bench, in the boat, I apply Drop Shadow for them:


Step 40
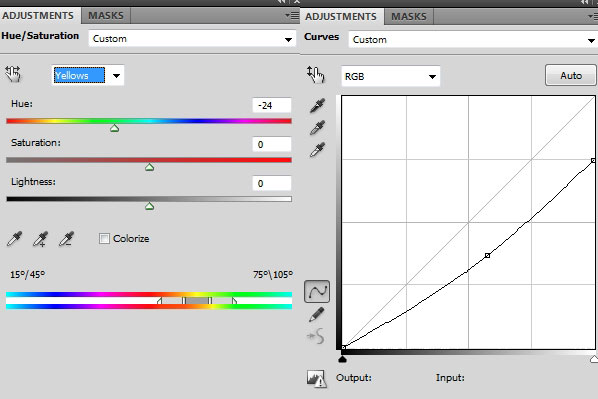
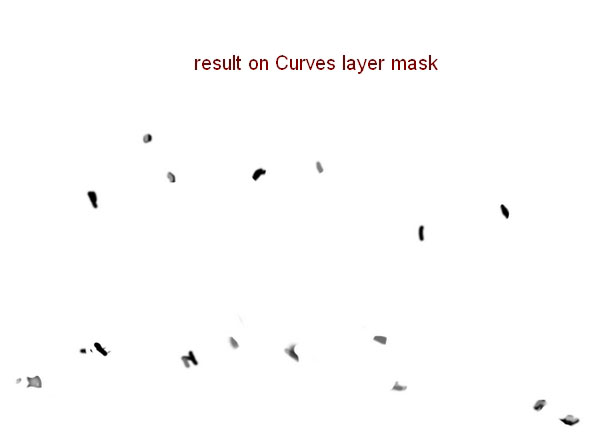
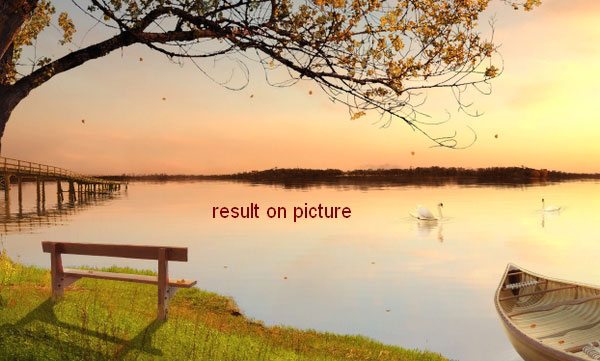
Make group for leaves layers. I use Hue/Saturation and Curves to adjust color and brightness of the leaves:
I use black brush to erase or blur dark effect on some leaves as the screenshot below shows:
Step 41
Make reflection for the leaves on the water:
Step 42
Make a new layer on the top, change the mode to Overlay 100% and fill with 50% gray:

Take Dodge and Burn Tool with Midtones Range, Exposure 20-30% to fix light and shadow on the tree. You can see how I applied this tool with Normal mode and result with Overlay mode:


Step 43
In this step we’ll increase the contrast for overall picture. Create a new layer and active Radial Gradient with default colors (black and white) and change the mode to Soft Light 100%:

I use layer mask to reduce or remove dark contrast on some parts below:

Step 44
Create some adjustment layers on the top:
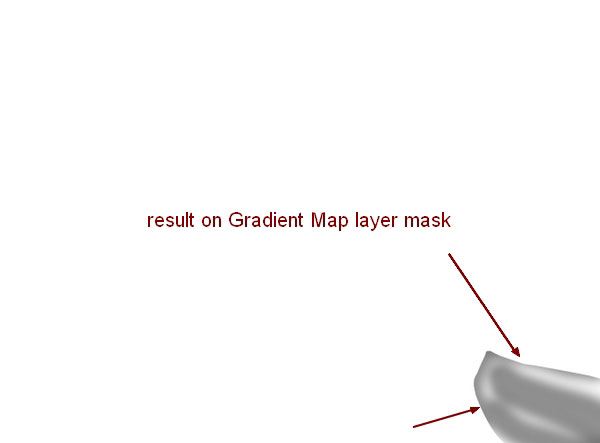
Gradient Map:
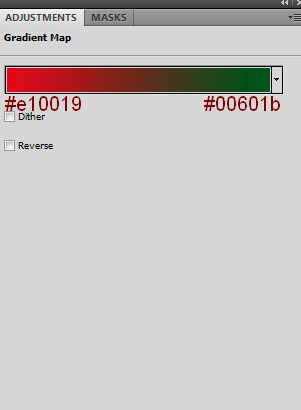
Set this Gradient Map layer to Soft Light 100%.
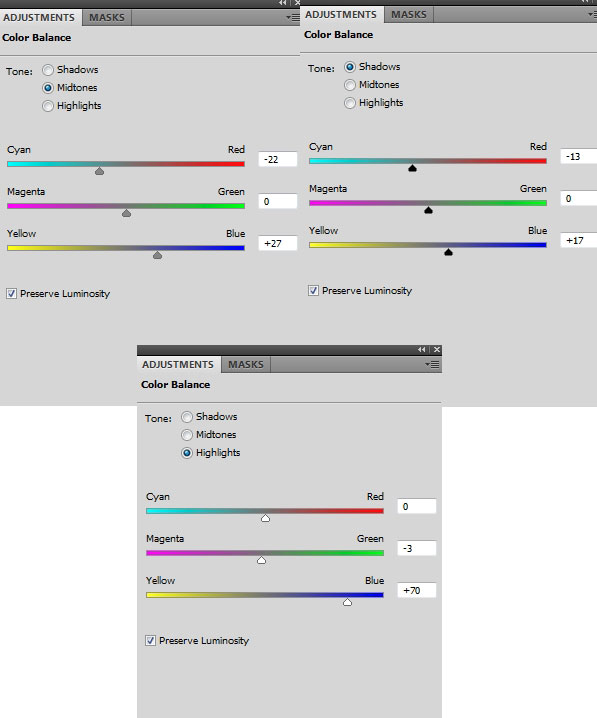
Color Balance:
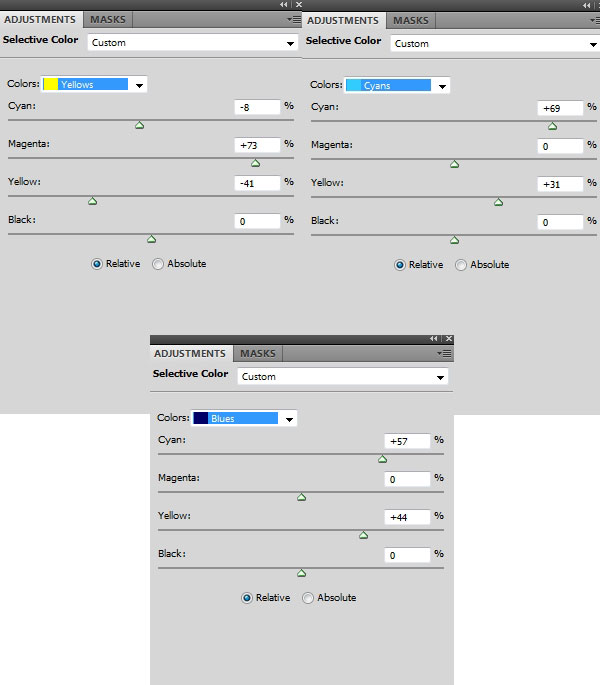
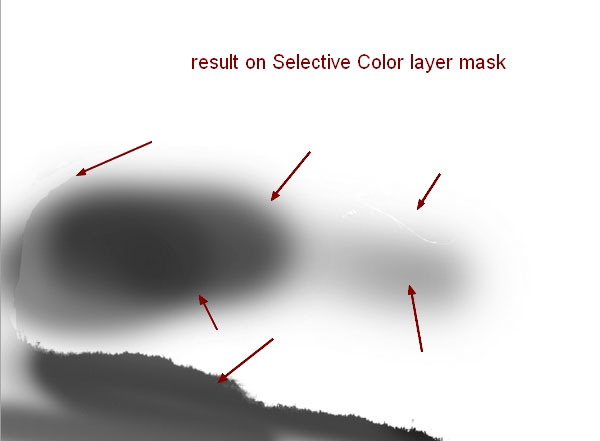
Selective Color:
On Gradient Map layer mask I use brush with opacity and flow about 50% to erase the boat:
On Selective Color layer mask I erase grass part, tree and the right of sky:
Step 45
Continue with another adjustment layers (Levels, Curves and Hue/Saturation):
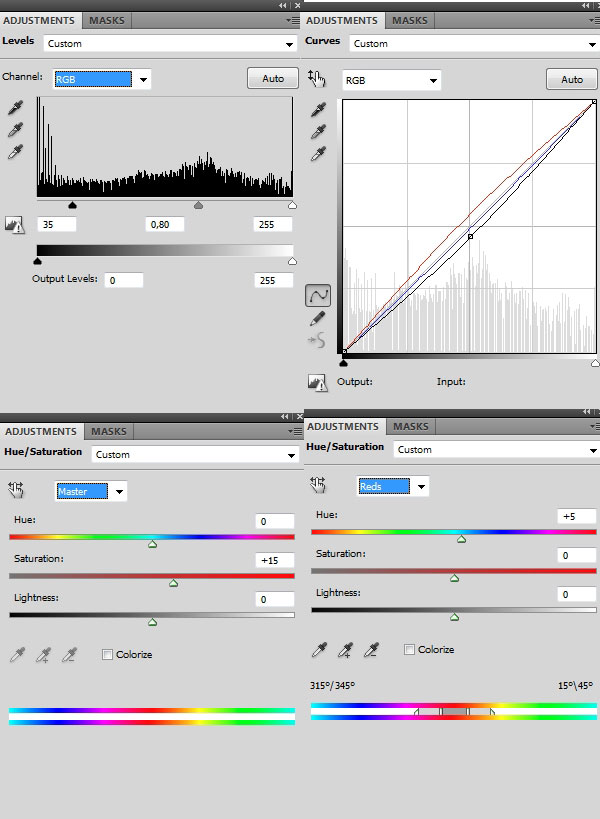
On Levels layer mask I use black brush to reduce or remove dark contrast of bridge, the bushes, the swan 1 and the bench:

Step 46
Create a new layer, load tree, boat and bench selection. Use brush with color #ff874c to paint on the grass edges, the bench and the boat sides. Then change the mode to Overlay 100%. This step is to add some color reflection from sky to these subjects:

New layer again I use same brush to paint on grass edges and put the mode as Color 100%:

And We’re Done!
You can view the final outcome below. I hope that you enjoyed this tutorial and would love to hear your feedback on the techniques and outcome.
Member File Download
Download the original .psd file for this tutorial here:

 Members Area Tutorial: Create a Cat in a Magical Pond Scene Photo Manipulation
 Members Area Tutorial: Create A Dark Ghostly Scene Photo Manipulation
 Members Area Tutorial: Create a Fantasy Halloween Witch Cat Photo Manipulation

Absolutely love the final product. Thanks for making this look so easy!
Thanks so much for the feedback Gary, I’m so glad that you enjoyed this tutorial. Were you able to create your own outcome?