
Members Area Tutorial: Follow Along With a Professional Beauty Retouching Process
Are you new to photo retouching?
It can be a pretty daunting process to start with, so it’s definitely help to follow along with a real workflow and learn by doing.
Today we will be focusing on a portrait that we will be beautifying and manipulating with some handy retouching tips. We will first concentrate on improving the overall look of our model image and then from there we will build off of the foundation that we have created to add some cool effects. We will combine photography with textures, custom brushes, vectors and 3d elements to create a unified design.
Many of the techniques that we are going to be covering can be applied to almost any portrait and in most cases probably should be used especially when you are working with a raw image that hasn’t undergone any post-production work.
Let’s dive right in!
Resources Used In This Tutorial
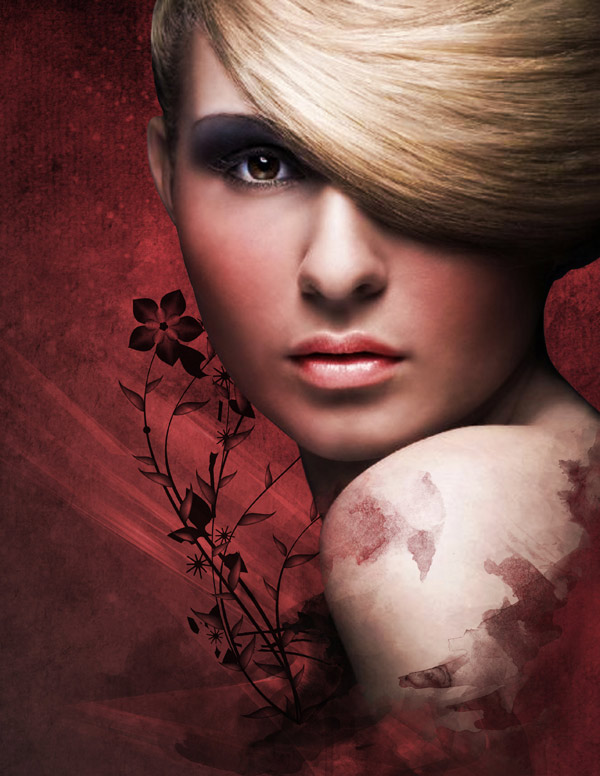
Final Image
Here is a preview of the image that we are going to be creating:
Step 1
To start things off we will open our portrait image from the resources folder, which is a free image courtesy of Morguefile.com.
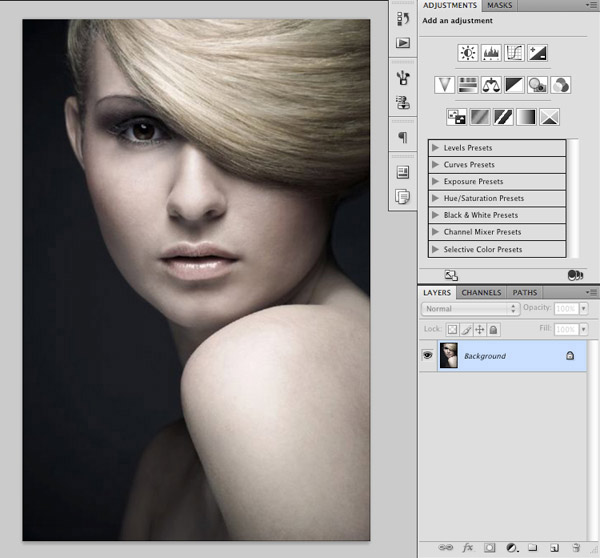
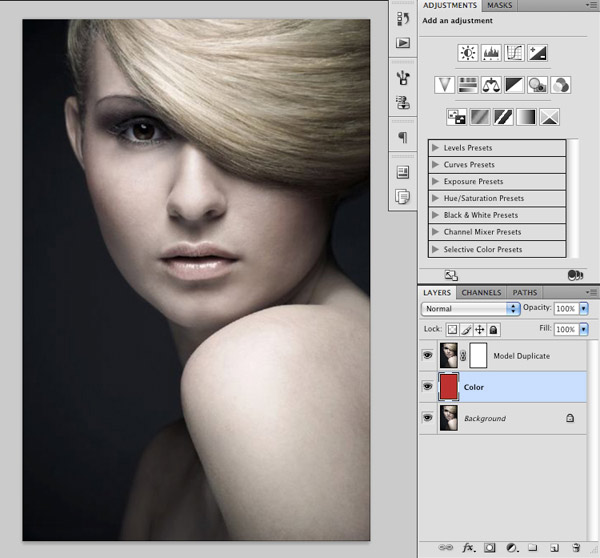
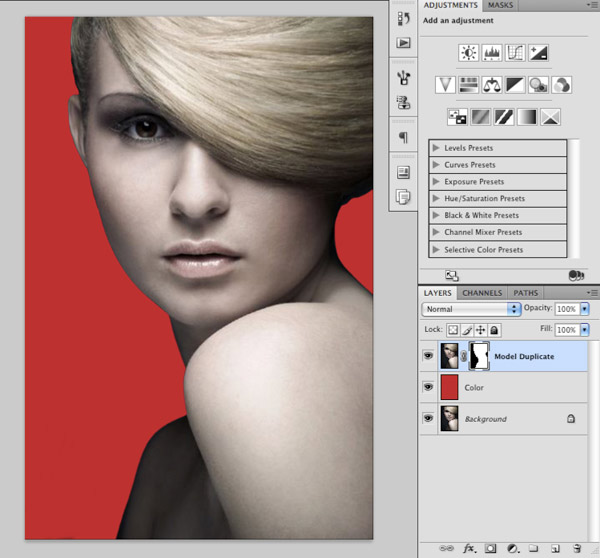
The first thing that we will do is press Command/Ctrl + J to duplicate the original layer so that we can work from a copy just in case.

After you’ve done that we want to add a layer mask by clicking the icon highlighted at the bottom of the Layers Palette as shown below:

Hopefully you guys are plenty familiar with Layer Masks but I always look to keep things as simple and straightforward as possible so that users of all levels can follow along.
Next, create a new layer and place it between your original and duplicated layers. You can pick any color you like here but I want to use something on the brighter side so that as we begin to mask out our model we can clearly see our progress. Simply fill the new layer with your color using the Paint Bucket Tool (G) or by first selecting your color and then pressing Alt/Option + Delete with your layer selected. This is a quick shortcut command that will automatically fill your layer with your foreground color.
If we were to use a gray color or something too similar to the background of the original image we are more likely to miss certain parts and not get the clean cut out that we want.
Step 2
Switch to your Brush Tool (B) and using a hard round brush with a solid black color, begin to silhouette the portrait by painting into the layer that is attached to the Layer Mask. Luckily this image has mostly sharper edges so it makes this step fairly easy. I still like to zoom way in to ensure a nice clean cutout.
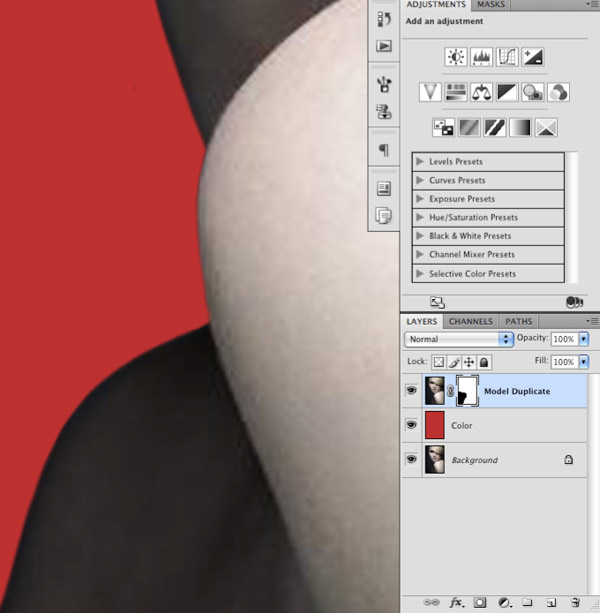
Once you have silhouetted your image you should be able to see the colored layer underneath as shown below:
Step 3
Because our image is tall but rather narrow, I’m going to add some extra space on the left side. To do this, we want to go to the Image Menu and choose ‘Canvas Size’.

Normally when you change the height or width values in this dialog box it will add room on both sides, but in this case we ONLY want to add space on the left. To make this happen we will select the middle right box as I have indicated here:

Next, change the width to about 11 inches so that we have a document that is roughly A4 size.
Press the Enter Key or click ‘OK’ to apply the changes. Now you will notice that we have this big empty white space where our canvas has been extended.
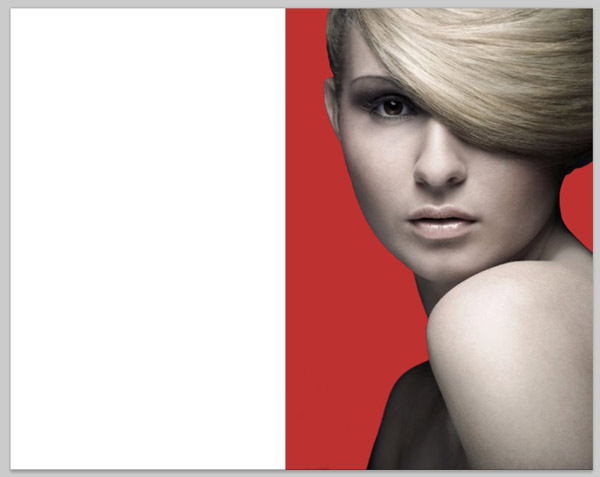
Select your color layer that should be between your silhouette and the original image and press Command/Ctrl + T to initiate a Free Transform Command. Grab the left handle of the color layer and drag it all the way out so that the color fills the entire background.
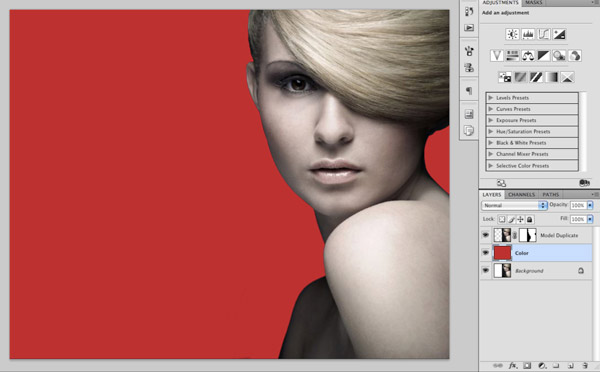
We may end up cropping some of this off later on but it gives us a nice amount of breathing room so that the image doesn’t feel so confined.
Step 4
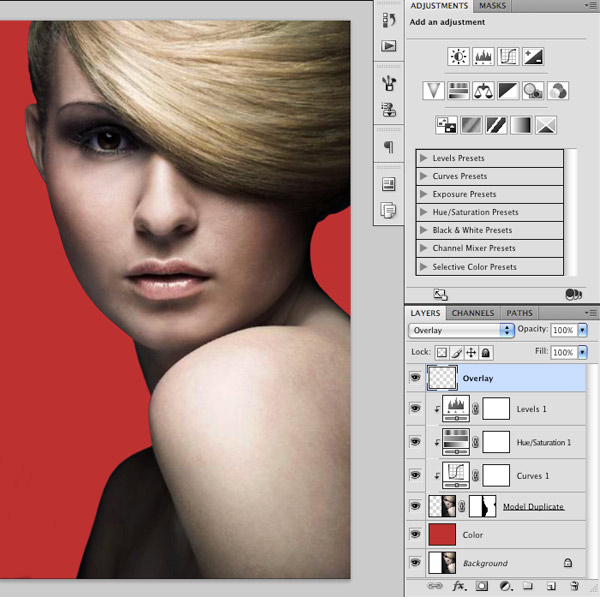
The next thing we are going to do is add a few Adjustment Layers to our model portrait to help bump up the contrast and values a bit further. With your model layer selected, click on the Adjustment Layer Icon at the bottom of the Layers Palette and then choose ‘Levels’ from the pop-up menu that appears.
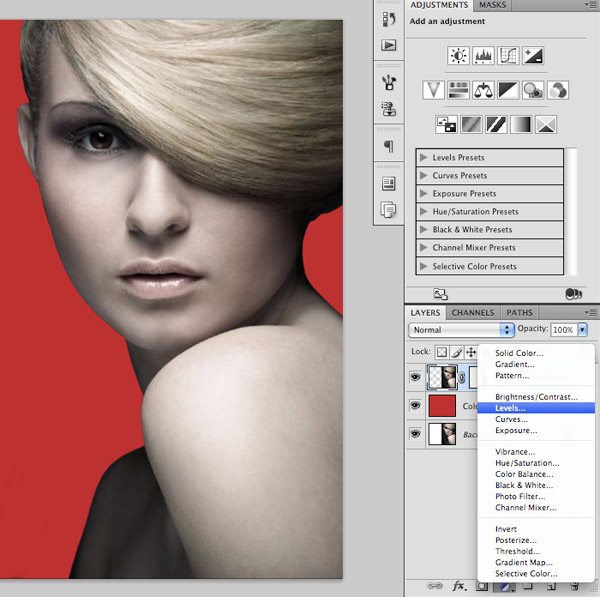
Once the dialog box appears move the middle slider to the right slightly so that it’s set to about ‘0.89’ as shown below:
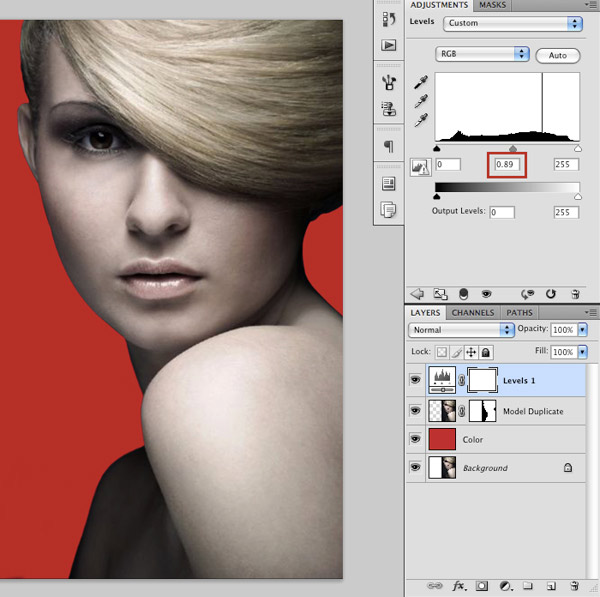
After moving the slider, hold down the Control Key and click on the Levels Adjustment Layer in your Layers Palette. You should now see a dropdown menu where you will want to select ‘Create Clipping Mask’.
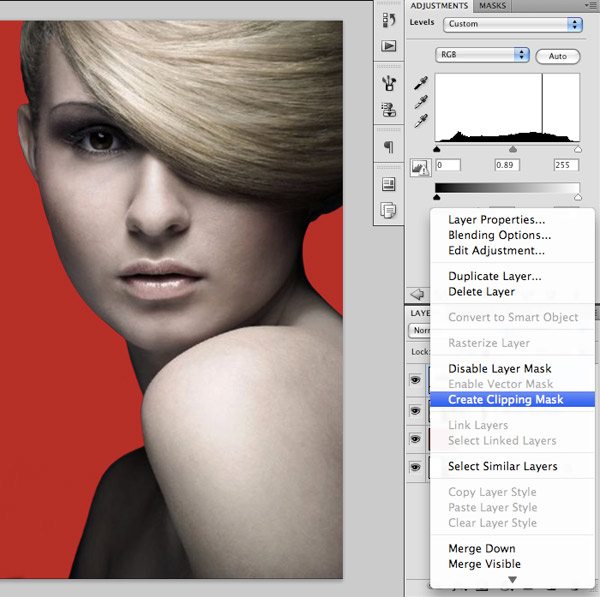
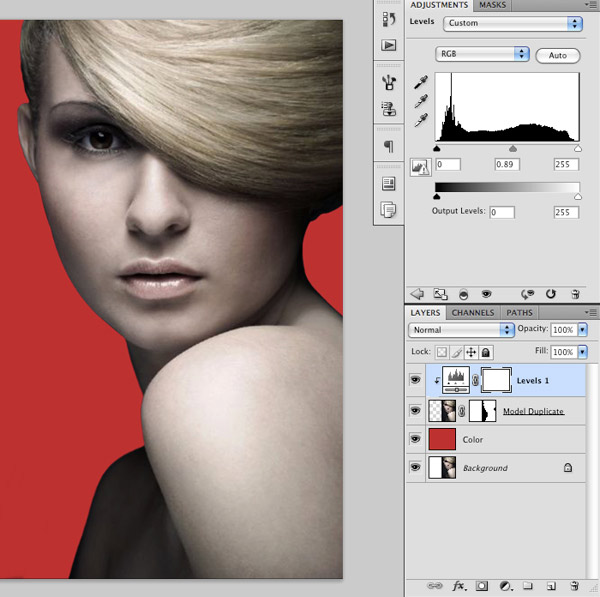
Once you’ve applied the Clipping Mask you will see a little arrow on the Levels Adjustment indicating that it is only affecting the layer directly below it. This is a great way to ensure that your adjustments are contained within a certain area rather than EVERY layer below.
Step 5
Select your model layer once again in your Layers Palette.

Return to the Adjustment Layers Icon at the bottom of your Layers Palette and this time select ‘Hue/Saturation’.

Once the dialog box appears move the middle Saturation slider to the right so that it’s set to about ‘34’ as shown in the image below:

By first selecting our model layer before we add an Adjustment Layer we can create a nested Adjustment Layer that will automatically be given a Clipping Mask. You will notice how this layer is kind of sandwiched in between the two layers and has the same little arrow icon as our Levels Adjustment Layer.
Step 6
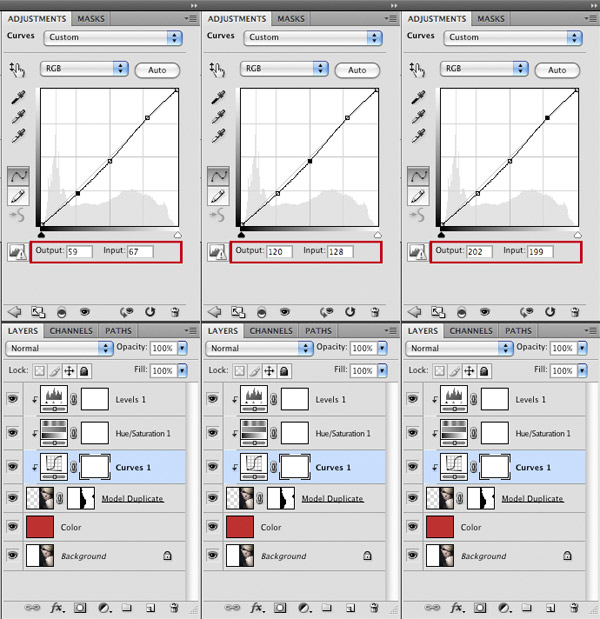
Repeat the previous step to add a Curves Adjustment Layer that will also automatically have a Clipping Mask applied to it.
Create three points on your Curves Adjustment Layer – one in the middle, one in the upper quadrant, and one point in the lower quadrant. For each of these points, make sure that you have the same Output and Input settings as the image below:
Step 7
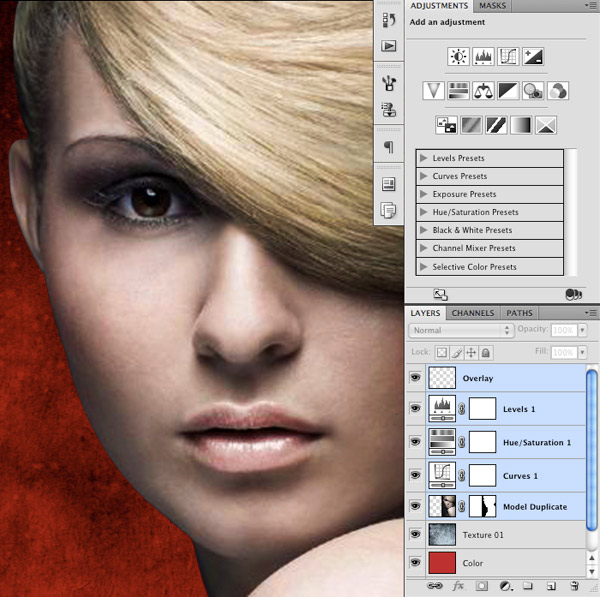
Create a new layer at the top of your Layers Palette and change the Blending Mode to Overlay.
Switch to your Brush Tool (B) and select a soft round brush with a solid white color and reduce the opacity to about 20%. A quick way to do this is to simply press the number 2 on your keyboard. The number keys vary the opacity setting of our brush by increments of ten, and by holding down the Shift Key while you do this you can instead control the Flow Settings. For now, we are going to leave the Flow Settings alone, but this may come in handy later on.

On your new ‘Overlay’ layer use your low opacity white brush to lightly go over the lips, the eye, and a little bit of the forehead just above the eye as shown below:

At this point we have added three Adjustment Layers and an Overlay Layer but you can already see a noticeable difference in the image.
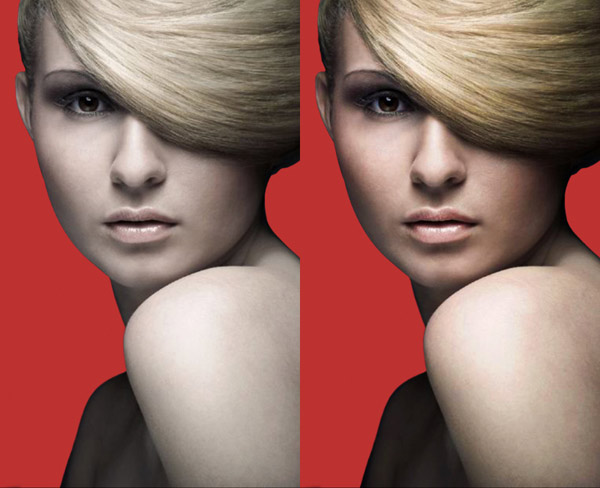
The original image on the left seems insipid and lifeless in comparison with the more saturated and higher contrast result on the right. We didn’t have to go too far with these adjustments except for the Hue/Saturation Adjustment Layer so you can see that for the most part a little goes a long way. We want to make the image believable and to bring life back into it so that it pops off of the screen.
Step 8
Next, open up the first texture image from the resources folder shown below:
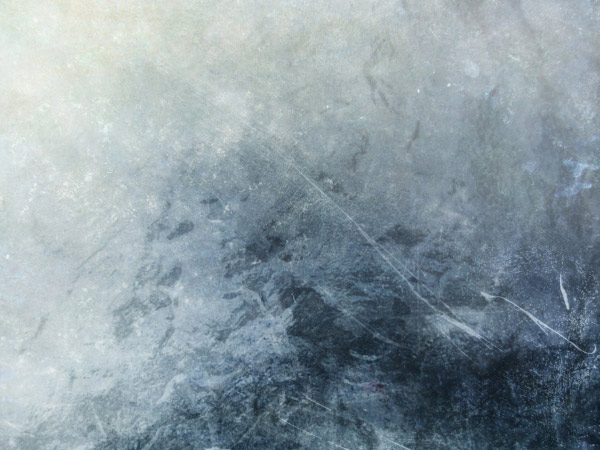
Bring the texture image into your working document and place it just above the colored background layer. You may have to do a quick Free Transform (Command/Ctrl + T) in order to expand the image so that it covers the entire background.
Once you have done that, change the Blending Mode of the texture layer to Multiply. You should now have something like this:

Step 9
Select the model layer and then hold down the Shift Key and select the top Overlay Layer as shown in the image below:
Once you have all of these layers selected, drag them (as a group) down to the New Layer Icon at the bottom of the Layers Palette to duplicate them.
After copying these layers, make sure that they are all still selected and press Command/Ctrl + E to merge them together. You should now have a copy of your model layer with the Overlay Layer and Adjustment Layers all merged together.

Step 10
With your newly merged layer selected, go to the Filter Menu and select Other>High Pass as shown here:

Next, apply a setting of about 9 pixels and press OK to apply the changes.

Step 11
With the same layer selected, return to the Filter Menu and this time choose Blur>Gaussian Blur.

When the dialog box appears, we are now going to apply a setting of about 3 pixels. A good rule of thumb is to use 1/3 of the amount of blur that you apply for the High Pass, and in this case since we used 9 pixels for the High Pass Filter, we are going to use a Gaussian Blur of 3 pixels.
Once you have done that, press OK once again to apply the blur.

Next, go to the Image Menu and choose Adjustments>Invert as shown here:

After inverting the image, change the Blending Mode of the layer to Overlay and reduce the opacity to about 50%.

Step 12
Hold down the Alt/Option Key and select the Layer Mask Icon at the bottom of your Layers Palette. By holding down the Alt/Option Key the mask will automatically be inverted, so as a result you will see the image before any of our High Pass or Gaussian Blur settings were applied. This will make it so that we can brush the effect back IN as opposed to subtracting it from our image.

Switch to your Brush Tool (B) and select a low opacity soft round brush with a solid white color as your foreground color. Next, begin to paint over the skin making sure to avoid the edges of the image as well as the eyes, nose, and lips. As you paint you will now notice that the areas that you are painting over will be revealing the softer skin that we created before applying the inverted Layer Mask.

Here I have also brought up my opacity up 25% from 50% to 75% because the skin of our model is a bit bumpy so in order to really see the effect we need to raise the opacity a bit higher. Feel free to experiment with this until you find a setting that you are happy with. We don’t want to completely remove the skin texture, but my making it look softer it gives our image a more polished look.
Step 13
Create a new layer at the top of your Layers Palette and select a red color such as #CA001E as shown in the image below:

Switch to your Brush Tool (B) and make sure that you have a low opacity soft brush selected.

Change the Blending Mode of your new layer to Soft Light and paint over the lips with your soft brush to apply some lipstick to the model. You may wish to clean up some of the edges a bit and play around with an opacity setting that looks natural for the best results. I find that something between 60-80% works best for this particular image.

Add another layer and use this same technique to apply some eye shadow. This time I have used a Blending Mode of Multiply with a bluish color to get a sultry and sexy look. For this layer I am currently using a transparency of about 80%.

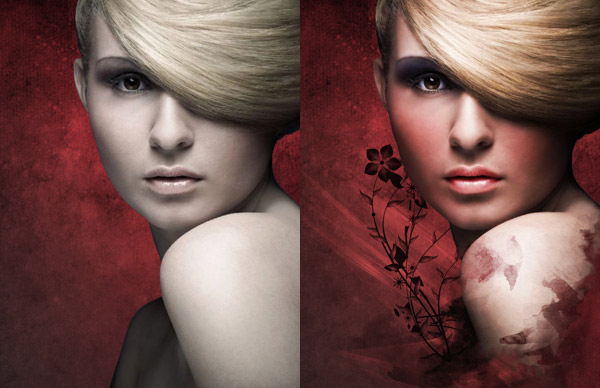
This seems like a good spot to make sure that you have saved your work so far if you haven’t already been doing so. Let’s take another look at the image we started with compared to where we are at the moment:

We have already made this image look about ten times better than the original, so hopefully you are still following along with me! Most of the touching up and beautifying is good at this point so we can now start to focus on some other areas of the design.
Step 14
Switch to your Gradient Tool (G) and select a Radial Gradient that fades from solid white to transparent as shown here:

Next, create a new layer just above the texture layer in your Layers Palette.

On your new layer, click and drag outwards to create a white Radial Gradient.

Change the Blending Mode of the gradient layer to Overlay and place it towards the right side of the canvas, behind the head of the model. This will help to add some contrast and a lighter halo effect around the image.

Step 15
Use your Eyedropper Tool (I) to sample a deep red color from the background such as #210B0B.

Switch back to your Gradient Tool (G) and this time select a Linear Gradient that fades from your deep red color to transparent as shown here:

Create a new layer just above your background Overlay Layer and then click in the bottom left hand corner and drag towards the upper right hand corner to create your gradient. Change the Blending Mode of the layer to Multiply and you should then be left with a darkened bottom left corner similar to the image below:

By creating more contrast in the background we are making sure that we keep the viewer’s eye focused on the right side of the composition.
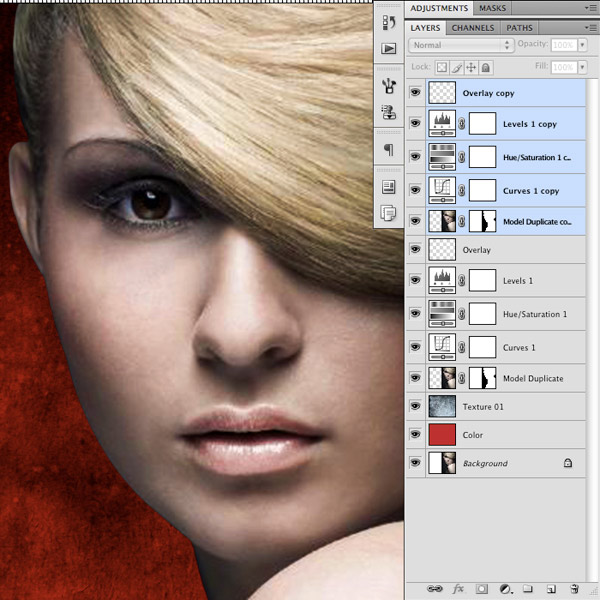
Step 16
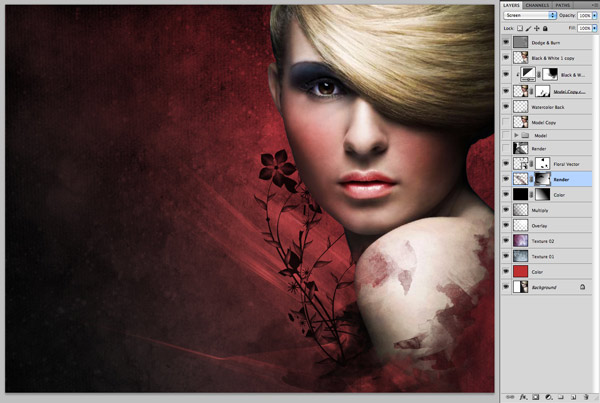
Next we will select the top layer in the Layers Palette and then hold down the Control Key and select the model layer. You should now have all of the layers connected to the model highlighted as shown in the image below:

With your layers selected, press Command/Ctrl + G to put all of the layers into a Group Folder.

Grab your newly created Group Folder and name it whatever you like. Drag the folder down to the New Layer Icon at the bottom of the Layers Palette to duplicate the folder.

Hold down the Control Key and click on the new folder to reveal a dropdown menu. From this menu, choose ‘Merge Group’ at the very bottom of the list.
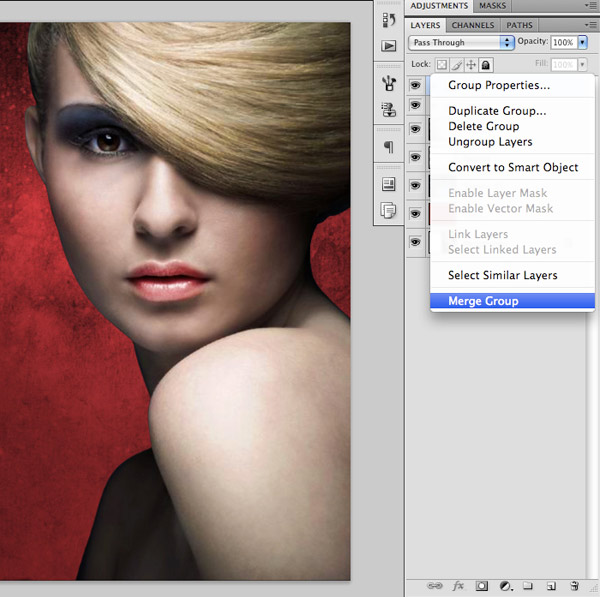
You can now turn the visibility of the original folder off since we will be working off of this merged copy.
Step 17
Next we want to create a new layer and place it at the top of the Layers Palette.

Hold down the Control Key and click on your new layer to reveal a dropdown menu. When the menu appears, click on ‘Create Clipping Mask’ as shown below:

Change the Blending Mode of the new layer to Multiply and name the layer ‘Blush’.

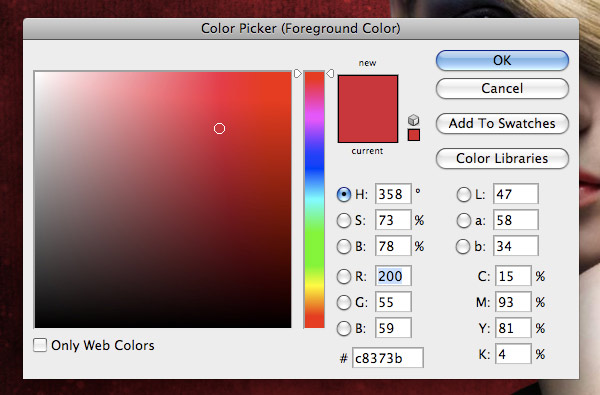
Select a nice red color such as #C8373B.
After picking your red color, switch to your Brush Tool (B) and make sure that you have a low opacity soft round brush similar to the settings I have applied here:

Now on your new layer start to paint over the cheeks of the model to add some blush. The layer is already set up for us with a Clipping Mask and is set to Multiply so we can just gradually add in some colors here. Once you are happy with the results play around with the opacity – here I have my layer set to about 80%.

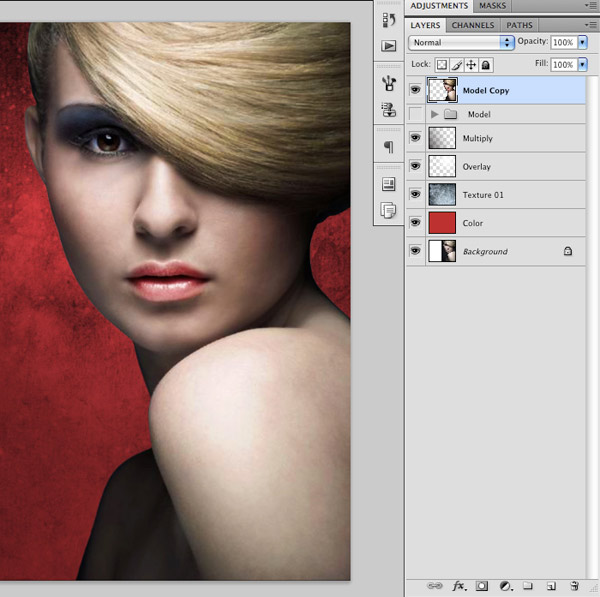
After you are happy with the results, make sure your ‘Blush’ layer selected and press Command/Ctrl + E to merge it with the model layer below.

Step 18
Select your model layer and press Command/Ctrl + J to duplicate the layer.
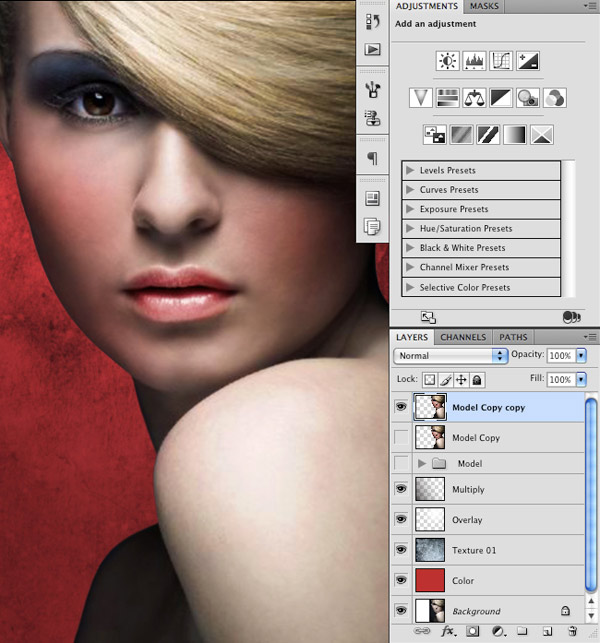
With your newly duplicated layer now selected, add a Layer Mask by clicking on the icon at the bottom of your Layers Palette.

From here, press F5 on your keyboard to bring up the Brushes Palette. Once the dialog box appears, click on the small arrow icon at the top right of the menu.

When the dropdown menu appears, select ‘Load Brushes’ from the list. Load the watercolor brushes that you should have downloaded from the resources section for this tutorial.

Select some of the brushes in your Brush Palette and play around with the size and rotation of the brushes to get some interesting results.

Make sure that you have a solid black color selected and use some of these brushes to mask out the model along the side and bottom of the image. Feel free to experiment and play around here to get some interesting shapes, if you want to go back you can always undo it or switch from a solid black to white color to brush some of the image back into the mask.

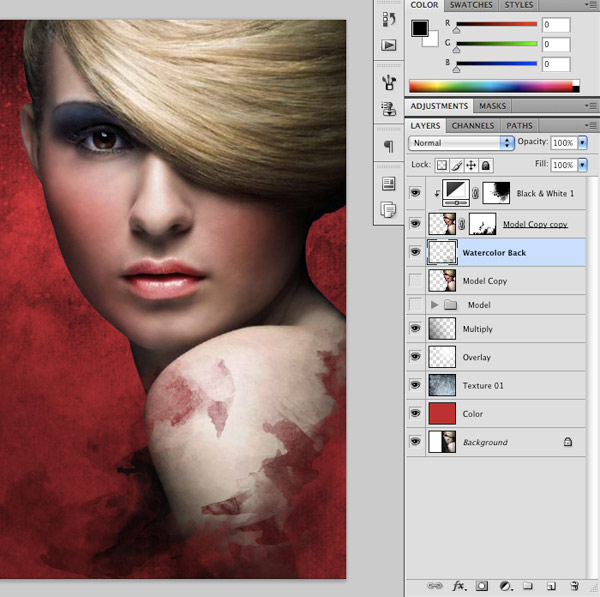
Step 19
With your top model layer selected, click on the Adjustment layer Icon at the bottom of the Layers Palette and chooe ‘Black & White’ as shown in the image below:

Once the Adjustment Layer is applied you will notice it makes the whole image desaturated. To rectify this we will hold down the Control Key and click on the Black & White Adjustment Layer in the Layers Palette and when the dropdown menu appears select ‘Create Clipping Mask’ as we did earlier on in the tutorial.

Try out a few of the different presets for the Adjustment Layer – I happen to like the way that the Green Filter looks but it isn’t extremely important as we will be fading this layer out in a moment.

Here I have once again selected a solid black color and I begin using some of the same watercolor brushes to bring the color back in to the face and top of the shoulder of our model. The idea here is to gradually fade the color out to black and white, as we get closer to the bottom of the image.

Step 20
Create a new layer just below your model layer and use some of your watercolor brushes to add some texture behind the model. This will help to extend the watercolor outwards from the bottom of the image. Once again, experiment with the rotation, size and opacity of the brush until you get some shapes that you are happy with.
Step 21
The next thing we are going to do is hold down the Alt/Option Key and click on the New Layer Icon at the bottom of the Layers Palette. Once you do that you will be prompted with a dialog box that looks like the image below:

You will notice here that I have named the layer ‘Dodge & Burn’ since that is what we will be using it for. Also, make sure to change the Mode to Overlay and check off the box that says ‘Fill with Overlay-neutral color (50% gray)’ as this is how to apply a non-destructive Dodge & Burn effect.

Using a low opacity soft round brush, select a solid white color to lightly brush over the hair, eyes, cheeks, and lips in order to get a Dodge effect, and use a black color to go over some of the shaded areas to apply a Burn effect.
Subtlety is the key with this type of effect but looking back once again we can see where we began and where we are at the moment:

Step 22
Create a new layer just above the Multiply Layer that we created earlier and fill it with a solid black color using your Paint Bucket Tool (G). Once you have done that, change the Blending Mode of the layer to Color.

Click on the Layer Mask Icon at the bottom of the Layers Palette to add a Layer Mask to your Color Layer.

We will now switch to the Gradient Tool (G) and make sure that we have a Linear Gradient that goes from white to black as shown below:

Click and drag from the bottom left corner towards the upper right corner of the image to gradually fade out the Color Layer. You should now have something like this:
Step 23
Open up the next texture image from the resources folder, which looks like this:

Place the new texture image between the original Texture 01 Layer and the Overlay Layer. You may have to do a Free Transform Command here to fill the entire background with the image, and once you have done that change the Blending Mode to Multiply. Lastly, reduce the opacity of the layer to about 50%.

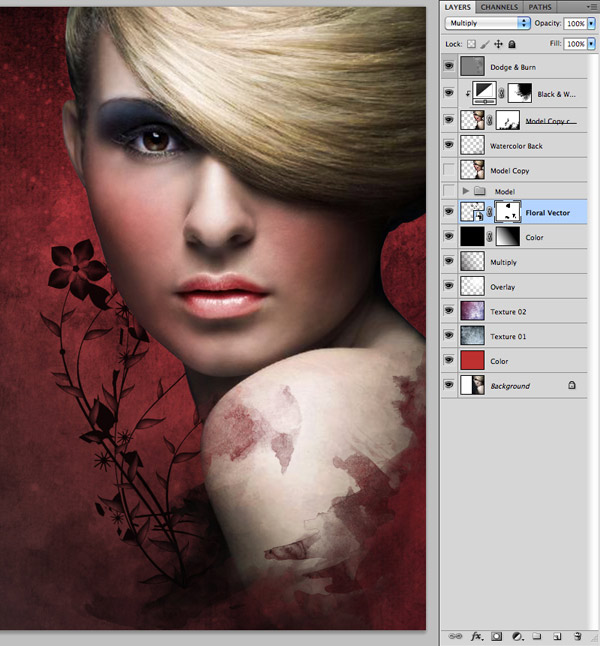
Step 24
Next, go to the resources folder and open up the China Dream file from the vectors folder in Illustrator. Once the image opens up, hold down the Shift Key and click on both of the background colors as shown here:

Once you have both of these layers selected, press Command/Ctrl + 2 to lock them. After that, press Command/Ctrl + A to select all and then Command/Ctrl + C to copy the vector artwork.

Return to Photoshop and press Command/Ctrl + V to paste the artwork into your document. You will be prompted with a dialog box asking you how you would like to paste your work and select ‘Smart Object’ as shown here:

Once the vector work is in place, move it behind all of your model layers so it’s just above the background layers and change the Blending Mode to Multiply. Use the image below as a reference for placement.

We will now add a Layer Mask to the vector art by clicking the Layer Mask Icon at the bottom of the Layers Palette. Once you have added your mask, brush out the areas of the vector art on the top and bottom left where the stems are sticking out. Also make sure to clean up any areas where the vector art is showing through the model such as the shoulder area. You should then have something like this:
Step 25
Select the Black & White Adjustment Layer and then while holding down the Shift Key click on the two layers below it – this should be your model copy and the watercolor layer.

Drag these layers down to the New Layer Icon to make a copy of them and then press Command/Ctrl + E to merge them together. Once you have done that, hold down the Control Key and click on your newly merged layer and then choose ‘Release Clipping Mask’ from the dropdown menu that appears.

Next, go to the Filter Menu and choose Blur>Gaussian Blur as shown below:

For the settings, apply a Gaussian Blur of about 5.5 pixels.

Press OK or hit the Enter Key to apply the changes and after doing that, change the Blending Mode of the blurred layer to Overlay and reduce the opacity to somewhere around 20-25% which will provide a nice bit of contrast to the portrait.

Step 26
Next, open up the render image from the resources folder.

Bring the render image into your working file and change the Blending Mode of the layer to Screen. Once you have done that, make sure that the layer is just below the floral vector and position it at an angle as I have done in the image below:

With your render layer selected, press Command/Ctrl + Alt/Option + U to bring up the Hue/Saturation dialog box and apply the settings below:

After making the adjustment press OK or hit the Enter Key on your keyboard to apply the changes. We will then go ahead and add a Layer Mask to the render layer and use a low opacity soft round brush to fade out the render from the left side coming in. You should now have something like this:
Step 27
If you remember towards the beginning of this tutorial I had extended the canvas to leave some extra room for us to play with, but now at this point I am thinking that it’s TOO much negative space happening. It also provides me with a nice opportunity to show you a handy trick with the Crop Tool.
Press C on your keyboard to switch to the Crop Tool and take a look at the settings across the top of the interface. You will notice by default that the ‘Delete’ option is filled in, but instead we are going to switch it off to ‘Hide’ instead.

Now you can use the Crop Tool (C) to frame your image so that it’s about half as wide.

Once you are happy with the framing of your image press the Enter Key to apply the changes. The nice thing about this is that if you take your Crop Tool (C) again and extend it to the left, your original image will still be there! So this is a non-destructive way to crop an image to ensure that you don’t lose anything in case you want to go back.

Step 28
Select your very top layer and then click on the Adjustment Layer Icon at the bottom of your Layers Palette. When the pop-up menu appears select Hue/Saturation as shown below:

Check off the ‘Colorize’ box and move the Hue slider all the way to the right to change it to red. Once you have done that, change the Blending Mode of the layer to Color and reduce the opacity to about 20%.

Once we do this it will provide a more uniform coloring to the overall image to help tie it all together. It should be subtle so make sure to keep the opacity low. A small detail that we want to quickly address after making this color shift is that the model’s eye is now looking pink. To fix this we will select a soft black brush and just brush over the eye while you have the Layer Mask of the Hue/Saturation Adjustment Layer active.

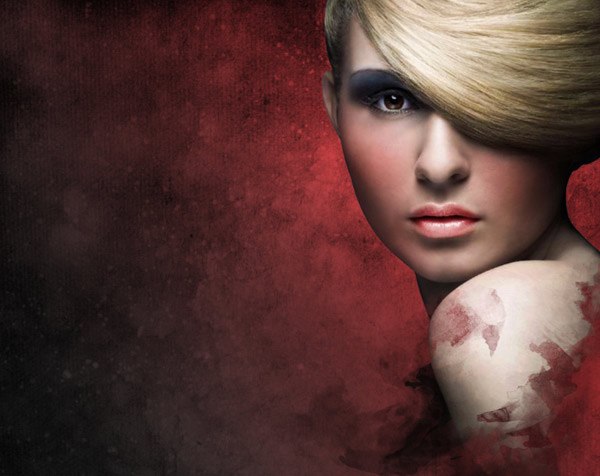
We have now completed our tutorial and should take one last look at where we began and compare it to where we ended up.
You can really notice a difference here and all of the techniques that we have covered can be applied to just about any portrait image to create a beautifully polished image. I hope you have enjoyed this tutorial and learned some handy tips along the way. Happy Photoshopping!
And We’re Done!
You can view the final outcome below. I hope that you enjoyed this tutorial and would love to hear your feedback on the techniques used.
Member File Download
Download the original .psd file for this tutorial here:

 Professional Retouching Tutorial: Using Curves in Photoshop (Part 3)
 Members Area Tutorial: Follow an Expert Photo Manipulator’s Workflow
 Take 10 Years Off a Male Portrait Via Photo Retouching

hi just thought i’d say what a beautiful tutorial very nice work just one thing is that the first texture is not listed in the resources but yeh can’t wait to try out this tut very alluring
Hi Rob, thanks for the heads up. Let me check about the texture with our author Eric for you.