
Members Area Tutorial: Create a Dark And Surreal Photo Manipulation “Volcano Spirit”
In this tutorial I’ll how you how to create a dark and surreal photo manipulation called “Volcano Spirit”.
We’ll combine several stock photos to create a surreal head carrying a volcano with hot lava flowing from the eye.
Here’s a look at some of the advanced techniques covered in this tutorial:
- Creating custom smoke using an original technique
- Creating a custom wave effect using photo manipulation techniques
- Building up advanced lighting effects for a bold outcome.
- Creating artificial lighting to make your piece more cohesive.
- Professional photo blending techniques, including a study of how to utilize layer blend modes
Final Image
As always, this is the final image that we’ll be creating:

Here’s a close up look out the outcome:

Resources Used In This Tutorial
Step 1
Create a new document with 1300×800 px and fill with any colors you like. As you may see, I like to start with white. Now make a new layer (Cmd/Ctrl+Shift+N) and hit G to active Gradient Tool. I choose Radial Gradient with settings below:

Drag a line from top to bottom and we get the result:

Step 2
Open sky stock. Use the Rectangular Marquee Tool (M) to make a selection on sky part as the image below shows:

Use Move Tool (V) to drag this selection into our canvas, place it at the top center:

I convert this layer to Smart Object (right click this layer, choose this action) then go to Edit-Transform-Warp and bend it:

Click the second button at the bottom of Layer Pallete to add layer mask to this layer. Use a soft black brush to remove the hard edges of the sky:

Change the mode to Soft Light 100%:

Step 3
Create some new adjustment layers to change the color of our picture. Go to Layer-New Adjustment Layer-Photo Filter:

Curves:

This is the result:

Step 4
Open ‘sea stock’ from the resources for this tutorial. Copy a part of this image and paste into the bottom of our main document, convert to smart Object and use Cmd/Ctrl+T to resize and stretch it :


Change the mode to Overlay 100% and blend the sea part with layer mask:

Step 5
I make a new layer and use Smudge Tool with Strength about 50% and paint over the sea part from left to right to soften the details on it:

Step 6
Extract ‘mountain 1′ and place it at the right corner of the sea part:


Change the mode to Overlay 70% and use a layer mask to blend the bottom with the sea:

Step 7
I want to reduce the saturation of this mountain so I make an adjustment layer with a Clipping Mask. Go to Layer, New Adjustment Layer-Hue/Saturation:


Step 8
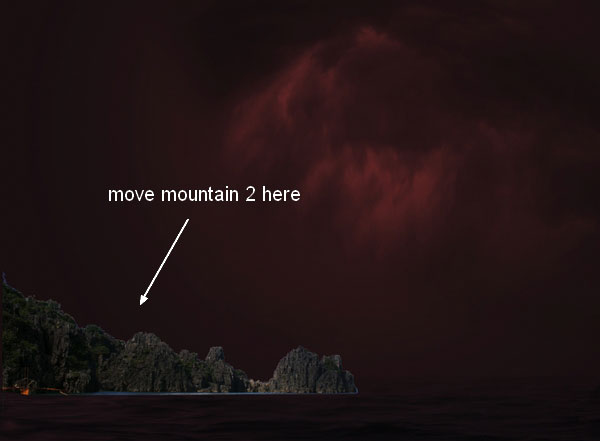
Isolate mountain 2 and position it at the left edge of the sea and change the mode to Soft Light 50%:


Step 9
I want to make the sea look redder so I create a new layer and change my brush color to #c80204. Use this brush to paint over the sea and change the mode to Color 70%:

I make a new layer and continue with this brush on the right edge of the sea. I put the mode to Color 100%:


Step 10
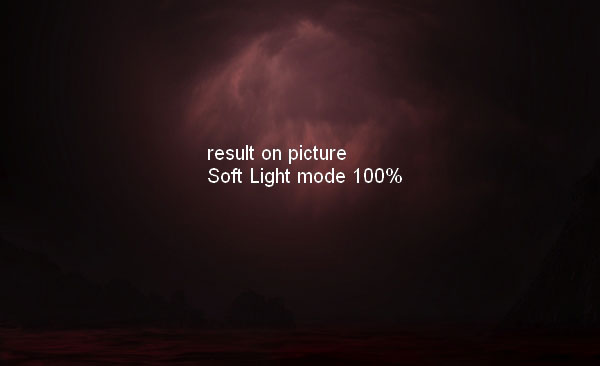
Make a new layer on the top. Choose Radial Gradient with default colors (black and white):

Change the mode to Soft Light 100% and use layer mask to reduce dark contrast (lower opacity of brush to 30-40%) at the bottom edge of the picture. You can see result with layer mask:

Result on picture:
Step 11
Open woman stock (you can use your own picture). Take only the head and place it at the middle section of our main picture, transform if needed to get the a straight look:


Change brushes to the grunge brush set found in the resources for this tutorial. Add a layer mask to the model head and use this new brush to remove the top of the head. Remember to vary brushes to achieve a random shattered effect:

Step 12
Add some adjustment layers with Clipping Mask to the head one.
Curves:

I use soft black brush to erase model eyelids (on Curves layer mask) as I found they are too dark after applying this adjustment layer.

Hue/Saturation:


Step 13
Open volcano stock. Extract the one at foreground and locate it above model head after converting it to Smart Object and resizing:


Add layer mask to this layer and use black brush with hardness about 30-40% to remove hard edges on model forehead and brush with hardness 100% to remove the right side of the volcano. Don’t use soft brush in this case as it will leave an unatural look:

Step 14
I use Hue/Saturation and Curves layers (Clipping Mask) to change color of the volcano:


Step 15
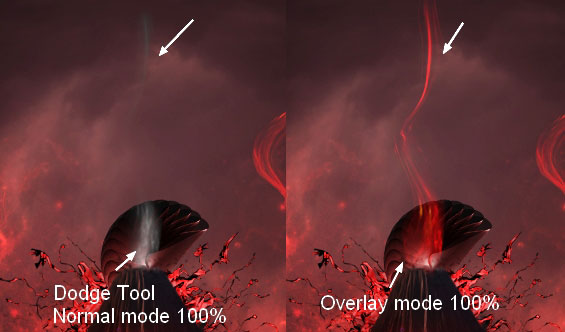
The left side of the volcano looks brighter than the right. To fix it, I make a new layer (Clipping Mask), change the mode to Overlay 100% and fill with 50% gray:

Take Dodge and Burn Tool with Midtones Range and Exposure about 20-30% to darken the left and brighten the right. You can see how I applied this tool with Normal mode:

Overlay mode:

Step 16
Open lava stock. Make a selection at the left edge of this stock as shown below:

Place it at the right of model face and transform it using Cmd/Ctrl+T key and Warp tool:

Change the mode to Overlay 100% and use layer mask to blend this lava part with the face:

Name this layer “lava 1″.
Step 17
I take other three parts from lava stock and add to the face as done with lava 1. I name them from “lava 2″ to “lava 4″.


Step 18
Make a new layer with same settings in step 15. Use Burn tool to darken the edges of lavas a little:

Step 19
To make the face get a stronger “lava effect”, I create a new layer and use soft brush with color #f87879 with opacity 50-70% and paint on red parts of the lavas. Then I set the mode as Soft Light 100%:

Step 20
Open ’3D render stock pack’ found in the resources section for this tutorial. Choose number 1 and 5 from this pack to use. First move number 5 into our picture, resize it to be much smaller and place it behind the volcano. Also set this layer under model head one. I call it “render 1″.

I darken and change color of this render with Channel Mixer and Curves layers (Clipping Mask):


Step 21
Move number 1 from render pack above volcano top after downsizing it and use layer mask to remove the bottom. Name it “render 2″:

Change color of this render with a Color Balance layer (Clipping Mask):

Step 22
Open nebula 1 stock. First I use channels to remove most of dark parts from this stock (we’ll be using this stock a lot in the future steps and removing dark parts is really necessary).

Copy a part on the left and situate it at the left of our main photo, transform it:

Change the mode to Color Dodge 100% and use layer mask to remove rough edges:

Duplicate this layer, move to the right and flip it horizontally (Edit-Transform-Flip Horizontal). Mask it to get a similar result below:

Step 23
Make a new layer on the top. Use Pen Tool to make a path inside model left eye then hit Cmd/Ctrl to turn it into a selection. Go to Edit-Fill and choose color #de201e:

Right click this layer, choose Blending Options:


This is what we have:

Duplicate this layer, move to the right eye and apply Flip Horizontal:

Step 24
Create a new layer and use soft brush with same color in previous steps (#de201e). Paint over the eyes and eyelids and change the mode to Color Burn 100%:

Step 25
Make a new layer on the top and use grunge brushes with color #271d1f to paint around the top of the volcano. You can see my result below:

Step 26
Open nebula 2 stock. Use Elliptical Marquee Tool to make a circle at the red part of the center and drag it into our picture:

Change the mode to Hard Light 100% and remove hard edges with layer mask:

Step 27
I use two adjustment layers with Clipping Mask to remove some blue sparks remained after previous step.

Hue/Saturation:

Color Balance:


Step 28
On a new layer, I use soft brush with color #f87879 to paint on the top right part of model head (the bottom of the volcano) to make it look more saturated. Change the mode of this layer to Overlay 100%:

Step 29
Open nebula 1 stock again. Copy a part at the left bottom of this stock and paste into our picture, resize it to be smaller:


Go to Filter-Liquify and choose Forward Warp Tool with settings below:

Use this tool to tweak this nebula part to get the look of a swirling smoke, remember to vary the size of this tool for smaller areas:

Change the mode to Pin Light 100% (I found it’s the best mode in this case):

Duplicate this swirling smoke and move to the left. Use Liquify Tool to change the look of it:

Step 30
I choose another part from nebula stock, place it above the sea part and apply Liquify tool again to make the look of a wave. Set the mode to Pin Light 100% and use layer mask to remove two sides of this wave:


I choose this nebula part again to liquify it, set the same mode (Pin Light 100%) and move it to the right of the sea:

Step 31
I name these layers “red wave 1″, “red wave 2″. To change color of them together, make these layers selected and hit Cmd/Ctrl +G to make group for them. Change the mode of this group from Pass Through (default group mode) to Pin Light 100% (it’s very important to keep the effect like before grouping). On red wave 2 layer, go to Layer-New Adjustment Layer-Hue/Saturation:

You can see the yellow parts turn into red and these waves more saturated. Because the mode changed to Pin Light 100% so this Hue/Saturation only affects the layers inside this group (red wave ones).

Step 32
Open red splash stock. You can use your own image if you can’t take it from Photoxpress. Isolate it from white background and position at the middle of red waves and resize it:

Remove hard edges with layer mask:

Step 33
I use Color Balance and Curves layers (Clipping Mask) to make color and brightness of this splash fit the waves.


Step 34
Take another part from nebula stock and liquify it to make it look like a smoke, transform and move it above volcano top to get the look below:


Change the mode to Pin Light 100% and remove the bottom with layer mask:

Step 35
Add a Channel Mixer layer (Clipping Mask) to make this smoke more visible:

Step 36
I add a new layer with same settings like in step 15 and use Dodge Tool to brighten this smoke:
Step 37
I duplicate this smoke and apply Flip Vertical for it (Edit-Transform-Flip Vertical). Move it under the left eye and liquify it to get a flow of hot lava going from this eye to the sea. I change the mode to Hard Light 100%:

I duplicate this layer five times, continue liquifying to complete the flow and make another smaller flow one. I name them from “hot lava 1″ to “hot lava 6″:

Step 38
Make a new layer on the top and use soft brush with color #f87879 to brighten the part between left eye and lava flow. Set the mode to Overlay 100%:

Step 39
I use Dodge and Burn tool on a new layer to give more details to the eyes and brighten the top of lava flows:

Step 40
Make a new layer and take soft white brush to paint over the top center of the picture. Change the mode to Overlay 70% to brighten this part:

Step 41
Browse one from rock particles pack. Go to Edit-Define Brush Preset and name it whatever you want:


Now come back to our main picture. Make a new layer, change foreground color to #090405 and choose this brush we’ve just created. Press F5 to make settings for this brush:

Paint randomly on the left of the picture but increase brush size while spotting at the edge:

Step 42
Double click this layer, choose Blending Options:

Add rocks to the right side and apply Layer Style with same colors but change the angle of the light:

We have result:

Step 43
Apply Liquify Tool to these rocks layers to bend small rock particles into different movements. You can use any tool from Liquify Filter that you find it works best. Here is my result:

Step 44
I use a Channel Mixer layer on the top to to add red color to entire picture. Then I use soft black brush on Channel Mixer layer mask to erase or blur red effect the top center of picture and model head. You can see that I keep the middle parts of the volcano red to make a strong effect of lava flow.


Step 45
In this step we’ll add light to model head. Make a new layer on the top. Hold Cmd/Ctrl while clicking model head layer to load its selection. Then go to Edit-Stroke and choose color #f87879:


Change the mode to Overlay 100%.

Apply Gassian Blur with 1 px (Filter-Blur-Gassian Blur) then use layer mask to remove the top head and the bottom:

Step 46
Create a new layer and use brush with color #f87879 again. Paint on the sides of the top head to create some reflected light there. I change the mode to Color 100% in this case:

Step 47
Make a new layer and use Smudge Tool with Strength about 10% to soften the red waves and make them blend with the sea better:

Step 48
Hit Cmd/Ctrl+Alt/Option+Shift+E to merge all visible layers into a new one. Use Elliptical Marquee Tool to make selection on the middle area of the picture then set feather =50:

Press Cmd/Ctrl+Shift+I to invert this selection then go to Filter-Blur-Gassian Blur and choose radius as 4 px:

Add layer mask and remove or blur the effect on the parts below:

And We’re Done!
You can view the final outcome below. I hope that you enjoyed this tutorial and would love to hear your feedback on the techniques and outcome.
Here’s a close up look out the outcome:
Member File Download
Download the original .psd file for this tutorial here:

 Members Area Tutorial: Create the Surreal Photo Manipulation ‘Twisting Water’
 Members Area Tutorial: Create A Dark Ghostly Scene Photo Manipulation
 Members Area Tutorial: Create a Cat in a Magical Pond Scene Photo Manipulation

Just finished reading. This is a very interesting and in-depth tutorial. I’m sure that lots of reader will benefit from this one. Really nice work!!
Thanks Cosmas! I really love this tutorial too. I’m glad that you enjoyed it, thanks for commenting.
I loved this tutorial. Thank you fanextra. This is my work : http://haidermiz.deviantart.com/art/Volcano-Spirit-477414796
Wow, this is beautiful Haider! I love how dark and moody you made your version, it works really well. Lovely detailing in the sky too!