
Members Area Tutorial: Construct a Detailed, Realistic Scene Using Advanced Photo Blending
Hello to FanExtra members old and new!
Today we have a fantastic tutorial for you that focuses on a very common problem amongst Photoshop and design enthusiasts. This applies to everything from hobby design work to high-end corporate commissions.
Can you guess what it is?
Too much focus on the main subject, not enough focus on the background.
This is a huge problem that most designers simply ignore. They pour all of their time into creating stunning characters that are pixel perfect and retouched to hell, but often the backdrop or environment for the character is a mere after thought. Not only does this make the work look more flat and unfinished, but it actually detracts from the impact of the character and piece as a whole.
In today’s advanced tutorial we will be creating a 70′s theme room from scratch to match a classic character. This tutorial covers topics like.
- Concept sketching.
- Light painting and Shadow painting.
- Using One point Perspective.
- Effective use of Filters.
- How to Work With Clipping Masks.
- Creating an oil painting effect for faux paintings.
- How to focus on the tiny details that do make a difference.
and much more interesting stuff related to photo manipulation.
This tutorial isn’t all about the environment though. You’ll also learn some cool character retouching techniques like skin fixes and applying delicate digital makeup. Beyond this, you’ll crucially learn how to convert a promising, but boring/washed out photo into a bold, eye-catching work of art.
Phew! Let’s get started shall we…
Final Image
As always, this is the final image that we’ll be creating:

Resources Used In This Tutorial
- Jessica Rabbit – Jagged-eye
- Floral Pattern – Brusheezy
- Lamp Stand – ed-resources
- Smoke Brush – PhotoshopTutorials.ws
- Wooden Floor Texture – sxc.hu
- Couch – sxc.hu
- Wall Lamp – sxc.hu
- Table Lamp – sxc.hu
- Buildings – sxc.hu
- Frame – sxc.hu
- Candles – sxc.hu
- Table – sxc.hu
- Window – sxc.hu
- Portrait – sxc.hu
- Bowl – insectualstock
- Curtains – linzee777
- Lamp Stand – ed-resources
Step 1
Create a new canvas in Photoshop and import your character on to it.

Step 2
In this step we are going to draw a rough sketch of the room.
1) Create a new layer and draw few perspective lines as shown. Since the scene will be focused on the character in the center, we will be using One Point Perspective here.

2) Now draw a rough sketch of the room as shown.

Step 3
In this step we are going to place the Couch in the scene.
1) Import the image of the couch on to the working canvas and place it as shown.

2) Create an Exposure adjustment layer to the couch layer and set the Gamma Correction level to 0.70.

Step 4
In this step we are going to create the floor using the floor texture.
1) Import the image of the Wooden Floor texture and transform it as shown to fit the perspective using the Move Tool (V).

2) Now duplicate the floor layer and complete the floor as shown.

3) Create a Brightness/Contrast adjustment layer to the floor layer and set the Brightness to -5.

4) Now by using the Exposure adjustment layer set the Exposure to -0.46 and Gamma Correction to 0.79.

Step 5
In this step we are going to create the wall.
1) Create a new layer below the floor layer and paint the wall with pink color as shown.

2) Reduce the Brightness of the wall to -104 using Brightness/Contrast.

3) Now by using Hue/Saturation reduce the Saturation level to -29.

4) Now right click on the wall layer and select Layer Style. Then go to Pattern Overlay and select the floral Pattern. Then reduce its Opacity to 43, change the Blending Mode to Overlay and Scale the pattern to 57%.

Step 6
In this step we are going to create the window to the room.
1) Import the image of the Window frame on to the working canvas and place it as shown. The by using the Brightness/Contrast reduce the Brightness of the window frame to -31.

2) Now create an Exposure adjustment layer to the window frame layer and set the Exposure to -0.17, Offset to -0.0738 and Gamma Correction to 0.76.

Step 7
In this step we are going to color correct the whole scene to blend the elements of the scene evenly.
1) Create a Curves adjustment layer on the top of layers pallet and set the RGB curves as shown.

2) Now by using Hue/Saturation adjustment layer set the Saturation level to -17.

3) Now create an Exposure adjustment layer and set the Offset level to -0.0087 and Gamma Correction to 0.64.

4) Now create a Brightness/Contrast Adjustment layer and set the Brightness level to -37.

Step 8
In this step we are going to color correct the model.
1) To soften the skin of the model, first duplicate the model layer and a Smart Blur of Radius 3.0 with Threshold 19.4 to the duplicate layer.

2) Now create a Clipping Mask to the duplicate layer and paint black on the hair area as shown in the clipping mask. Because we don’t want the hair to look smooth, as it is beautiful with crisp details.

3) Now create a Brightness/Contrast adjustment layer and set the Brightness level to -20.

4) Now by using Exposure adjustment layer set the Offset value to -0.0174 and Gamma Correction level to 0.88.

5) Now create a new layer above the Model layer and paint dark shadow on as shown.

Step 9
In this step we are going to color correct the couch and paint some shadows on it to blend it perfectly with the scene.
1) Using the Soft Round brush paint the dark shadow on the bottom of the couch as shown.

2) For the yellow light shade, paint the couch with the color #eea922 as shown on a new layer placed above the couch. Then set the Blending Mode of the layer to Overlay.


3) Now create a Clipping Mask to the light layer and mildly erase the yellow light color at the center of the couch as shown.

Step 10
In this step we are going to paint Yellow Light shade on the model.
-Create a new layer above the model layer and paint the color #eea922 as shown on the right side of the model as show. Then set the Blending Mode of the layer to Overlay.


Step 11
In this step we are going to place the lamp on the left side of the wall as per the sketch we drew earlier.
1) Cut the image of the lamp from the source image and place it as shown on the working canvas.

2) Now paint the light rays from the lamp as shown in a new layer and set the Blending Mode of the layer to Overlay, then set the Opacity to 42%.

3) Now paint the color #dc8e1d on a new layer and set its Blending Mode to Overlay.


Step 12
In this step we are going to create a city backdrop outside the window.
1) Cut the image of the buildings and place them behind the wall layer and position it as shown.

2) Now create a new layer behind the buildings layer and fill the layer with black color.

3) Since the buildings are located far in the scene we need to add a Gaussian Blur of Radius 2.2px to maintain the Depth Of Field (DOF) of the scene.

4) Now create a new layer above the buildings layer and paint the light glow on the tall building a shown. The set its Blending Mode to Lighten and Reduce the Opacity to 55%.

Step 13
In this step we are going to place the curtains to the window.
1) Import the image of the curtains on to the working canvas and place them as shown on the window.

2) Now by using Hue/Saturation set the Saturation level of the curtain to +15.

3) Now create a Curves adjustment layer and set the RGB curves as shown.

4) Create a new layer above the curtain layer and paint the light glow as shown. Then set its Blending Mode to Overlay and reduce the Opacity to 74%.


Step 14
In this step we are going to create shadow to the curtain knob, so that it blends perfectly with the lighting conditions of the scene.
1) Create a new layer above the curtain layer and paint the dark shadow on the knobs as shown.

2) Now create a new layer under the curtain layer and fill in with black color in the shape of the knobs and move the layer slightly towards the right as shown.

3) Now add a Gaussian Blur of Radius 4.8px to the knobs shadow layer.

Step 15
In this step we are going to place a small stand beside the couch for the table lamp which will be added in the following steps.
1) Import the image of the stand on to the working canvas and place it beside the couch as shown

2) Now by using the Soft Round Brush paint the dark Shadow on the stand as shown.

Step 16
In this step we are going to place a table lamp beside the couch resting on the top of previously created stand.
1) Import the image of the table lamp on to the working canvas and place it as shown.

2) Using Exposure adjustment layer to the table lamp set the Offset level to -0.0261 and Gamma Correction to 0.73.

Step 17
In this step we are going to create the light glow to the table lamp.
1) Now by using a White and Orange radial gradient paint the light glow as shown. Then set the Blending Mode of the layer to Overlay.


2) Similarly create another layer and paint another radial gradient with much dark orange and set its Blending Mode to Overlay and reduce the Opacity to 62%.


3) Now create a new layer above all the table lamp layers and paint the light glow as show using Soft Round Brush with color #dc8e1d.

4) Similarly add another light gradient on the neck of the table lamp as shown.

5) Now paint a dark shadow at the bottom of the table lamp as shown.

Step 18
In this step we are going to create a Photo Frame hanged to the wall.
1) Import the image of the wooden frame on to the working canvas. Since we need a rectangular frame, cut the frame and move the right side of the frame apart as shown.

2) Now cut the middle part of the frame into a new layer and cover the gap.

3) Now create a new layer above the frame layer and select the Clone Tool, then cover the similar looking parts of the frame as shown.

4) Now create a new layer beneath the frame layer and fill in the layer with black color in the shape of the frame. Then move it slightly towards right as shown.

5) Then add a Gaussian blur of Radius 4.8px to the shadow layer.

Step 19
In this step we are going to pain shadows and light shade on the window frame.
1) Now create a new layer above the couch layer and paint the dark shadow covering the couch and frame as shown.

2) Then create a new layer above the window frame layer and fill in with the color #dc8e1d in the shape of the frame. Then set the Blending Mode of the layer to Overlay.


Step 20
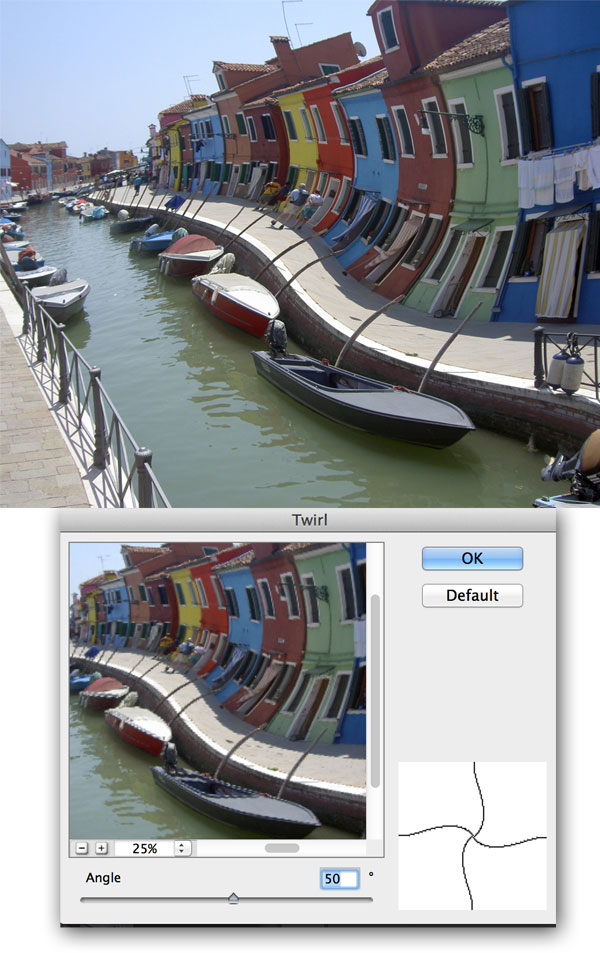
In this step we are going to create a painting for the photo frame.
1) Import a landscape image in to Photoshop and go to Filter>Distort>Twirl and set the Angle to 50.
2) Now go to Filter>Stylize>Wind and select Wind in Method and choose From the Right in Direction.

3) To get the Oil paint effect go to Filters>Oil Paint and set the Values as shown.

4) Then create an Exposure adjustment layer to the Oil paint image and set the Exposure to +0.41 and Gamma Correction to -0.91.

5) Now import it on to the working canvas and place it behind the frame layer.

6) Using Hue/Saturation reduce the Saturation level to -100.

7) Then by using Curves raise the Red curve as shown to get the reddish shade to the image.

![]() Create a new layer above the frame layer and paint the yellow light color as shown on the photo frame and reduce its Opacity to 79%.
Create a new layer above the frame layer and paint the yellow light color as shown on the photo frame and reduce its Opacity to 79%.

Step 21
In this step we are going to do few enhancements to the makeup of the model.
1) Create a new layer above the Model layer and paint pink on the cheek as shown and set the Blending Mode of the layer to Overlay.


2) Similarly darken the eye brow as shown.

Step 22
In this step we are going to create the cigarette burn and smoke effect.
1) Create a new layer above the model layer and paint the color # cd2202 at the tip of the cigarette.

2) Now create another layer and paint the smoke as shown using the smoke brush.

Step 23
In this step we are going to create a table in front of the model.
1) Import the image of the table on to the working canvas and place it as shown in front of the model.

2) Now duplicate the body of the table and move it towards the left as shown.

3) Now import the image of the leg of the table and place it as shown under the table.

4) Create a new layer above the table leg layer and paint the dark shadow as shown.

5) Now create an Exposure adjustment layer to the table body layers and set the Offset value to -0.0377 and Gamma Correction to 0.52.

6) Then by using the Curves adjustment layer set the Red curve as shown.

Step 24
In this step we are going to place a Bowl filled with rose petals on the center of the table.
1) Import the image of the Rose petals bowl on to the working canvas and place it on the table as shown.

2) Now create a new layer above the bowl layer and paint the dark shadow on the bowl and on table as shown.

3) Now by using the Dodge Tool (O) increase the brightness of the bowl.

Step 25
In this step we are going to place a couple of curtains closer to the scene.
1) Import the image of the curtains on to the canvas and place them closer to the scene as shown on the both ends of the scene.

2) Since the curtains are closer to the scene, add a Gaussian Blur of Radius 15.5px to maintain the DOF of the scene.

3) Now create an Exposure adjustment layer to the curtains and set the Exposure level to -0.05, Offset to -0.0304 and Gamma Correction to 0.66.

4) Now create a Curves adjustment layer to the curtains and set the RGB curves as shown.

Step 26
In this step we will be placing Candles in the scene.
1) Import the image of the candles on to the working canvas and place them on the right side bottom corner of the scene as shown.

2) Using the technique used for creating light glow in step 17 to create the glow effect to the candle light.

3) Now add a Gaussian Blur of Radius 25px to the candles to maintain the DOF of the scene.

And We’re Done!
You can view the final outcome below. I hope that you enjoyed this tutorial and would love to hear your feedback on the techniques and outcome.
Member File Download
Download the original .psd file for this tutorial here:

 Members Area Tutorial: Photo Manipulate an Atmospheric Warrior Scene
 Members Area Tutorial: Photo Manipulate a Complex Lion King Warlord Scene
 Members Area Tutorial: Create a Stunningly Detailed Matte Painting Landscape

it is really amazing…so many details..I am wondering, how much time did it require to create such a good tutorial?
Thanks Daniel! The tutorial took in the region of 4-6 hours. Thanks for the kind words, I hope that you’ll continue to enjoy our teaching resources.