
Members Area Tutorial: Create a Beautiful Snow Queen Photo Manipulation
In this tutorial we will be creating a fantasy scene with a princess and magic lamp. In the background there will be dragons flying by the castle and the snow covered hills.
This tutorial covers topics like
-Painting snow surface texture.
-Digital Hair Painting.
-Advanced Matte Painting Techniques.
-Makeup and skin enhancement.
-Lighting principles for digital painting.
and many more photo-manipulation short cuts and techniques.
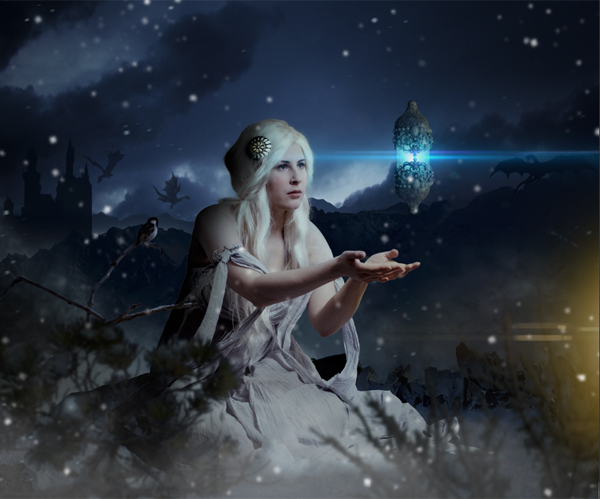
Snow Princess
As always, this is the final image that we’ll be creating:
Resources Used In This Tutorial
- Princess – aurelia-isabella
- Surface Edge – sxc.hu
- Snow Covered Rocks – sxc.hu
- Rock – sxc.hu
- Hill 1 – alzirrswanheartstock
- Hill 2 – alzirrswanheartstock
- Dragon 1 – elevit-stock
- Dragon 2 – elevit-stock
- Dragon 3 – madetobeunique
- Falcon – sacral-stock
- Lantern – sacral-stock
- Castle – skinywitch
- Hair Clip – sxc.hu
- Dark Sky – sxc.hu
- Plant 1 – sxc.hu
- Plant 2 – sxc.hu
- Lens Flare 1 – leostarkoneru
- Lens Flare 2 – leostarkoneru
- Snow Brush – girlsdesign
- Fog Brush – brusheezy
- Hair Brush – para-vine
Step 1
Create a new canvas in Photoshop with Width=3415px and Height=2816. Then import the image of the princess on to the canvas and place it in the center.

Step 2
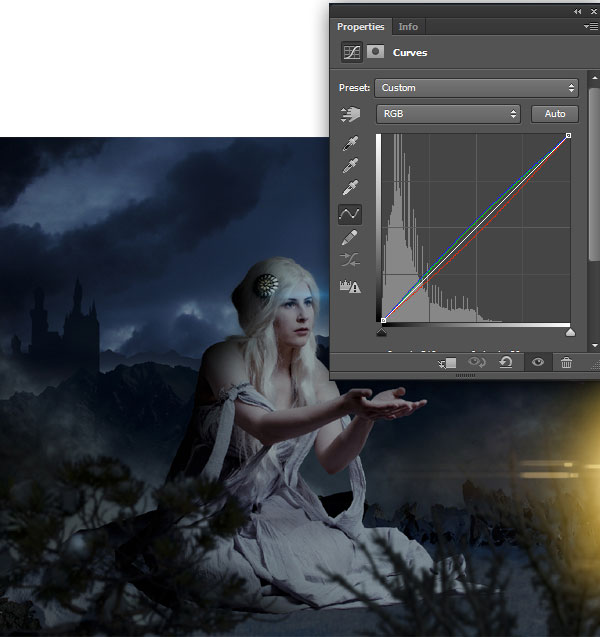
In this step we are going to place the sky in the background and color correct the princess to match with the BG sky using Adjustment Layers.
1) Import the image of the Night Cloudy sky on to the canvas and place the layer under the princess layer.

2) Now create an Adjustment layer of Curves to the princess layer and set the RGB curves as shown.

3) Using the Brightness/Contrast adjustment layer set the brightness to -13 and Contrast to 61.

4) De-Saturate the princess layer to -31 using the Hue/Saturation Adjustment layer.

5) Now by using the Exposure Adjustment layer set the Exposure to -0.55, Offset to -0.0087 and Gamma Correction to 0.69.

Step 3
In this step we are going to create snow covered rocky borders to support the snow surface that we will be creating in the next step.
1) Cut the snow covered cliff and place it beneath the princess as shown.

2) Now place a rock behind the princess as shown.

3) To complete the border of the surface place snow covered rocks.

Step 4
In this step we will be digitally painting the snow surface using the Dry Brush.
1) Using basic round brush paint white within the area of the surface, then by using the Dry Brush paint the snow texture with the color #c9c6d1.

2) Using the same Dry Brush paint another coating of snow texture in a new layer with the color #a0abc2.

3) While performing the previous steps make sure you paint the snow overlapping on the small corners of the rocky borders.

Step 5
In this step we are going to color correct the surface to match with environment of the scene.
1) Merge all the surface layers and create an Adjustment layer of Exposure and set the Exposure to -2.08 and Gamma Correction to 0.81.

2) Now increase the saturation level of the surface layer to +55 using Hue/Saturation Adjustment layer.

Step 6
In this step we are going to place hills in the background.
1) Cut the image of the snow covered hill from the stock photo and place in the background as shown.

2) Similarly place another hill beside the previously placed hill.

Step 7
In this step we will be color correcting the BG hills.
1) Merger the two hills into a single layer and create a Selective Color Adjustment layer, then select White from the Colors drop down list. Now set the Cyan level to +36, Magenta=+29, Yellow=+65 and Black=+15.

2) Now reduce the Brightness of the hills to -40 using Brightness/Contrast Adjustment layer.

3) Create a Curves Adjustment layer and set the RGB curves as shown.

4) To make the hills look darker create an Exposure adjustment layer and set the Exposure level to -1.73 and Gamma Correction to 0.67.

Step 8
In this step we will be performing final adjustments to the hills to match them perfectly to the scene.
1) Create a new layer above the hills layer. Then select a mask in the shape of the hills and fill in the selection with the color #091323.

2) Then set the Opacity of the color layer to 80%.

Step 9
Create a new layer between the hills and surface layers and paint fog as shown using the fog brushes.

Step 10
In this step we will place a castle in the background of the scene.
1) Cut the image of the castle from the stock image and place it on the left side of the scene as show. Place the castle layer behind the hills layer.


2) Create a new layer above the castle layer and select a mask in the shape of the castle. Then fill the selection with the color #131a2b.

3) Hide the palace image. Then duplicate the color layer of the castle and stretch it vertically as shown.

4) Now Merge both the castle layers and add a Gaussian Blur of Radius 0.9px.

5) Create a new layer above the castle layer and paint the fog as shown.

Step 11
In this step we are going to paint distant hills in the BG. The only logic we need to remember here is that the colors of the hills get lighter as they are illustrated far away in the scene.
1) Select a random mask as shown using the Lasso Tool (L). Then create a new layer under the Castle layer and fill in the selection with the color #36456a.

2) Similarly create another random mask on a new layer placed beneath the previously created hill layer and fill it with the color #131a2b.

3) Now create a new layer above the painted hill layers and paint the fog as shown.

Step 12
In this step we are going to place a couple of snow covered plants in the scene.
1) Import the image of the plant into photoshop and select Red layer from the Channels pallet.

2) Now go to Image>Calculations and select Red from the Channel drop down list of Source 1 and Source 2.

3) Now go to Image>Adjustments>Levels and set the levels as shown to make the plant look completely white.

4) To select the mask around the plant go to Select>Load Selection and select “Alpha 1″ from the Channel drop down list.

5) Using the mask seperate the selection into a new layer.

6) Import the image of the plant on to the working canvas and place it on the left side of the scene as shown.

7) To make the plant look closer to the scene and create a Depth Of Field to the scene, add a Gaussian Blur of Radius 6.4px.

![]() Then by using the Curves Adjustment layer color correct the plant.
Then by using the Curves Adjustment layer color correct the plant.

9) Now import another plant into the scene and place it on the right side of the scene. Then add a Gaussian Blur of Radius 9.0px.


10) Since it’s a night scene we need the plants to be dark shaded. Hence Merge the two plant layers and create an Exposure adjustment layer to it and set the Exposure to -4.00 and Gamma Correction to 0.82.

Step 13
In this step we are going to paint shadows on the princess and the surrounding rock boundaries.
1) Create a new layer above the princess layer and paint shadow on the back of the princess as shown.

2) Now create a new layer above the surface boundary layer and paint the shadows as shown.

Step 14
In this step we are going to create a hair clip for the princess.
1) Import the image of the flower shaped broacher and place it on the princess as shown. Here the broacher is illustrated as the Hair Clip.

2) Now create a new layer beneath the Hair Clip layer and paint the shadow of the clip as shown.

3) Create another layer above the Hair Clip layer and paint the dark shadow on the hair clip as shown.

4) Now by using the hair brush paint some hair overlapping on the clip.

5) Create an Exposure Adjustment layer to the Hair Clip layer and set the Exposure to -0.55 and Gamma Correction to 0.97.

6) Now de-saturate the clip to -54 using the Hue/Saturation.

Step 15
In this step we will be creating a magic floating lamp.
1) Mask out the perfume bottle’s body part into a new layer using the Pen Tool (P).

2) Duplicate the isolated bottle layer and flip it vertically. Then move it upwards and place it as shown.

3) Merge both the previous bottle layers and import it on to the working canvas and place it as shown.

4) Cut the top of the lantern from the stock image and place it as shown on the top and bottom ends of the lantern we created in the scene.

5) Merge all the lantern layers and create a Curves Adjustment layer and set the curves as shown.

6) Create an Exposure adjustment layer to the lantern layer and set the Exposure to -1.73 and Gamma Correction to 0.81.

Step 16
In this step we are going to create the lantern glow effect.
1) Create a new layer above the lantern layer and fill the layer with white and blue radial gradient in the shape of the lantern’s glass. Erase the part of the gradient that is overlapping the design of the lantern.

2) Now import the image of the Lens Flare on to the canvas and place it on the lantern. Then set the Blending Mode of the layer to Screen.

3) To create a glow of the fire that is out of the scene, paint yellow on the right side of the scene in a new layer.

4) Now place a lens flare to the fire glow as shown.

5) To match the color of the lens flare to the glow color, create a Hue/Saturation adjustment layer to the flare layer and check the Colorize option. Then set the Hue level to 40 and Saturation level to 36.

Step 17
In this step we will be creating the fire glow casting on the magic lantern.
1) Using the Soft Round brush paint the fire glow on the lantern as shown in a new layer placed above the lantern layer.

2) Now set the Glow layer to Hard Light and set the Opacity to 49%.

Step 18
In this step we are going to color correct the whole scene to blend all the elements of the scene evenly.
1) Create a Hue/Saturation adjustment layer placed below the lantern and fire glow layers. Then set the Saturation level to -22.

2) Now create an Exposure Adjustment layer above the previous adjustment layer and set the Exposure to -0.62 and Gamma Correction to 0.83.

3) Using the Curves adjustment layer set the RGB curves as shown.
4) With the Brightness/Contrast adjustment layer increase the brightness of the scene by 34.

Step 19
1) Create a new layer on the top of glow layers and paint Black Bokeh by the edges of the scene as shown, then set the Opacity of the layer to 47%.

2) Now create a new layer below the Black Bokeh layer and paint thick fog on the bottom of the scene as shown.

Step 20
In this step we are going to do some lighting and makeup adjustments on the princess.
1) Create a new layer above the princess layer and paint the light strokes on the princess hair as shown using the color #90c0c7.

2) Then set the Blending Mode of the layer to Overlay and Opacity to 72%.

3) To enhance the makeup of the princess create a new layer and paint the cheeks and eye lashes with orange color and lips with red. Then set the Blending Mode of the Layer to Overlay and Opacity to 20%.

4) Following the step 20-1 create the white light shade on the left shoulder of the princess.

5) To create the yellow fire glow casting on the princess hands, paint yellow color on the hands of the princess as shown in a new layer.

6) Then set the blending Mode of the layer to Overlay.

Step 21
In this step we are going to create a sparrow sitting on a dead branch.
1) Import the image of the dead branch on to the working canvas and place it beside the princess as shown.

2) Now create an Exposure adjustment layer to the dead branch layer and set the Exposure level to -1.10 and Gamma Correction to 0.75.

3) Import the image of the sparrow and place it on the dead branch as shown.

4) Using the Exposure adjustment layer to the sparrow set the Exposure level to -1.96. But since there is a light source from the right side of the scene we need a dim glow on the sparrow’s chest. Hence select the clipping mask of the adjustment layer and erase the adjustment layer’s effect on the sparrow’s chest using the Brush Tool (B) with black paint selected.

5) De-Saturate the Sparrow layer by -55 using the Hue/Saturation.

6) Now create a new layer above the sparrow layer and paint dark shadow on the back of the sparrow as shown.

7) Merge both the sparrow and the dead branch layers into a single layer and create a Curves adjustment layer to the folder and set the Blue curve as shown.

![]() Now add a Gaussian Blur of Radius 1.3px to the Sparrow and Dead Branch layer.
Now add a Gaussian Blur of Radius 1.3px to the Sparrow and Dead Branch layer.

Step 22
In this step we are going to paint snow covering the bottom part of the princess’s dress.
1) Using the Brush Tool (B) paint snow as shown with white color.

2) Now paint another shade of the snow with the color #9faaae on the previous snow layer.

3) Using the Smudge Tool soften the shades of the snow we previously created.

4) By using the Soft Eraser Tool (E) erase the hard edges of the snow.

Step 23
In this step we are going to color correct the snow we previously painted.
1) Merge all the snow layers and create a Curves adjustment layer and set the curves as shown.

2) Now create an Exposure adjustment layer and set the Exposure level to -1.49 and Gamma Correction to 0.81.

3) Now increase the Saturation level of the snow layer by +55 using the Hue/Saturation.

Step 24
In this step we are going to create snow in the scene.
1) Create a new layer beneath the princess layer and paint the snow using the snow brush.

2) Then add a Motion Blur with Angle 18 and Distance 20px.

3) Now create a clipping mask to the snow layer and erase the excess snow in the scene. By doing this way you can control the amount of snow in the scene any time.

4) Now create another new layer for the snow and place it above the princess layer and follow the previous step to create more snow in the scene. For this step increase the snow brush size as the snow particles in this layer are illustrated as flying close to the scene.

Step 25
In this step we are going to add Dragons in the scene.
1) Import the image of the Dragon into the scene and place it as shown.

2) Using the Exposure adjustment layer to the Dragon reduce the Exposure to -1.17 and Gamma Correction to 0.61.

3) Now create a new layer above the Dragon layer and fill the color #182438 in the shape of the Dragon.

4) Reduce the Opacity of the Dragon color layer to 63%.

5) Now Merge both color and Dragon layers and add a Gaussian Blur of Radius 1.8px

6) Using the Exposure Adjustment layer to the Dragon color layer set the Gamma Correction level to 1.12.

7) Similarly add a couple more Dragons to the scene as shown.

And We’re Done!
You can view the final outcome below. I hope that you enjoyed this tutorial and would love to hear your feedback on the techniques and outcome.
Member File Download
Download the original .psd file for this tutorial here:

 Members Area Tutorial: Create a Spooky Paranormal Photo Manipulation
 Members Area Tutorial: Create a Dark Photo Manipulation Using Photoshop CS6 New Features
 Members Area Tutorial: Create a Stunningly Detailed Matte Painting Landscape

Broken link for first resource (Princess). Just wanted you to know!