
Members Area Tutorial: Learn How to Photo Manipulate a Realistic Fallen Angel Scene
In this tutorial you’ll learn how to create a photo manipulation of a fallen angel using advanced skills. You’ll master some techniques such as:
- Extracting hair the correct way.
- Blending various photographic elements seamlessly.
- Creating realistic, custom lighting for your scene.
- Working with smart objects and a professional non-destructive workflow.
Final Image
As always, this is the final image you’ll be creating:

Resources Used In This Tutorial
- Model by Marcus Ranum.
- Hair by Cindy Grundsten
- Wing by Joe Diamond
- Floor by CGTextures.com (free membership required)
- Wall by CGTextures.com (free membership required)
- Pipes by CGTextures.com (free membership required)
- Drips by CGTextures.com (free membership required)
- Grunge by CGTextures.com (free membership required)
Step 1
First off, create a new file (Ctrl+N/Cmd+N) which is 2000×2313 pixels at a Resolution of 300 pixels/inch, set the Color Mode to Lab Color and the background to Transparent. Save this file as “Angel.psd”.

Step 2
Click on the foreground color swatch in the tool box to open up the color picker. Set the color to a dark blue-gray (#181a1e).
Press Alt+Backspace/Opt+Delete to fill Layer 1 with this color. Rename the layer to “BG”.

Step 3
Open up the Wall image (PlasterLeaking0046_1_L.jpg), press Ctrl+A/Cmd+A to select all, followed by Ctrl+C/Cmd+C to copy the image to the clipboard. Switch to the Angel.psd image and copy the wall into it (Ctrl+V/Cmd+V). The new layer should sit above the BG layer. Rename this layer to “Wall”. Use Free Transform to scale and position the Wall layer as indicated below.
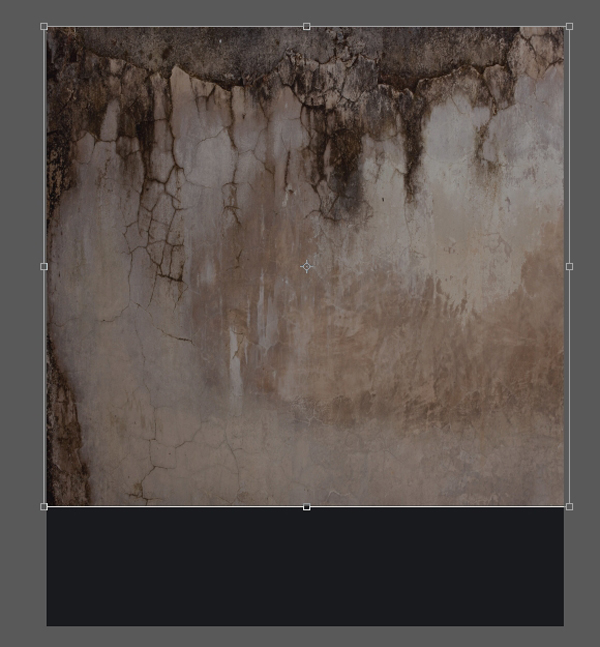
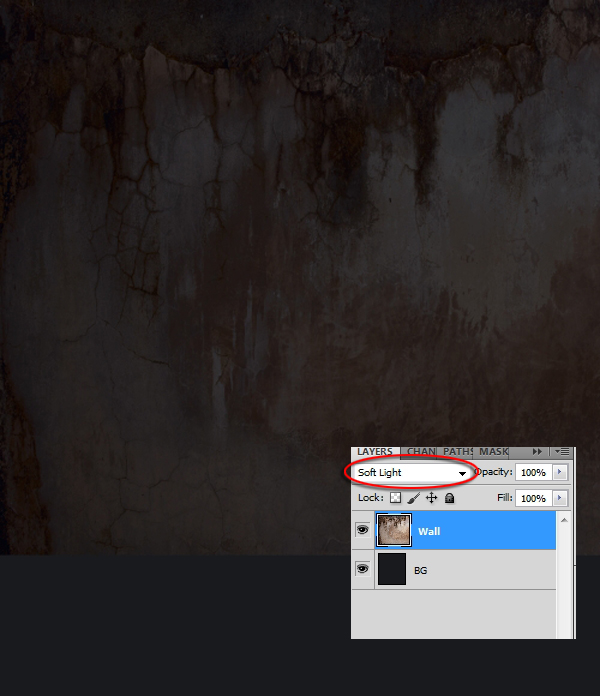
Next, set the Wall layer’s Blend Mode to Soft Light.
Step 4
Alt+click/Opt+click the Create new fill or adjustment layer icon at the bottom of the layer’s palette. Hold the Alt or Opt key while choosing Hue/Saturation from the pop-up menu.

When the New Layer dialog appears, type “Desat” in the name field and tick the Use Previous Layer to Create Clipping Mask box. Click Ok to create a new Hue/Saturation adjustment layer.

When the Hue/Saturation dialog pops up, set the Lightness to -50 and the Saturation to -22.

Click on the Wall layer and Shift+click on the Desat layer to select them both. Press Ctrl+G/Cmd+G to group the layer and rename the new group to “Wall”.
Step 5
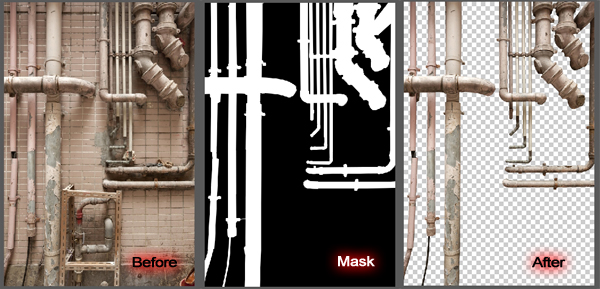
Although the wall won’t be playing a vital role in the overall composition, it helps to tell the story if we add some interest to it in the shape of pipes. Open up the Pipes image (Pipes0081_L.jpg). We need to separate the pipes from the wall. The easiest way to do that is to duplicate the background layer first by pressing Ctrl+J/Cmd+J. It’s always a good idea to duplicate the layer you’re going to work on, in case something goes terribly wrong. Next, create a layer mask for the new layer by clicking on the Add Layer Mask icon at the bottom of the Layer’s palette. Make sure the layer mask is active (it’ll have a double border around it) and that the foreground color is black. Use the Pen tool (P) to draw around each section of the wall. Every time you finish a piece of the wall press Ctrl+Enter/Cmd+Return to create a selection from the path and fill the selection with black by pressing Alt+Backspace/Opt+Delete. If you’re not sure how to use the Pen tool to create selections effectively, have a look at this tutorial.
When you’re done, the result should look like this:
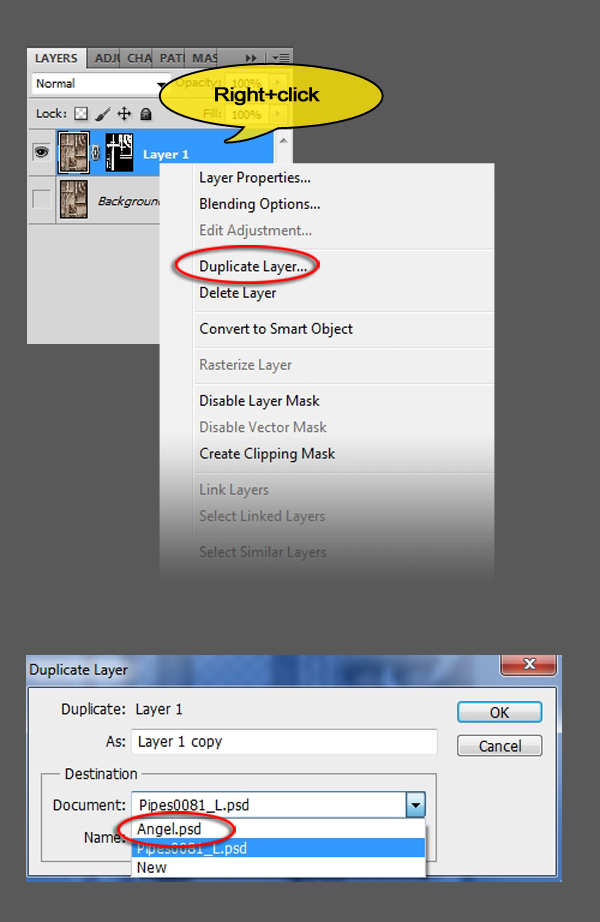
Now we’ll transfer the masked layer to Angel.psd. Right+click in an empty space next to your masked layer’s name and choose Duplicate layer from the pop-up menu. When the dialog appears, click on the arrow next to the Document name and choose Angel.psd from the list. Click Ok to confirm. You can now close the Pipes image.
Step 6
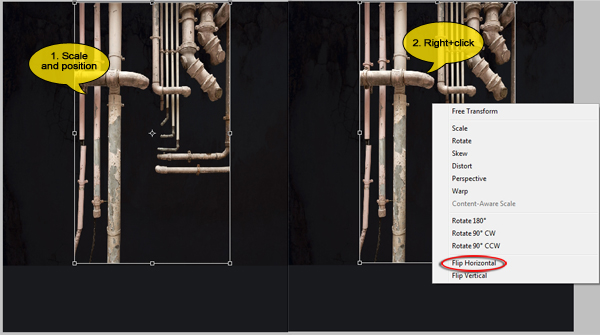
Back in Angel.psd you’ll see that the pipes are copied and pasted on their own layer. Make sure this layer sits above the Wall group and rename it to “Pipes left”. Next press Ctrl+T/Cmd+T and scale the pipes so that they fit vertically on the wall. When you’re done, right+click in the transformation rectangle and pick Flip Horizontal from the pop-up menu.
Right+click on the Pipes left layer mask and choose Apply Layer Mask from the list.

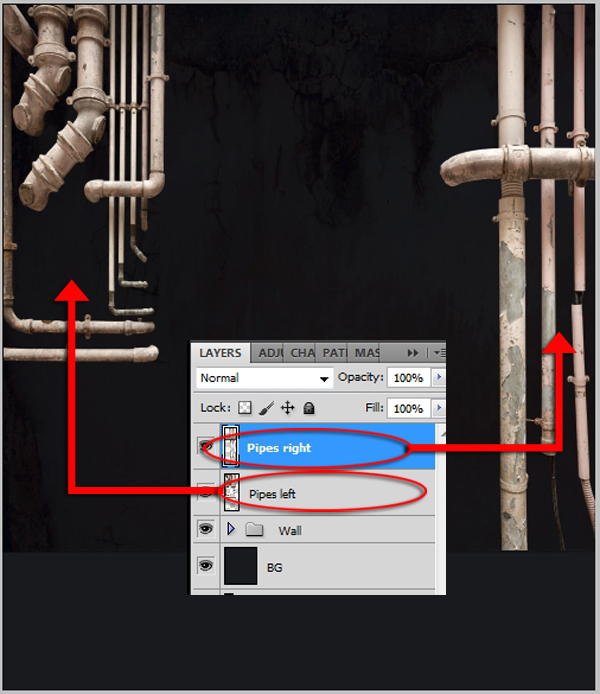
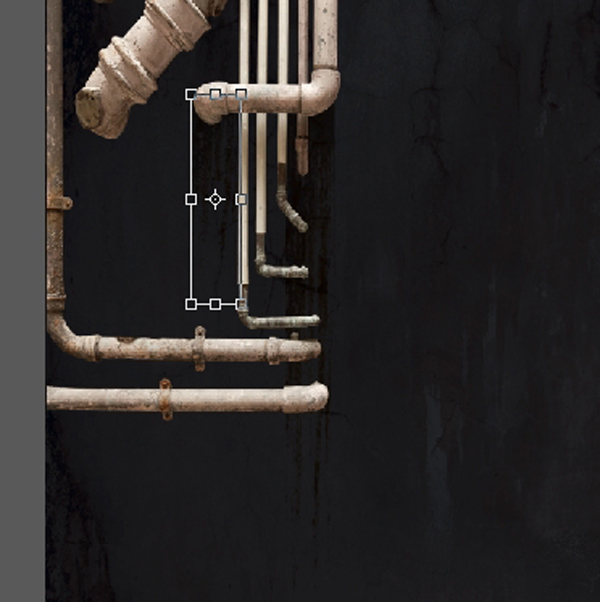
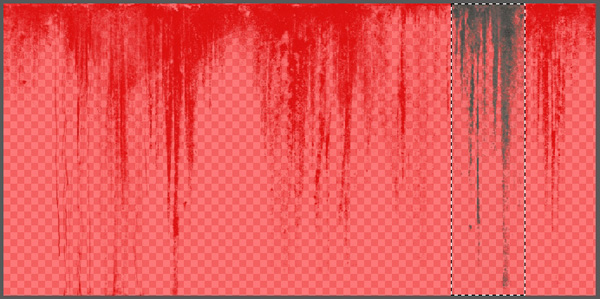
Use the Lasso tool (L) to select the right hand side group of pipes as shown below. Press Shift+Ctrl+J/Shift+Cmd+J to cut and paste the selection to a new layer. Rename this layer to “Pipes right”.

Activate the Move tool (V) and position the Pipes right layer against the right hand side edge of the image. Next, select the Pipes left layer by clicking on it and move it over to the left edge of the image.
Step 7
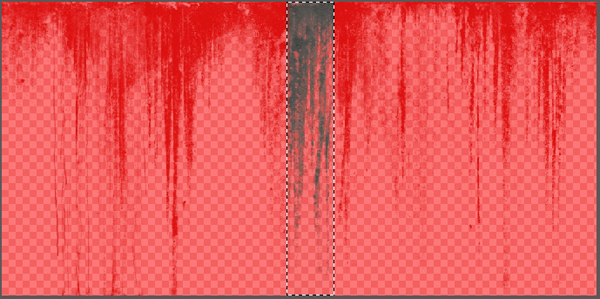
There are several things we need to do to make the pipes fit in with the wall. We’ll start with the pipes on the left. Open the Drips image (DecalsLeaking0181_1_S.png) and use the Rectangular Marquee tool (M) to select a piece of it as shown below. Copy it (Ctrl+C/Cmd+C) to the clipboard. Don’t close the image yet, we’ll need it again in a moment.
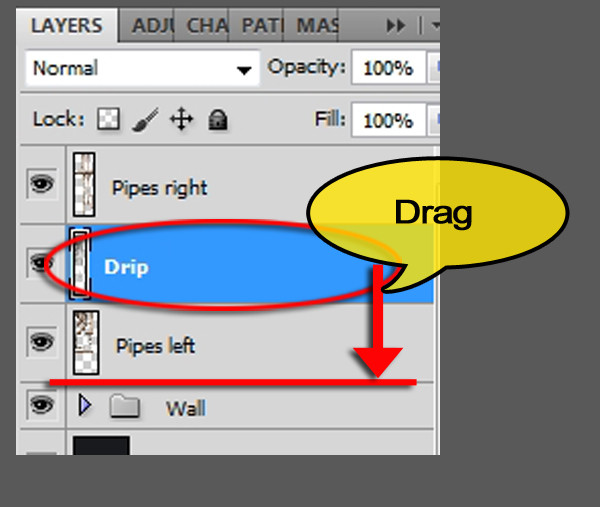
Switch to Angel.psd and press Ctrl+V/Cmd+V to paste the drip. In the Layers palette and rename the layer to “Drip”. In the Layers palette, grab the Drip layer and drag it below the Pipes left layer.
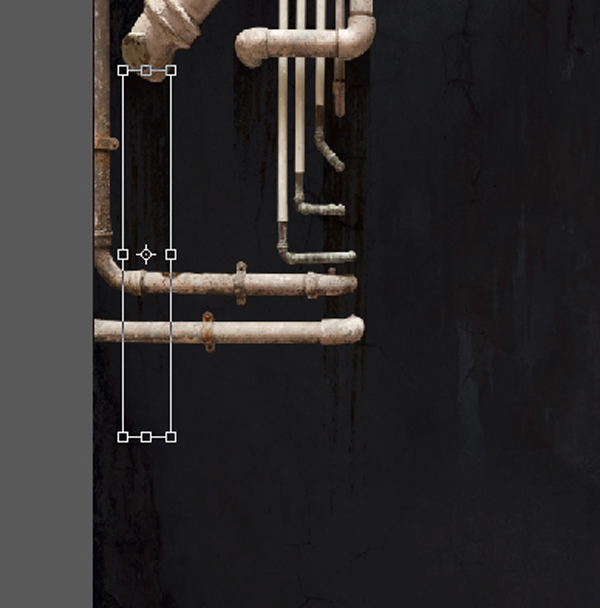
Use the Free Transform tool to position the drip underneath the left hand side pipes and scale it until it’s long and thin.

Set the Drip layer’s Blend mode to Multiply. Press Ctrl+J/Cmd+J to duplicate the layer. Rename it to “Drip 2″ and position and scale it as indicated below.
Make yet another copy of the drip by pressing Ctrl+J/Cmd+J once more. Call this layer to “Drip 3″. Move and scale it as shown in the image below.
Step 8
Click on the Pipes left layer to make it active and click on the FX icon at the bottom of the layer palette. Choose Drop Shadow from the pop-up menu and set its parameters as below.
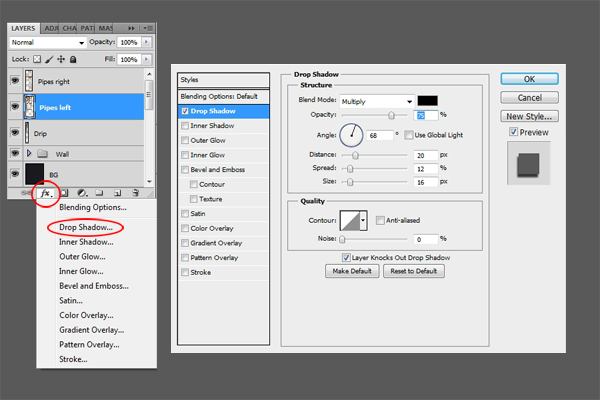
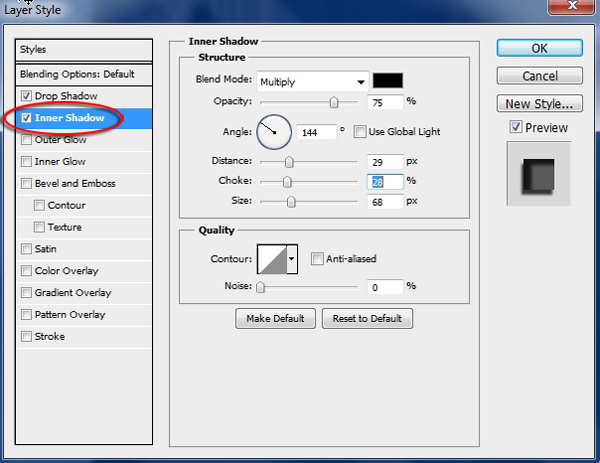
Still in the Layer Style dialog, click on Inner Shadow and adjust the settings as follows:
Step 9
To blend the pipes with the background, we’ll create a couple of adjustment layers. First, Alt+click/Opt+click the Create New Fill or Adjustment Layer icon at the bottom of the Layers palette and pick Hue/Saturation from the list. In the New Layer dialog, type “Desat” in the Name field and tick the Use Previous Layer to Create Clipping Mask box. Click Ok to accept. When the Hue/Saturation dialog appears set the Saturation to -79.

Next, Alt+click/Opt+click the Create New Fill or Adjustment layer icon again, but this time choose Curves from the pop-up menu. Type “Contrast” in the Name field and tick the Use Previous Layer to Create Clipping Mask box. Click Ok to accept. Adjust the curve in the Lightness channel as shown below.

Click on the Drip layer and Shift+click on the Contrast layer to select all layers belonging to the left pipes. Press Ctrl+G/Cmd+G and rename the resulting group to “Left pipes”.
Step 10
The right hand side pipes basically get the same treatment. Make sure the Left pipes group is selected but closed and return to the Drips image (DecalsLeaking0181_1_S.jpg). Select a portion of it with the rectangular marquee tool. Make sure it’s a different piece than the one we used for the left pipes. Copy and paste the piece into Angel.psd. You can now close the drips image, we won’t need it anymore.
Rename the new layer to “Drip” and use Free Transform to scale it and move it into place as indicated below. When it’s in place, change the Drip layer’s Blend Mode to Multiply.

Step 11
We’ll make short work of blending in the right hand side pipes by copying the layer style and the adjustment layers from the left hand side pipes. The layer style is first. Open up the Pipes Left group by clicking on the little arrow in front of it. Position the cursor on the FX icon next the Pipes Left layer’s name. Alt+click+drag/Opt+click+drag the icon up to the Pipes right layer. You’ll see a ghostly FX icon floating around while you do so. As soon as the icon appears to float on top of the Pipes right layer, drop it. This makes a copy of the layer style and attaches it to the Pipes right layer.

As you can see in the preview image, the main light source is located somewhere top center, so the shadows on the right should be the opposite of the one on the left. Open the layer style list by clicking on the arrow next to the Pipes right layer’s FX icon. Double-click on the Inner Shadow layer style to open its dialog, turn off the Use Global Light box and change the Angle to 45°.

The same applies to the drop shadow. Double-click on the Drop Shadow layer style to open it’s settings, turn off the Use Global Light box and change the Angle to 124°.

Step 12
We’ll perform the same operation on the adjustment layers. In the Left pipes group, click on the Desat layer and Shift+click on the contrast layer. Hold down Alt/Opt and click and drag both layers above the Pipes right layer.
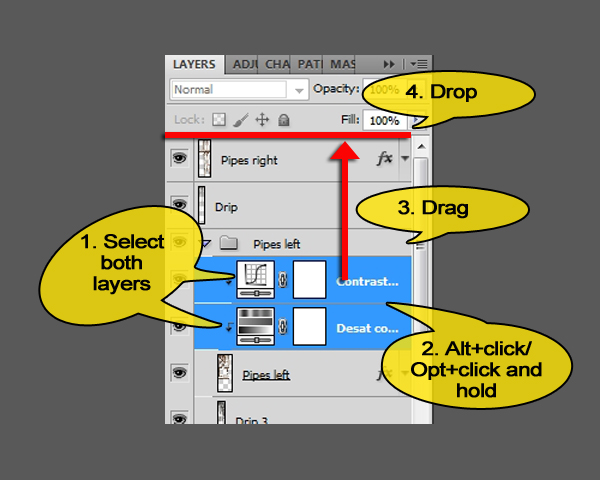
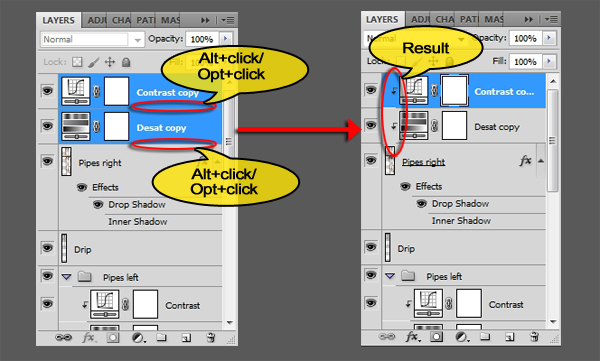
Your image has now become very dark. To fix this, Hold down Alt/Opt and position the cursor over the line between the Pipes right and the Desat copy layers, when the cursor changes to two overlapping circles, click once. This clips the Desat layer to the Pipes right layer. Do the same for the Contrast copy layer.
Step 13
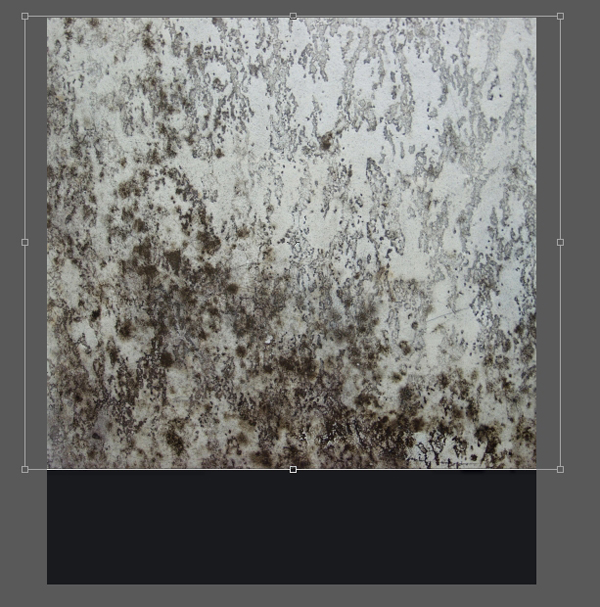
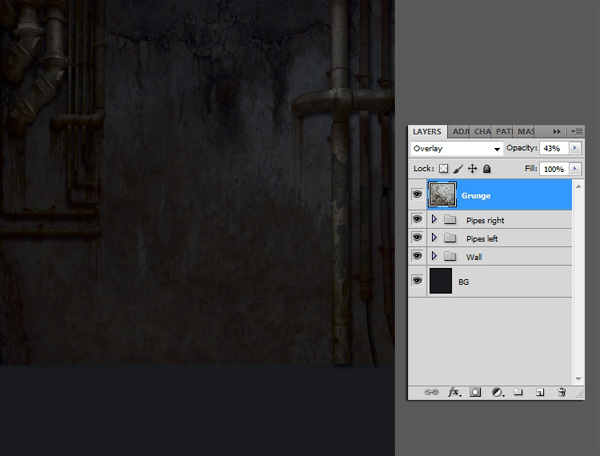
The back wall looks a little too clean, so let’s add some dirt and rust. Open the Grunge image (Grungemaps0001_L.jpg). Press Ctrl+A/Cmd+A to select the whole image. Next, press Ctrl+C/Cmd+C to copy it to the clipboard, followed by Ctrl+W/Cmd+W to close the image. Back in Angel.psd press Ctrl+V/Cmd+V to paste the grunge. Rename the layer to “Grunge”. Use Free Transform (Ctrl+T/Cmd+T) to scale the Grunge layer and position it so that it fits exactly onto the wall.
Set the Grunge layer’s Blend Mode to Overlay and its Opacity to 43%.

That concludes the creation of the back wall. Your image and Layer palette should look like the one below.
Step 14
To finish the environment, we’ll put in a floor. Open the Floor image (ConcreteFloorsDamaged0029_L.jpg). Copy and paste the whole image into Angel.psd as we did with the Grunge image. Rename the new layer to “Floor”. Using Free Transform (Ctrl+T/Cmd+T) scale and position it in such a way that it covers the lower portion of the image and touches the bottom of the wall. Don’t apply the transformation just yet.
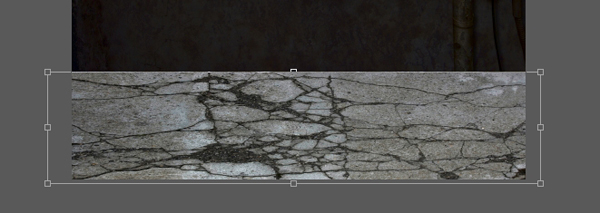
Right-click inside the transformation rectangle and choose Perspective from the list of transformations. Grab one of the bottom points and pull it outwards. Make sure the texture stays straight, otherwise it’ll look as if the floor is sloping sideways. When you’re done press Enter/Return to apply the transformation.

Step 15
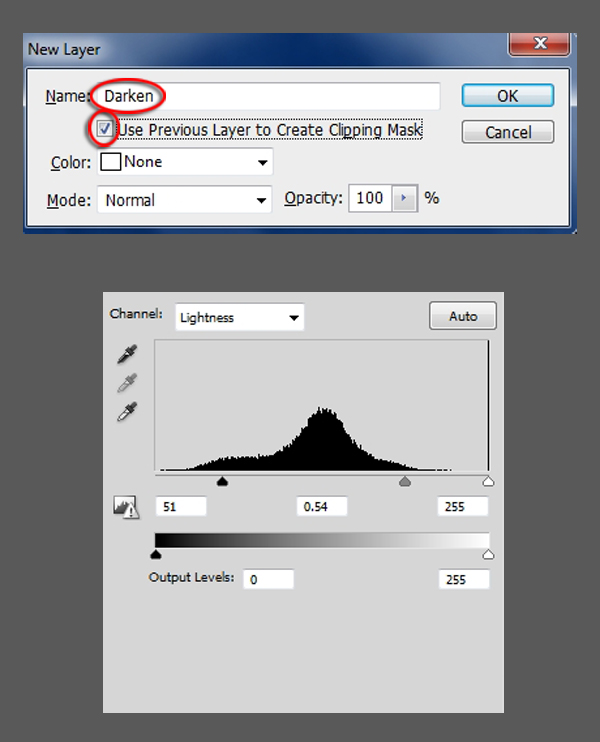
Although the floor should be a little lighter than the wall because the light is shining directly on it, it is too light at the moment. Also the color is wrong. First we’ll fix the lightness. Alt+click/Opt+click on the Create New Fill or Adjustment layer and pick Levels from the list. In the New Layer dialog type “Darken” in the name field and tick the Use Previous Layer to Create Clipping Mask box. Click Ok to accept and adjust the Lightness channel as shown below.
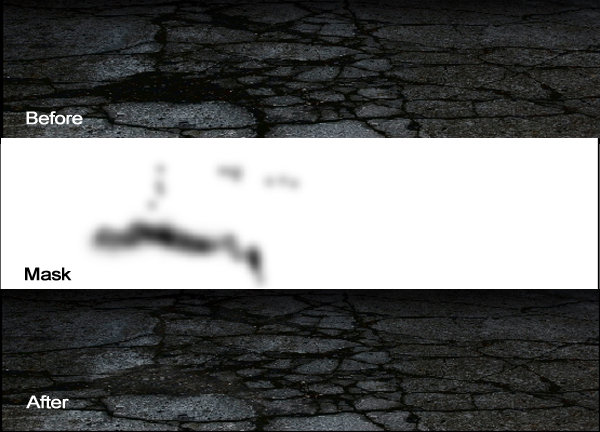
Some patches on the floor have now gone almost completely black which doesn’t look right. To exclude these very dark areas from the adjustment, click on the Darken layer’s layer mask, choose a soft, round brush and set its Opacity to 50%. Check that the foreground color is set to black and gently paint over some of the black areas on the floor to lighten them. You don’t have to catch them all, just paint over the biggest and most visible.
To adjust the color, Alt+click/Opt+click on the Create New Fill or Adjustment layer and pick Color Balance from the list. In the New Layer dialog type “Color” in the name field and tick the Use Previous Layer to Create Clipping Mask box. Click Ok to accept and adjust the Shadows, Midtones and Highlights as indicated below.

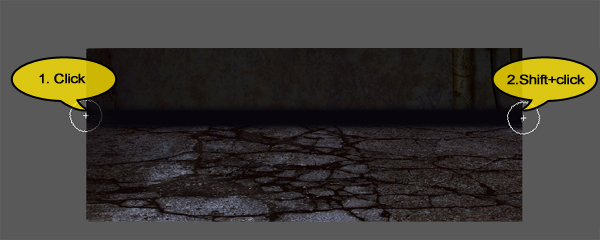
To make the intersection between the wall and the floor a little less harsh, Create a new blank layer above the Color layer by clicking on the New Layer icon at the bottom of the Layers palette. Renam this layer to “Wall/floor shadow”. Activate the Brush tool, choose a soft, round brush, set its size to 90 pixels and the Opacity to 100%. Click on the foreground color swatch in the toolbox and pick a dark color from the wall. I choose #08060c.

Draw a straight line over the area where the wall meets the floor by clicking on the left edge of the image and Shift+clicking on the right edge.
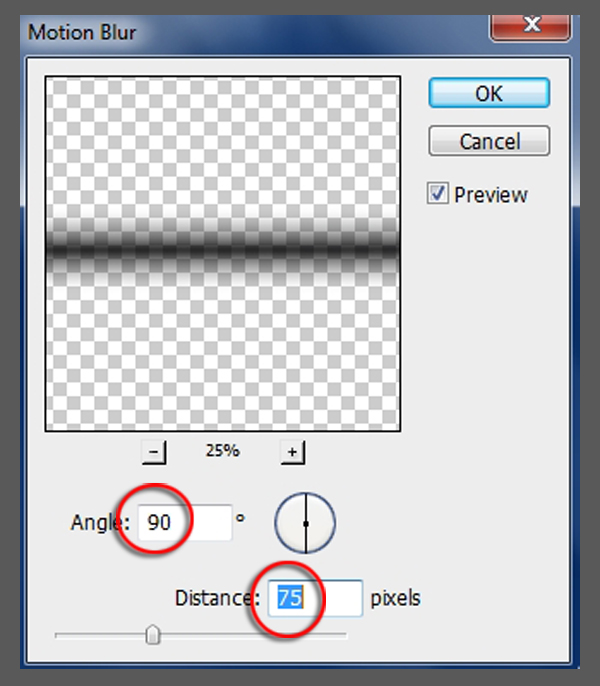
Choose Filter>Blur>Motion Blur from the menu, set the Angle to 90 and the Distance to 75.
Lastly, set the Wall/floor shadow layer Blend Mode to Overlay and its Opacity to 85%.

The environment, apart from the light which we’ll put in later, is now finished. Click on the Wall group and Shift+click on the Wall/floor shadow layer to select all wall and floor elements, and press Ctrl+G/Cmd+G to group them. Rename the new group to “Environment”.
Step 16
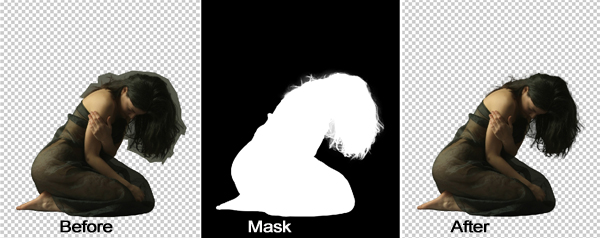
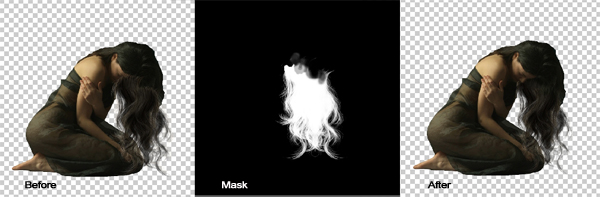
It’s time to bring the star of the show on stage. Open the Model image (dark_mist___1_by_mjranum_stock-d4sehmp.jpg). We need to separate the girl from the background. First of all, create a copy of the background layer by pressing Ctrl+J/Cmd+J. Turn off the background layer so you can see what your doing. Add a layer mask to this layer by clicking the Add Layer Mask icon at the bottom of the Layers palette. Next, use the Pen tool (P) to remove the background as we did with the pipes earlier. However, leave a margin of background around the hair.
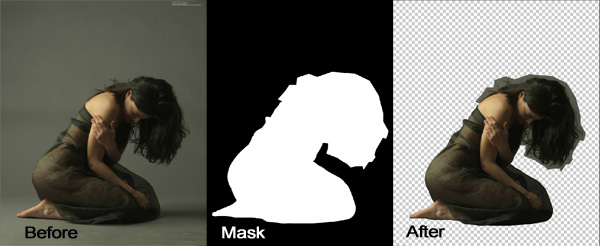
To mask out the hair, we’ll use Photoshop’s Refine Mask feature (NOTE: if you own a version of Photoshop older than CS5, you will not find the tools mentioned below. In that case, mask the hair with the Pen tool (P) and the Brush tool (B) as accurately as possible). Bring up the Masks palette. If you can’t see it, choose Window>Masks from the menu. Click on the Mask Edge … button to display the Refine Mask dialog. Change the settings as shown below.
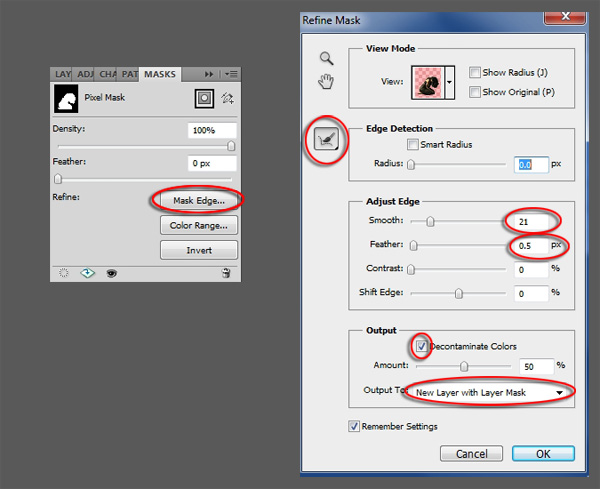
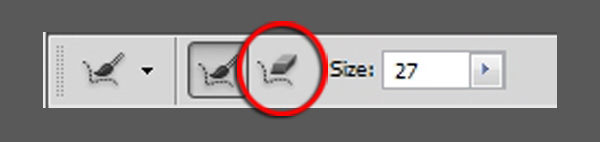
Zoom in so that you can see the hair clearly. Set the Mask brush in the Option Bar to 27 pixels and paint around and over the hair as indicated below. As you do, the gray background will disappear, leaving just the hair.

If you make a mistake, switch to the Mask eraser and paint over the offending area to restore it.
When you’re done, the mask should look approximately like the image below. When you’re satisfied, click Ok to apply the changes to the mask.
Step 17
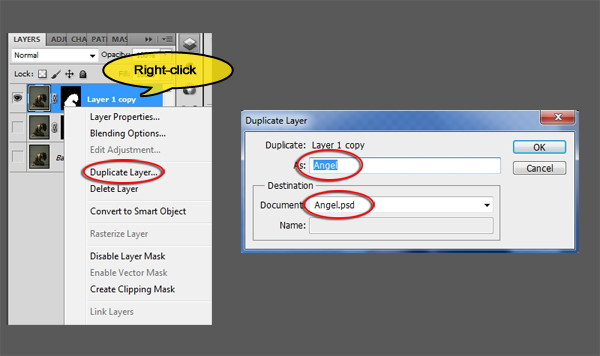
To transfer the girl and her mask to Angel.psd, right-click in an empty space next to the layer’s name and choose Duplicate Layer from the menu. In the Duplicate Layer dialog, type “Angel” in the As: field and choose Angel.psd from the document list. You can now close the Model image. It might be a good idea to save it as a psd file first, just in case something goes wrong.
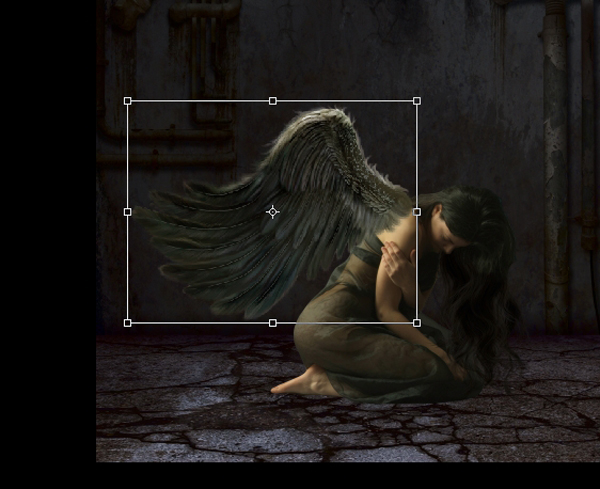
Back in Angel.psd, press Ctrl+T/Cmd+T to enable Free Transform mode. In the Option bar, click the Link button between the W and the H field and type 40 in the W field. The H field will automatically change to 40% as well. Move the angel so that she sits on the floor, just right from the center.

If, after all this, you can still see a light aura around the hair, return to the Masks palette, click the Refine Edge button and play with the settings until the hair looks right. The settings shown below worked for me, but you might have to experiment a little. Refining a mask edge is not an exact science, a lot of trial and error comes into play.

Step 18
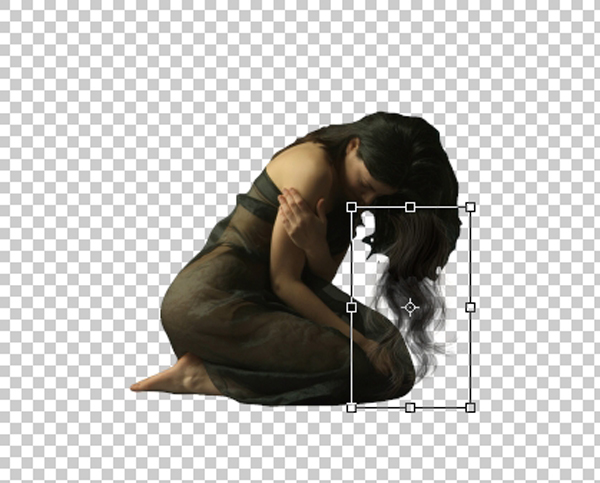
We’ll extend the hair a little to make the angel look a little less like a mortal woman. Open the Hair image (hair stocks.psd). Open the Hair group and locate the Black layer. There are two of the them but you want the one that looks thicker. Right+click next to the layer’s name and pick Duplicate Layer from the menu. As before, choose Angel.psd from the document list and Type Hair 1 in the As field.

Close the Hair image. In Angel.psd, turn the BG layer and the Environment group off for now by clicking on the Eye icon. Next, move and scale the Hair 1 layer as indicated below.

Press Ctrl+J/Cmd+J again to make a copy of the hair. Choose Edit>Transform>Flip Horizontal and move the layer so that the top of the hair sits over the angel’s face.

Press Ctrl+J/Cmd+J twice to create 2 more copies of the hair. Leave the Hair 1 copy 2 layer where it is but move the Hair 1 copy 3 layer as shown below.
Step 19
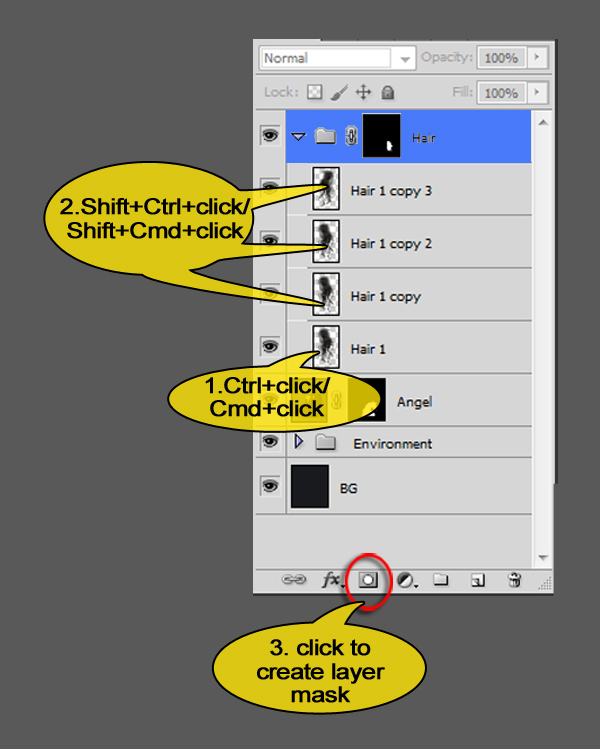
You now have 4 strands of hair. Select them all, press Ctrl+G/Cmd+G and rename the resulting group “Hair”. As it stands, we need to do some more work on the hair to make it blend in with the model’s own hair. Next open the Hair group and Ctrl+click/Cmd+click on the Hair 1 layer to create a selection from it. Add the other 3 hair layers to the selection by Shift+Ctrl+clicking/Shift+Cmd+clicking on each in turn. Next, make sure the group is active and click on the Add Layer Mask icon on the bottom of the Layers palette. The Hair group now has a layer mask containing all hair layers.
Make sure the Hair group’s layer mask is active. Press B to activate the Brush tool and choose a soft, round brush. Check if the foreground color is black and set the brush’s size to 15 pixels. Zoom in close to the face and remove all the hair which is overlapping the face. Next change the brush’s opacity to 30% by pressing the 3-key. Brush gently over the top of the new hair strands to make the blend in with the existing hair.
Step 20
To make the hair fit in better, we’ll have to change the color. Make sure the Hair 1 copy 3 layer is selected by clicking on it. Next, click on the Create New Fill or Adjustment Layer icon at the bottom of the Layers palette and choose Curves from the list. Rename the layer to “Darken” and set the curve for the Lightness channel as follows.

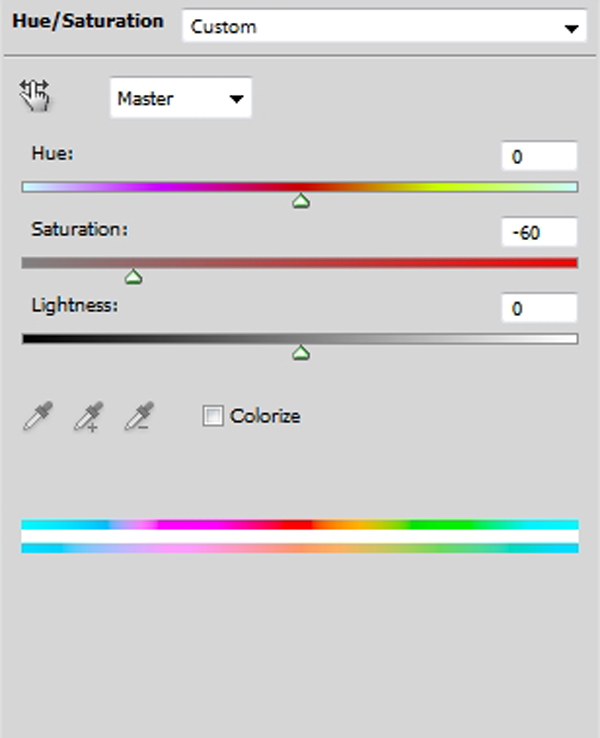
Create another adjustment layer but this time pick Hue/Saturation from the pop-up menu. Set the Saturation slider to -60 and rename the layer to “Desat”.
Step 21
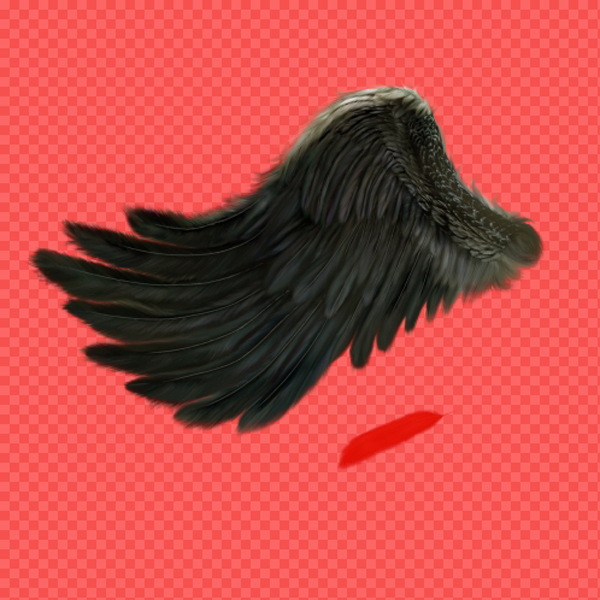
To complete the transformation from mortal woman to angel, let’s add some wings. Open the Wing image (angel_wing_by_jtotheotothee-d3btlrm.png) and use the lasso tool (L) to select the wing but not the loose feather. Because the Wing image is a png with a transparent background, you don’t have to be very precise, just make sure you catch all of the wing.
Copy and paste the wing into Angel.psd. Rename the layer to “Front wing” and scale and position it until it sits on the girl’s shoulder.
Press Ctrl+J/Cmd+J to duplicate the Front wing layer and rename the copy to “Back wing”. Grab the Back wing layer and drag it down to below the Angel layer.

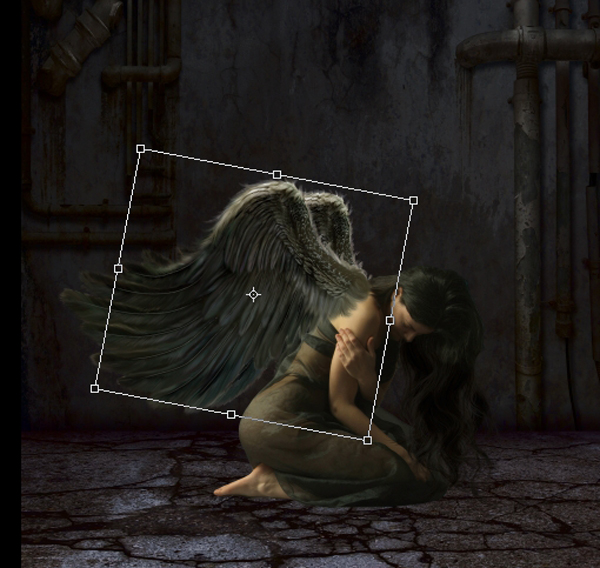
Use Free Transform (Ctrl+T/Cmd+T) to scale the back wing down a little horizontally and rotate it slightly.
Step 22
Return to the Front wing layer by clicking on it and create a layer mask for it by clicking on the Add layer mask icon at the bottom of the Layers palette. Select the piece of the wing which is overlapping the angel’s shoulder. You can use either the Pen tool (P) or the Lasso tool (L) for this. Fill the selection with black.

The cut from the wing looks harsh and unnatural at the moment. To fix this, go to the Masks palette and set Feather to 8 pixels. If you don’t have access to the Masks palette, choose Filter>Blur>Gaussian Blur from the menu and set the Radius to 8 pixels.

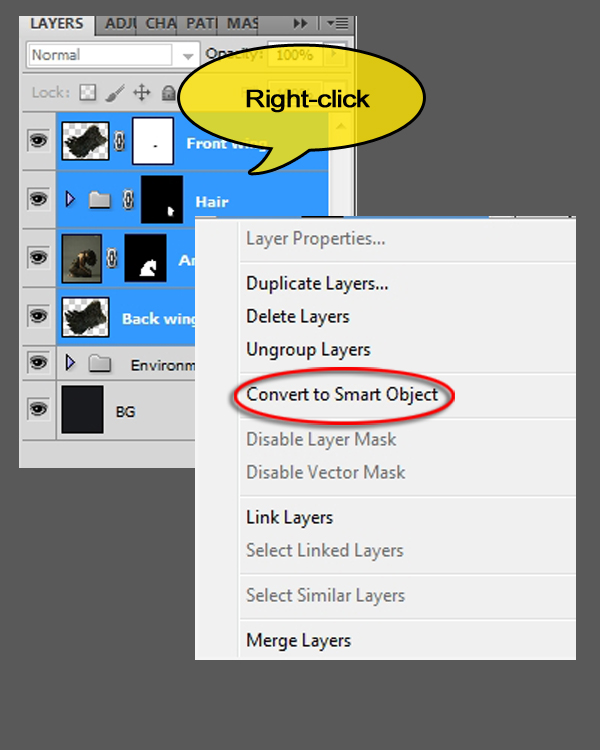
All elements for the angel are now in place. To make it easier to edit the angel as a whole, we’ll convert her to a smart object. In the Layers palette, click on the Back wing layer and Shift+click on the Front wing layer to select the whole of the angel. Next, right+click and choose Convert to Smart Object from the pop-up menu. Rename the smart object to “Angel”
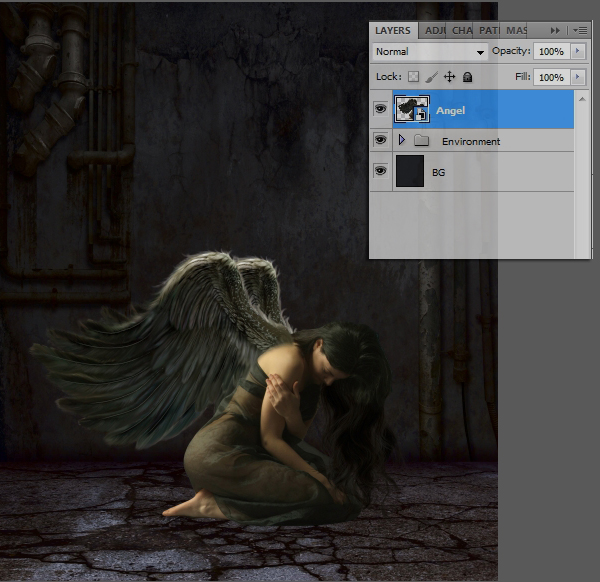
If everything went to plan, your image and Layers palette will now look like this:
Step 23
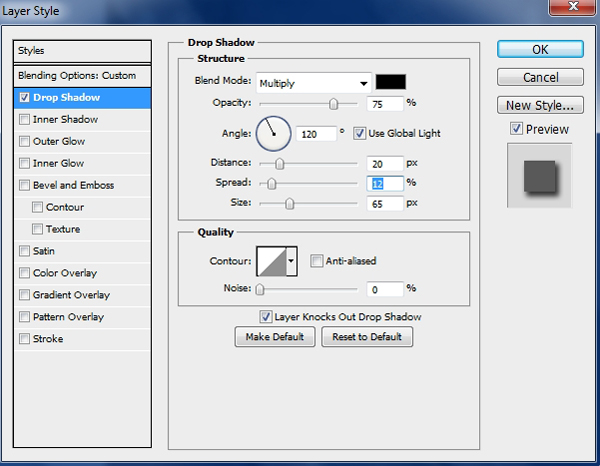
There are a few more things we have to do to blend the angel into her environment. First, there is no shadow on the floor underneath her, so let’s create one. Make sure the Angel smart object is selected then click on the FX icon at the bottom of the Layers palette and choose Drop Shadow from the list. Adjust the settings as indicated below.
Right+click on the FX icon on the Angel smart object and choose Create Layer from the pop-up menu. If you get a warning telling you not all layer styles can be converted to a layer, just click Ok. Photoshop now creates a layer beneath the Angel smart object called Angel’s Drop Shadow.

Use Free Transform (Ctrl+T/Cmd+T) to flatten the drop shadow until it looks like a pool of shadow underneath the angel.

Check the Layers palette. The layer’s Blend mode should be set to Multiply and the Opacity to 82%.

Choose Filter>Blur>Gaussian Blur from the menu and set the Radius to 14.8.

Step 24
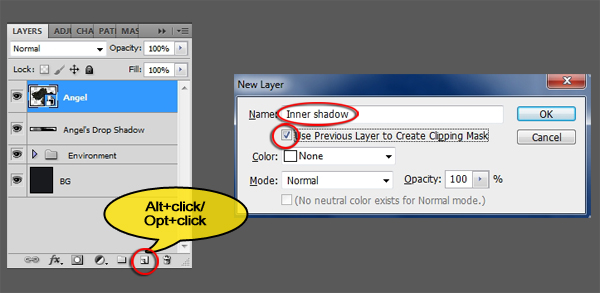
The shadow doesn’t look quite right yet. The problem here is that the shadow on the angel’s leg doesn’t match the shadow on the floor. To rectify this, select the Angel smart object and Alt+click/Opt+click on the New Layer icon at the bottom of the Layer’s palette. When the New Layer dialog appears, type “Inner shadow” in the Name field and tick the Use Previous Layer to Create Clipping Mask checkbox.
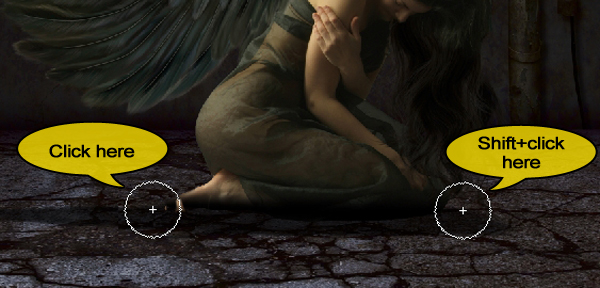
Activate the Brush tool, select a soft, round brush and set its Size to 100 pixels. The foreground color should be set to black. Click just left of the angel’s toes and Shift+click just right of her knee. This creates a straight line across the bottom of her leg.
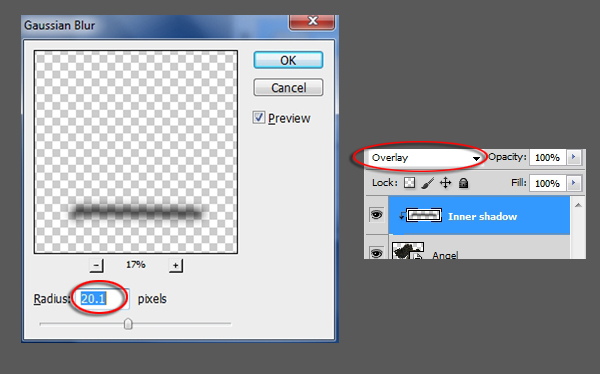
Choose Filter>Blur>Gaussian Blur from the menu and set the radius to around 20 pixels. Click Ok to accept. In the Layers palette, set the Inner shadow layer’s Blend mode to Overlay.
Step 25
Click on the Angel smart object to make it active, followed by clicking on the New Layer icon at the bottom of the Layers palette. Rename this layer to “Glow”. Because the Inner Shadow was clipped to the Angel smart object, the Glow layer will be automatically clipped to the angel as well.
We’ll use this Glow layer to create some light reflection on the top of the angel’s head. Set the foreground color to a pale yellow or #fffac5.
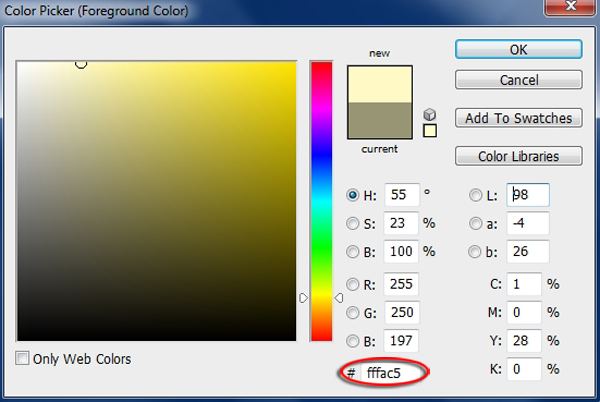
Activate the Brush tool (B), make sure the brush is a soft, round one and set it’s size to 70 pixels. Gently draw over the top of the angel’s head were the light would hit it.
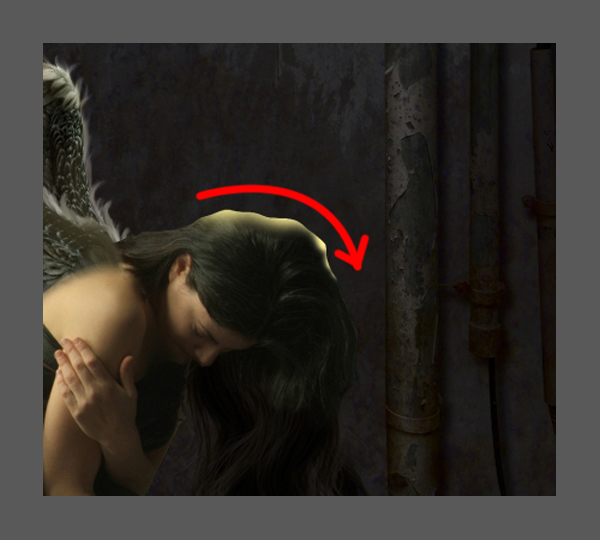
Choose Filter>Blur>Gaussian Blur from the menu and set the Radius to 18 pixels. In the Layers palette, set the Glow layer’s Blend mode to Vivid Light and the Opacity to 55%.

Click on the Angel’s Drop Shadow layer and Shift-click the Inner shadow layer. Press Ctr+G/Cmd+G and rename the resulting group to “angel”.
Step 26
Now we’ll create the light beam in which the angel is trapped. Make sure all groups are close and click on the Environment group to make it active. Create a new layer above the group and rename it to “Light circle”. Use the Eliptical Marquee tool (M) to draw an elipse on the floor beneath the angel as shown below. Next, fill the elipse with the same color you used for the light reflection on the angel’s hair (#fffac5).
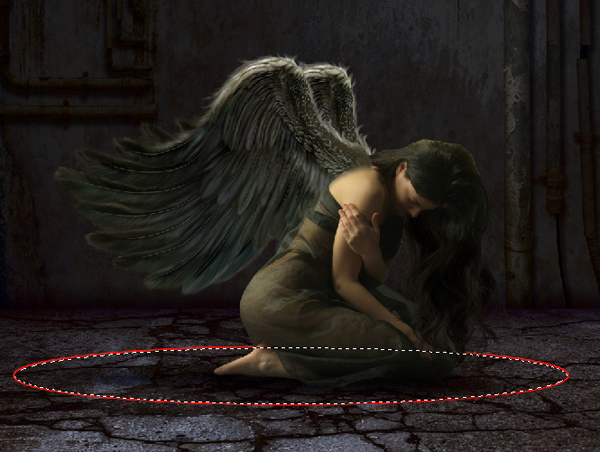
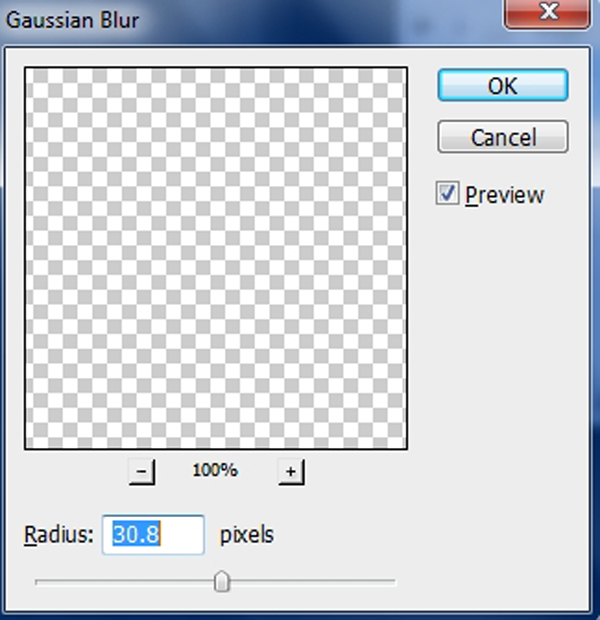
Apply a Gaussian Blur (Filter>Blur>Gaussian Blur) with a Radius of 30.8 to the light circle.
Next, set the Light circle layer’s Opacity to 29%

Step 27
To create the light beam, create a new layer above the Angel group and rename it to “Light beam”. Create a pyramid shape with the Polygonal Lasso tool (L) and fill it with the same pale yellow color (#fffac5).

Apply a Gaussian Blur with a radius of 53.3.

Create a layer mask for the Light beam layer and choose Filter>Noise>Add Noise from the menu. Set the Amount to 77.73 and the Distribution to Uniform. Next apply a Gaussian Blur (Filter>Blur>Gaussian Blur) with a Radius of 3.9 to the layer mask.

The light beam now completely obscures the angel. Open the Angel group and Ctrl-click/Cmd-click the Angel smart object’s thumbnail to create a selection from it. Make sure the Light beam layer’s layer mask is still active and fill the selection 31% gray (#4e4e4e).

Press Ctrl+D/Cmd+D to get rid of the selection. Next, Ctrl+click/Cmd+click the Angel’s Drop Shadow layer’s thumbnail to create a selection from it. Still on the layer mask, fill this selection with 15% gray (#2a2a2a).

Lastly, set the Light beam layer’s Opacity to 22%.

Step 28
Let’s evaluate what we’ve done so far. Your image and Layer palette should now look like this:

It looks alright but after all our effort the background still looks too bright The scene would be much more dramatic if the environment was darker. To make it so, click on the environment group, but don’t open it. Next, click on the Create New Fill or Adjustment Layer icon and pick Curves from the list. Adjust the Lightness channel as indicated below. Rename the layer to “BG Darken”.
To complete the background adjustments, create another adjustment layer, but this time choose Hue/Saturation. Set the Saturation and Lightness sliders as shown below and rename the layer to “BG Desat”.


Step 29
Last, but not least, we’ll bump up the color and contrast of the angel a little so she’s more in focus. Click on the Light beam layer to make it active. Ctrl+click/Cmd+click on the Light Beam’s layer’s layer mask to create a selection from it, Next, press Shift+Ctrl+I/Shift+Cmd+I to inverse the selection. Click on the Create New Fill or Adjustment Layer icon at the bottom of the Layers palette and choose Levels from the list. Photoshop will automatically add the selection to the Levels adjustment layer as a layer mask. Adjust the levels for the Lightness, a and b channels as follows:

Step 30
Well, that’s it, we’re almost done.
If you would like to save your work as a JPEG, first save the file to anther name (Shift+Ctrl+S/Shift+Cmd+S), and choose Layers>Flatten from the menu. Next convert the image to RGB color (Image>Mode>RGB color) and then save the result as a jpg image (Shift+Ctrl+S/Shift+Cmd+S)
Below you see the end result:
And We’re Done!
You can view the final outcome below. I hope that you enjoyed this tutorial and would love to hear your feedback on the techniques and outcome.
Member File Download
Download the original .psd file for this tutorial here:

 Members Area Tutorial: Photo Manipulate a Complex Falling Angel Scene
 Members Area Tutorial: Photo Manipulate a Complex Space Station Scene
 Members Area Tutorial: Photo Manipulate a Complex Surrogate Scene

Leave a comment
0 Comments:
No comments have been posted yet. Be the first!
Leave a Comment: