
Members Area Tutorial: Learn Digital Portrait Painting by Drawing a Beautiful Woman From Scratch
Today’s advanced Photoshop tutorial will teach you digital portrait painting by showing you how to draw a beautiful woman from scratch using Photoshop.
Final Image
As always, this is the final image that we’ll be creating:

Resources Used In This Tutorial
Step 1
This image is painted in photoshop by using graphic pen tablet in which several digital painting techniques and fundamentals are involved.
Hence, before we start painting let’s have a look about some basic fundamentals. In a digital painting three basic elements are:
Light: To add lightness to the scene.
Shadow: To add depth and shadows to the scene.
Blending: To add smooth blending to the scene.

Step 2
Create a new document of dimension 1920 x 1080 pixels, select a brush of size 2 pixels, press F5 and change the brush setting mentioned below:
Other Dynamics; Opacity Jitter – 0%, Flow Jitter – 0%.

Step 3
Start drawing outline of the face, you can take any image for reference for it. Don’t spend too much time to add details, a rough sketch will work and we will get enough time to add details. Set background color other than grey like #a49a92.

Step 4
Select a large brush of color #e6cbb0 and fill the color in the face. Next, select a brush of size 30 pixels & color #62463b and start adding shadows to the face. Now change the brush color to #f6e7c8 and add lights to the face.

Step 5
Now select a brush of size 35 pixels with following settings:
Shape Dynamics:
minimum diameter – 70%, Control – Pen Pressure. Set size jitter, angle jitter and roundness to 0%.
Next start blending lights and shadows, change the brush size when needed to get smooth skin shading. The result may look like this:


Step 6
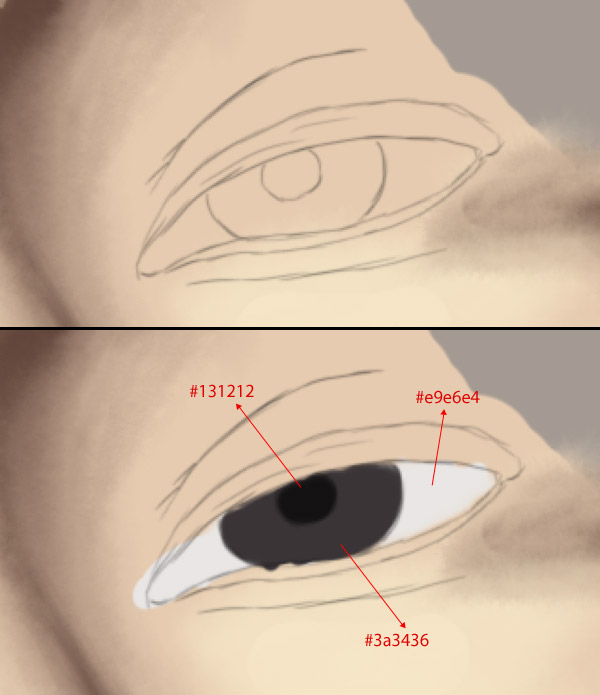
To make eyes, select a brush of size 2 pixels with these settings: Other Dynamics; Opacity Jitter – 0, Control – Off, Flow Jitter – 0, Control – Pen Pressure.
Draw the eye’s outline in detail then add following color to the eye:
Pupil – #3a3436,
Iris – #131212,
Eyeball – #e9e6e4.
Step 7
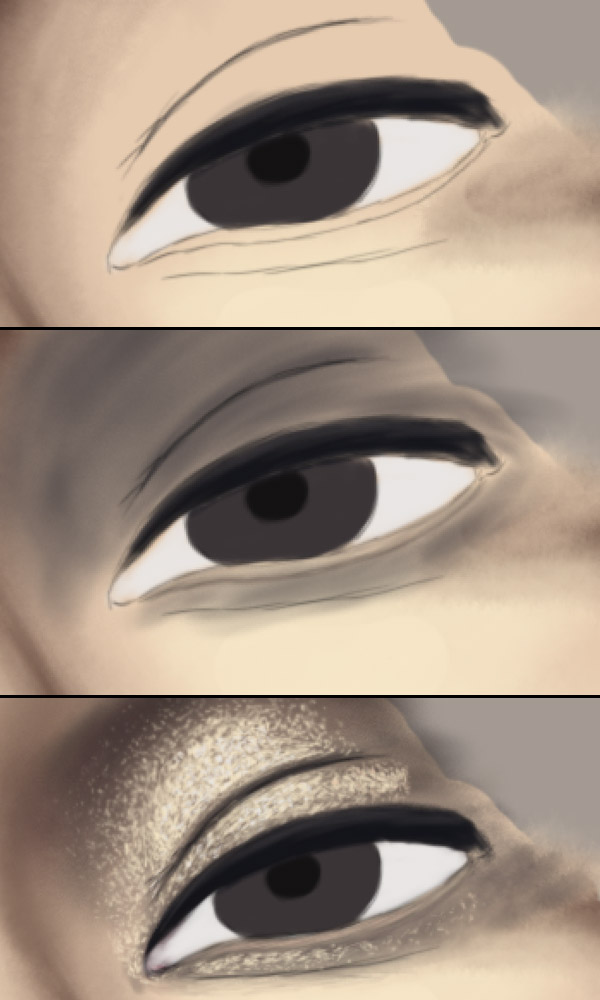
Select a soft brush of size 10 pixels & color #13141a and start creating upper eyelid. Change the brush color to #443f41 and increase the size and softness of brush then add some shading to the eye. Change the size of brush to 2 pixels and color to #e6cbb0 then start adding sparkling make up to the eye. Change the brush color to #f6e7c8 and add more lighting to the makeup.
Step 8
Set brush color to #13141a and add shading to the pupil. Next set brush color to #7e8181 and add lighting to the pupil. Add some more details to the eye to give it realistic look.

Step 9
Select a brush of size 2 pixels and create eyelashes and eyebrows. Repeat the steps 6 – 9 to create another eye to the face.

Step 10
To create lips first draw the outlines of lip with a brush of size 1 pixel. Set foreground color to #a25a68 and fill the color to lips. Next, select a soft brush of size 50 pixels and color #6a353f to add the shadow to the lips.

Step 11
Now set the brush color to #d19692 and add lighting to the lips. Next, set the brush of color #6c3741 & size 3 pixels and draw some wrinkles to the lip. To add the glossy look to the lip select a hard edge brush of color #fbece9 and create light reflections to the lip.

Step 12
Select a soft brush of color #cc9d95 and refine the lower lip lining. Now change the brush color to #6c3741 and add shadows to the lower lip lining to give it natural look. Add some more lights and reflection to make lips more realistic.

Step 13
Now we will add some more details to the lips to give it natural look. Select a chalk brush of color #e0bdbb and add some texture to the lip then apply Gaussian blur of radius 2 pixels. Set the layer’s opacity to 50%.

Step 14
Now we will refine the nose for that, create the outline of nose and then start adding details to it like nostrils, shadows, etc. Use soft brush to blend colors to get smooth skin texture.

Step 15
Next we will add the teeth to the mouth. To create the teeth select a brush of size 2 pixels & color#9c806b and draw the teeth outlines than fill the teeth with color #d5c7ba. Now add some shadows to the teeth then change the brush color to #18090e and draw inside area of mouth.

Step 16
Now add some shading to the teeth by selecting a soft brush of color #694745. Similarly add shading to lower teeth by using colors #90715d and #ccbcac. The teeth look a little yellowish hence we will use a light blue to make teeth white. Set foreground color to #abc1d7 and start brushing the areas that need to look more white. The result would look like this.

Step 17
To make teeth more brighter set foreground color to #f1e8db and brush the areas that you want brighter. Now add some more shadows by adding color #6f5855 to give teeth a natural look.

Step 18
Now select a brush of size 2 pixels and draw the light reflections on the teeth that would give teeth a realistic look.

Step 19
The teeth look natural, but we have not done here. Now we will draw the teeth inside the mouth that is very less visible. Select a brush of color #080204 and brush the darker areas, change the brush color to #241a1b and create the inner teeth.

Step 20
Now select a soft brush of color #e8d4b7 & #ddc2a7 start air brushing to get smooth skin texture.

Step 21
Next select skin texture brush, set the foreground color to #dac1a8 and start adding skin detailing, change the brush size & color to get better results.

Step 22
To add more detailing to the skin go to Filter > Filter Gallery > Texturizer. Set scaling to 75% and Relief to 1. The result would look like this.

Step 23
Now we will create hairs for the image for that, fill the hairs with color #241e20. Select a brush of size 2 pixels & color #5a3f36 and start creating hairs. Add some shadows of hairs to the face to give it natural look.

Step 24
The image looks impressive, but we can add some more hairs on face to make it more beautiful. Set the brush size to 1 pixel and draw some hair curls on the face. Add a mole near lips to increase its beauty.

Step 25
This is the last step of the tutorial. The hairs on woman’s head still needs refinements. To do this draw some more hairs on the edge of head to give it natural and realistic look. Duplicate the layer and set it’s blending mode to soft light, change the opacity to 50% and tutorial ends here.

And We’re Done!
You can view the final outcome below. I hope that you enjoyed this tutorial and would love to hear your feedback on the techniques and outcome.
Member File Download
Download the original .psd file for this tutorial here:

 Members Area Tutorial: Create a Vintage Gun From Scratch Using Photoshop
 Members Area Tutorial: Create the Beautiful Digital Masterpiece ‘Mesmerized’
 Members Area Tutorial: Digital Painting Lesson: Scarecrow’s Joyride

This is an amazing tutorial, I will make very good use of this and all the colours you have used. Its amazing thank you for sharing.
Thanks Evie, I’m so glad you enjoyed the tutorial. Do you feel that it’s given you a better handle on digital painting?
I’d love to see any of your work if you’re able to share it.