
How to Create a Surveillance Camera
Hi there. In the following tutorial your will learn how to create a surveillance camera.
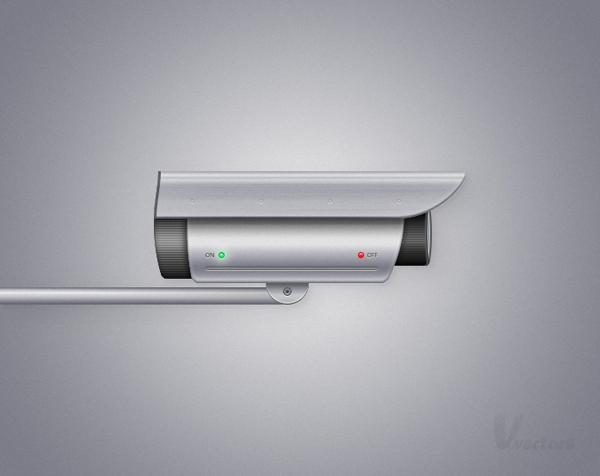
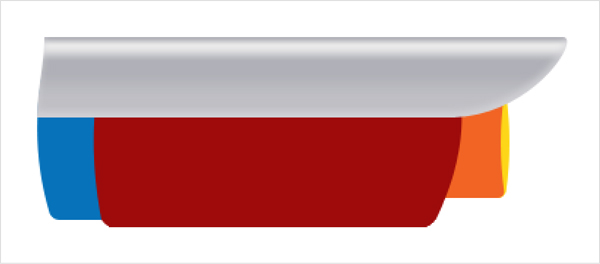
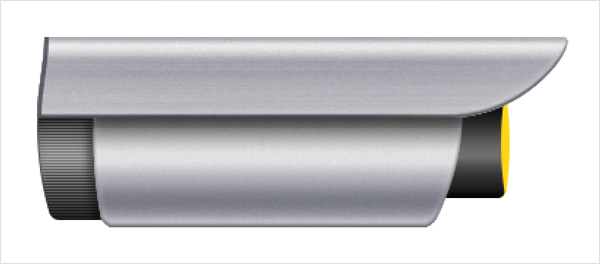
Final Image
As always, this is the final image that we’ll be creating:
Step 1
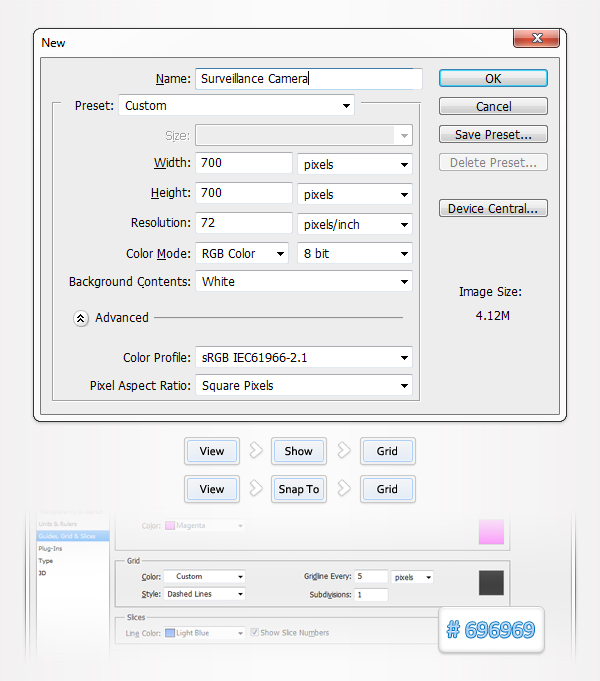
Open Photoshop and hit Control + N to create a new document. Enter all the data shown in the following image and click OK. Next, enable the Grid (View > Show > Grid) and the Snap to Grid (View > Snap To > Grid). For the moment you need a grid every 5px. Go to Edit > Preferences > Guides, Grid & Slices and focus on the Grid section. Enter 5 in the Gridline Every box and 1 in the Subdivision box. Also, set the color of the grid at #696969. Once you set all these properties click OK. Don’t get discouraged by all that grid. It will ease your work later. You should also open the Info panel (Window > Info) for a live preview with the size and position of your shapes.
Step 2
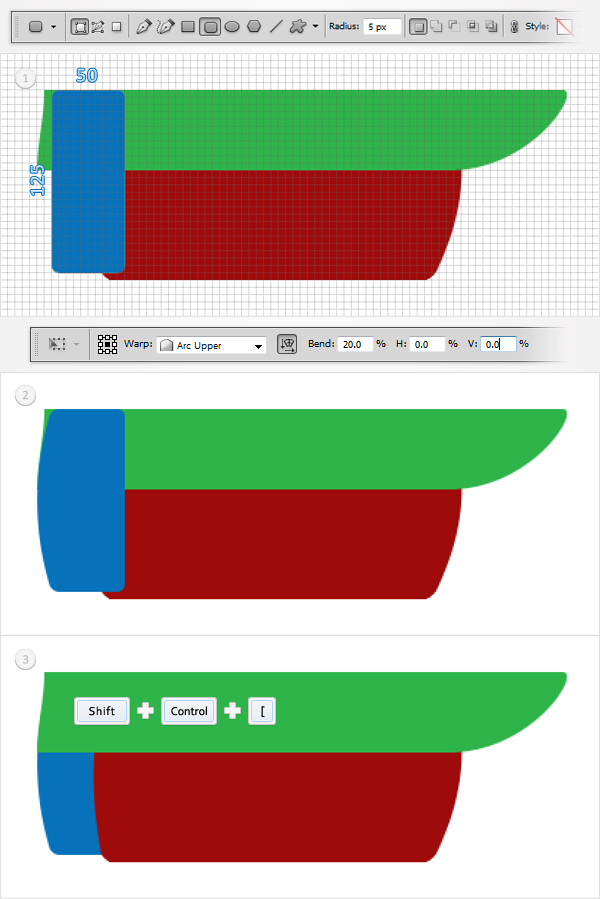
Pick the Rectangle Tool and create a 360 by 55px, green vector shape. Make sure that this shape is still selected and switch to the Direct Selection Tool. Select the bottom, right anchor point and move it 75px to the left. The Snap to Grid will ease your work. Now your shape should look like in the second image. Reselect it and go to Edit > Transform > Warp. Select Arc Lower from the Warp menu, enter 100 in the Bend box and hit Enter. Now your shape should look like in the third image. Reselect the Direct Selection Tool, select the top, left anchor point and move it 5px to the right. In the end your shape should look like in the fourth image.

Step 3
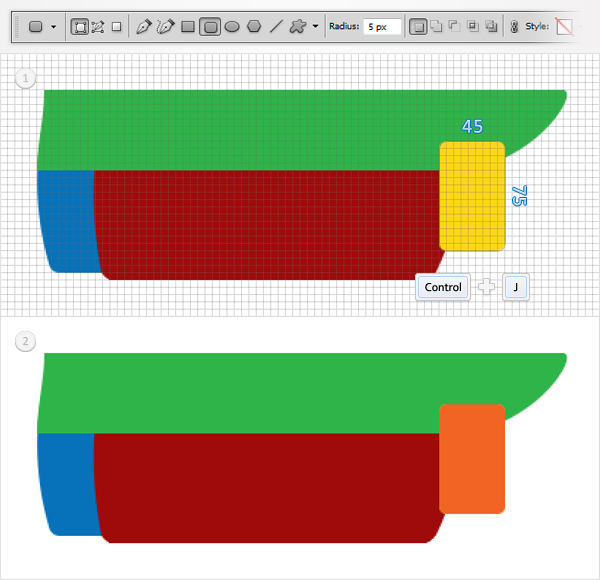
Pick the Rectangle Tool and create a 225 by 85px vector shape. Fill it with a flat red and place it as shown in the first image. Make sure that this shape is still selected and switch to the Direct Selection Tool. Select the top, left anchor point and move it 5px to the left. Continue with the Direct Selection Tool, select the top, right anchor point and move it 20px to the right. Now your shape should look like in the second image. Reselect it and go to Edit > Transform > Warp. Select Arc Upper from the Warp menu, check the Orientation button, enter 10 in the Bend box and hit Enter. Again, go to Edit > Transform > Warp. Select Arc Lower from the Warp menu, check the Orientation button, enter 20 in the Bend box and hit Enter. In the end your shape should look like in the fourth image.

Step 4
Move to the Layers panel, hold Control and click on the red vector shape created in the previous step. This will load a selection around it. Delete the red vector shape from the Layers panel and make sure that your selection is still active. Next, you need to add a some roundness for your selection. Go to Select > Modify > Smooth, enter a 5px radius box and click OK. Now your selection should look like in the second image. Hit Shift + Control + Alt + N to create a new layer, grab the Paint Bucket Tool, pick a dark red for the foreground color and simply click inside your selection. Hit Control + D to get rid of your selection, return to the Layers panel and convert this red shape into a smart object. Finally, send it to back (Shift + Control + [ ).

Step 5
Pick the Rounded Rectangle Tool and set the radius at 5px. Create a 50 by 125px shape, fill it with blue and place it as shown in the first image. Make sure that this shape is still selected and go to Edit > Transform > Warp. Select Arc Upper from the Warp menu, check the Orientation button, enter 20 in the Bend box and hit Enter. Now your shape should look like in the third image. Reselect it and send it to back (Shift + Control + [ ).
Step 6
Pick the Rounded Rectangle Tool and set the radius at 5px. Create a 45 by 75px shape, fill it with yellow and place it as shown in the first image. Make a copy of this vector shape (Control + J ) and fill it with orange.
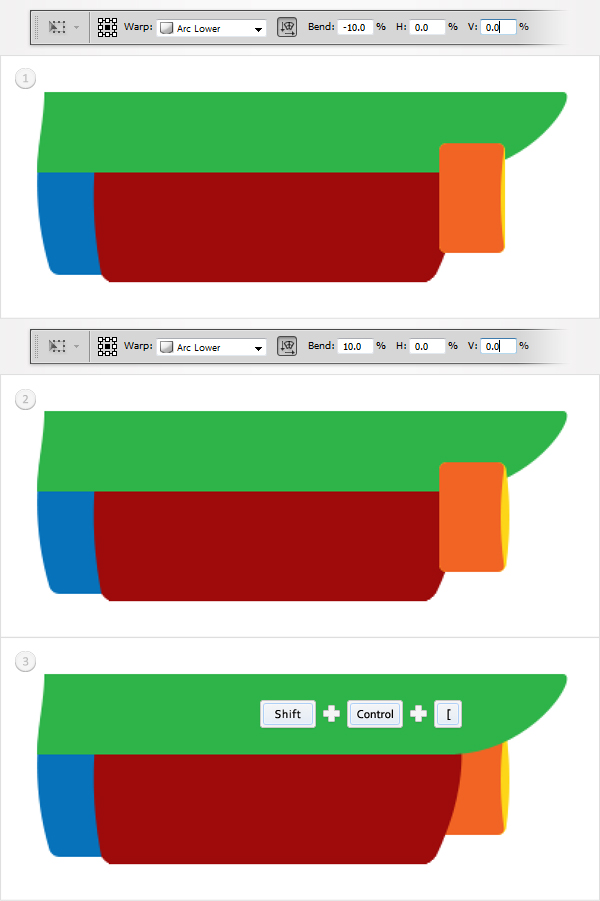
Step 7
Disable the Grid (View > Show > Grid). Select the orange vector shape and go to Edit > Transform > Warp. Select Arc Lower from the Warp menu, check the Orientation button, enter -10 in the Bend box and hit enter. Select the yellow vector shape and go to Edit > Transform > Warp. Select Arc Lower from the Warp menu, check the Orientation button, enter 10 in the bend box and hit enter. Reselect both vector shapes and send them to back (Shift + Control + [ ).
Step 8
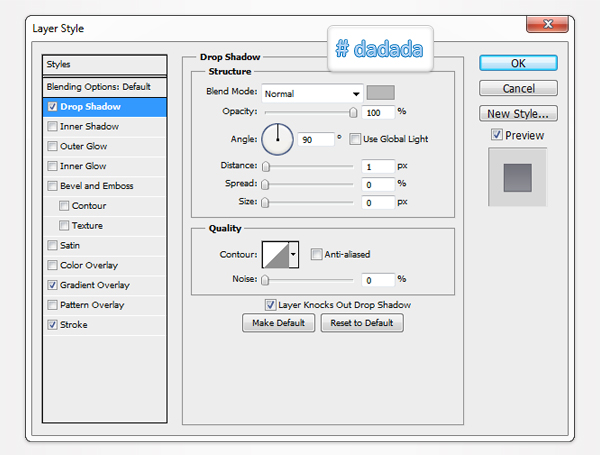
Go to the Layers pane and double click on the green vector shape. This will open the Layers Style window.
Activate the Inner Shadow and the Gradient Overlay then enter the properties shown in the following images.
Inner Shadow Blending Options Settings
Blend Mode: Normal
Opacity: 80%
Angle: -90 degrees
Distance: 4px
Choke: 0%
Size: 6px

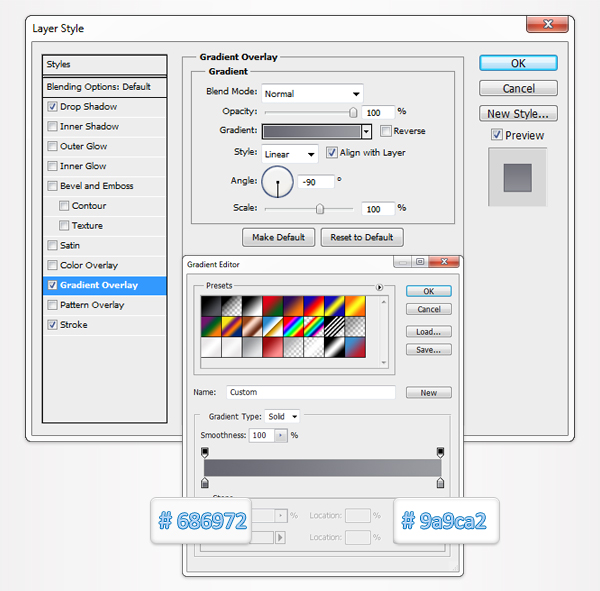
Gradient Overlay Blending Options Settings
Blend Mode: Normal
Opacity: 100%
Style: Linear
Angle: 90 degrees
Scale: 100%

Step 9
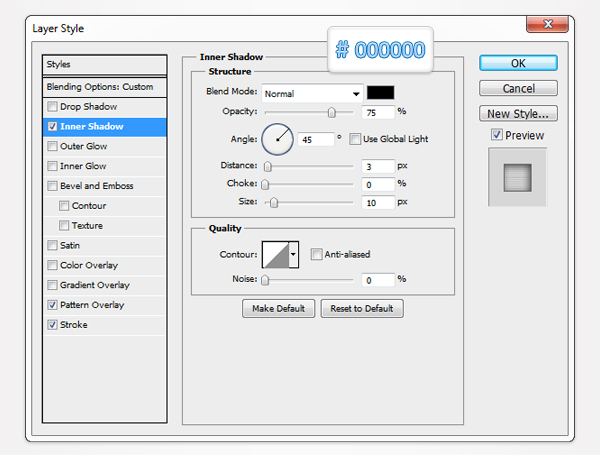
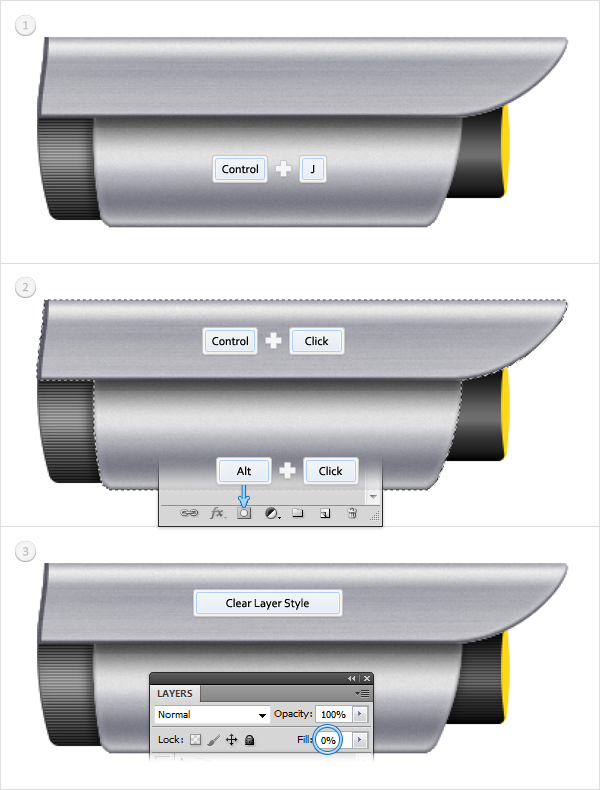
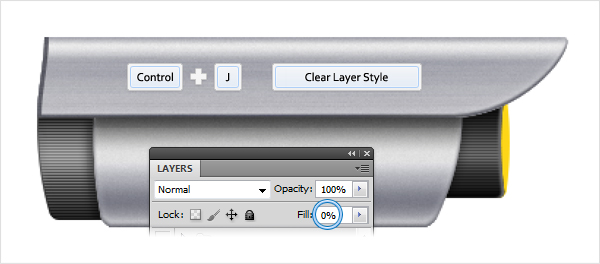
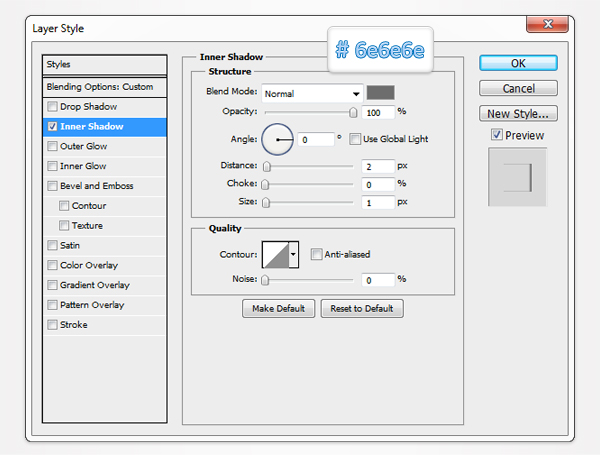
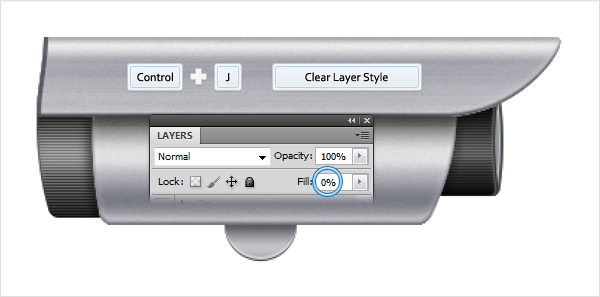
Reselect the green vector shape and duplicate it (Control + J). Move to the Layers panel, right click on this copy and go to Clear Layer Style. This will remove the properties added in the previous step. Make sure that this copy is still selected, lower the Fill to 0% and re-open the Layer Style window. This time, only activate the Inner Shadow. Enter the properties shown in the following image and click OK.

Inner Shadow Blending Options Settings
Blend Mode: Normal
Opacity: 100%
Angle: -90 degrees
Distance: 2px
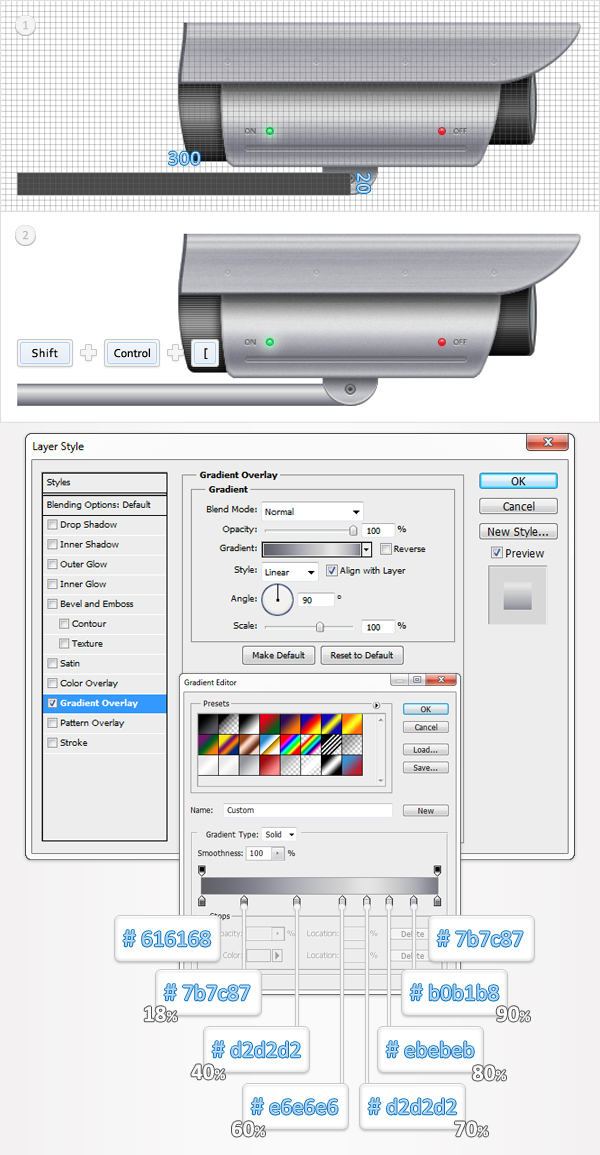
Choke: 0%
Size: 2px

Step 10
Select the vector shape created and edited in the previous step and duplicate it. Select this copy open the Layer Style window and edit the Inner Shadow effect as shown below.

Inner Shadow Blending Options Settings
Blend Mode: Normal
Opacity: 100%
Angle: 180 degrees
Distance: 3px
Choke: 0%
Size: 0px

Step 11
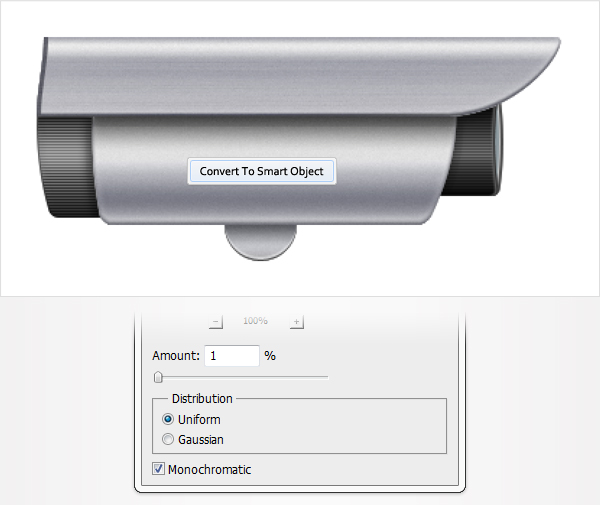
Select the three vector shapes created and edited in the last three steps and convert them to a smart object. Select it and go to Effect > Noise > Add Noise. Enter the data shown below and click OK.

Step 12
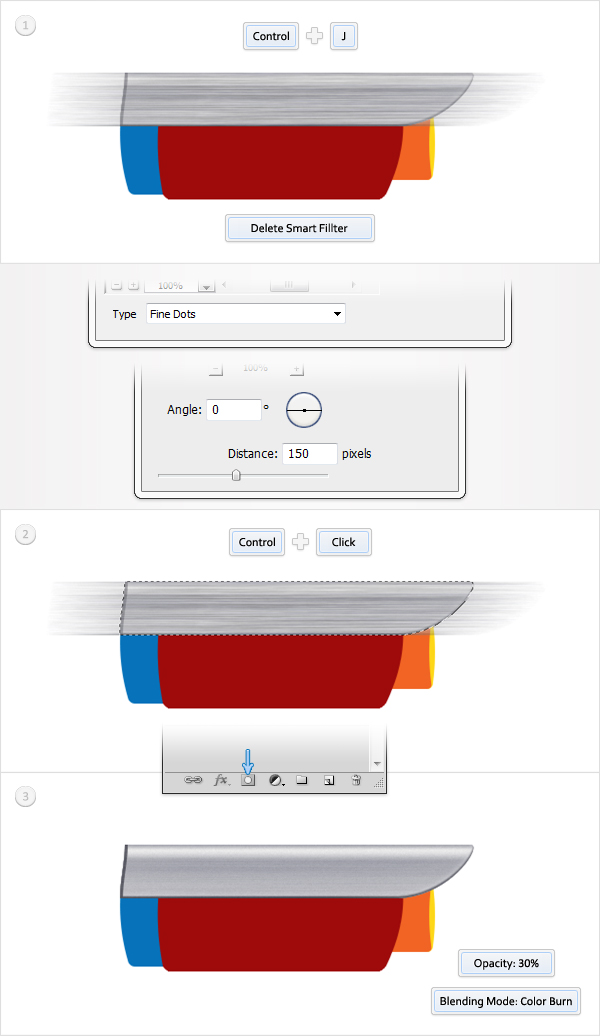
Select the smart object created in the previous step and duplicate it. Move to the Layers panel, select this copy, right click on the existing Noise effect and go to Delete Smart Filter. Obviously, this will remove it. Make sure that this new smart object is still selected and go to Filter > Pixelate > Mezzotint. Select Fine Dots from the drop down menu, click OK then go to Effect > Blur > Motion Blur. Enter the properties shown below and click OK. Now your smart object should look like in the second image. Keep it selected, hold Control and click on the original smart object created in the previous step. Again, this will load a nice selection around it. Now simply click on the Add Layer Mask button. It’s the little square icon from the bottom of the Layers panel. In the end your smart object should look like in the fourth image. Select it, lower its opacity to 30% and change its blending mode to Color Burn.
Step 13
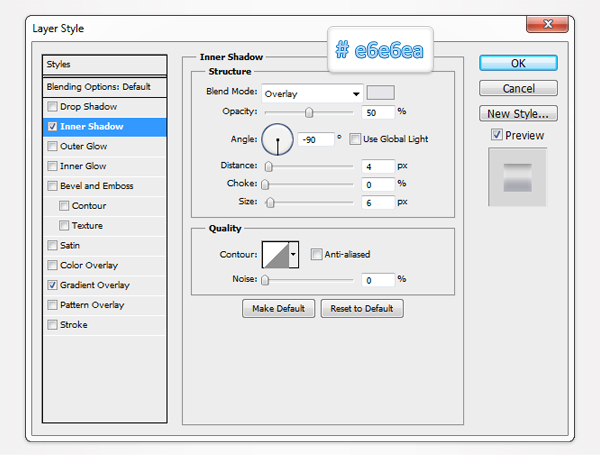
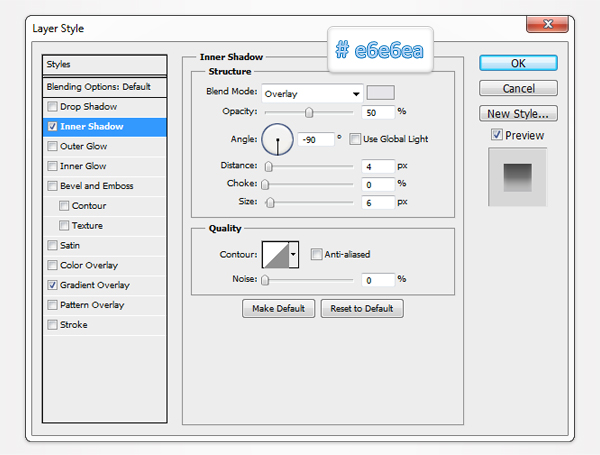
Open the Layers Style window for the red smart object. Activate the Inner Shadow and the Gradient Overlay then enter the properties shown in the following images.

Inner Shadow Blending Options Settings
Blend Mode: Overlay
Opacity: 50%
Angle: -90 degrees
Distance: 4px
Choke: 0%
Size: 6px
Gradient Overlay Blending Options Settings
Blend Mode: Normal
Opacity: 100%
Style: Linear
Angle: 90 degrees
Scale: 100%

Step 14
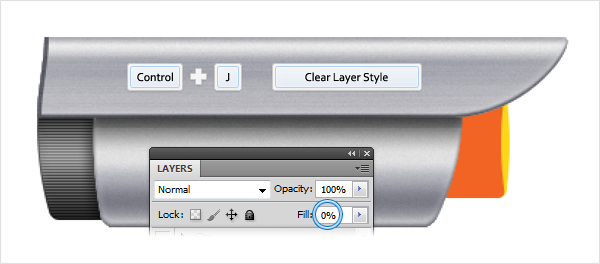
Reselect the red smart object and duplicate it (Control + J). Clear the Layer Style for this copy, lower its Fill to 0% and re-open the Layer Style window. Activate the Inner Shadow, enter the properties shown in the following image and click OK.

Inner Shadow Blending Options Settings
Blend Mode: Normal
Opacity: 100%
Angle: -90 degrees
Distance: 2px
Choke: 0%
Size: 3px

Step 15
Select the two smart objects created and edited in the last two steps and convert them to a smart object. Select it and go to Effect > Noise > Add Noise. Enter the data shown below and click OK.

Step 16
Reselect the smart object created in the previous step and duplicate it (Control + J). Delete the Smart Filter for this copy, lower its Fill to 0% and re-open the Layer Style window. Activate the Gradient Overlay, enter the properties shown in the following image and click OK. The yellow numbers from the gradient image stand for opacity percentage and the white numbers stand for location percentage.
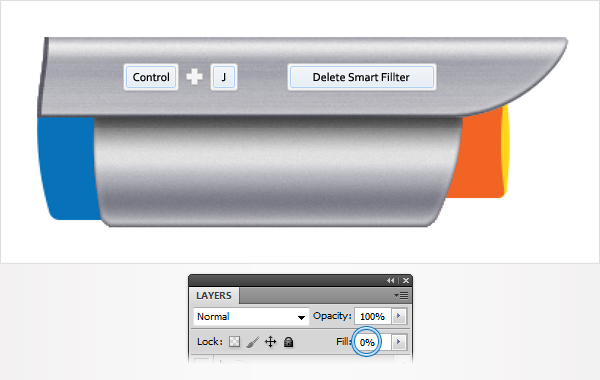
Gradient Overlay Blending Options Settings
Blend Mode: Normal
Opacity: 10%
Style: Linear
Angle: -90 degrees
Scale: 100%

Step 17
Focus on the Layers panel. Hold Control and click on the top grey shape to load a new selection. Hold Control
and Alt then click on the the bottom grey smart object to add a new selected area. In the end your selection should look like in the second image. Continue in the Layers panel, select the blue vector shape, hold Alt and click on the Add Layer Mask icon.

Step 18
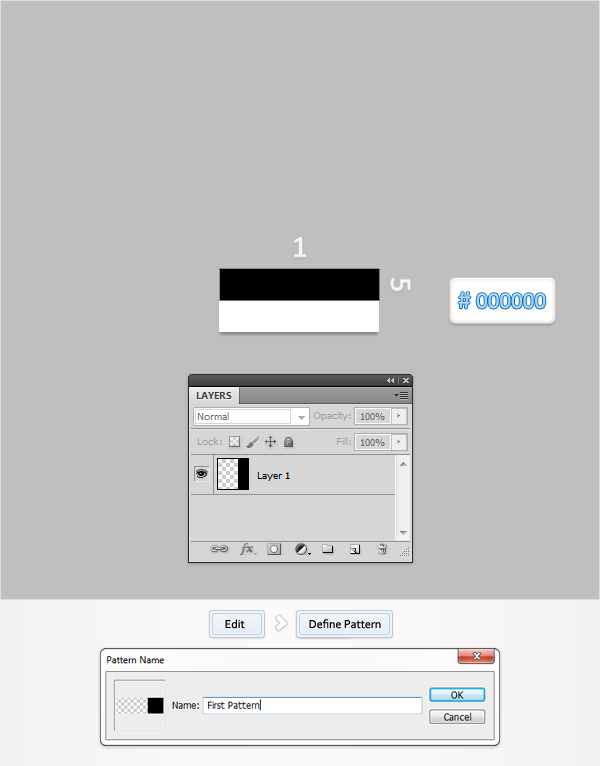
Next, you need to create your own simple pattern. Hit Control + N to open the New Document window. Enter 5 in the width box and 2 in the height box then click OK. Move to the Layers panel, unlock the Background layer and delete it. Select the Rectangle Tool and create a 5 by 1px vector shape. Fill it with black and place it as shown in the following image. Next, go to Edit > Define Pattern. Pick a name for your pattern, click OK and you have your own pattern. Close this small document and return to the main document.
Step 19
Open the Layers Style window for the bue vector shape. Activate the Inner Shadow and the Gradient Overlay then enter the properties shown in the following images.

Inner Shadow Blending Options Settings
Blend Mode: Overlay
Opacity: 50%
Angle: -90 degrees
Distance: 4px
Choke: 0%
Size: 6px
Gradient Overlay Blending Options Settings
Blend Mode: Normal
Opacity: 100%
Style: Linear
Angle: 90 degrees
Scale: 100%

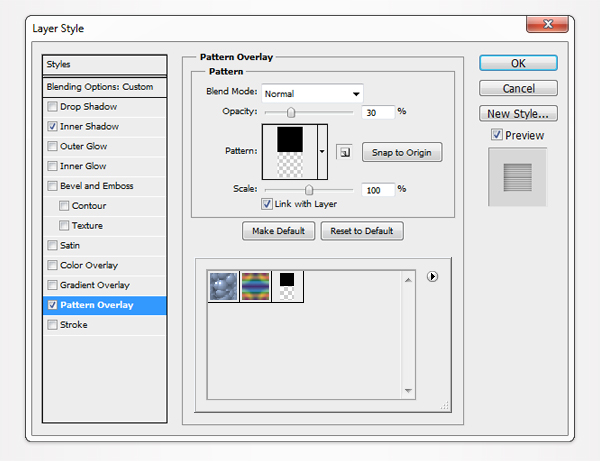
Step 20
Reselect the blue smart object and duplicate it (Control + J). Clear the Layer Style for this copy, lower its Fill to 0% and re-open the Layer Style window. Enter the properties shown below and click OK. For the Pattern Overlay you will need to use the pattern created in step #18.
Inner Shadow Blending Options Settings
Blend Mode: Normal
Opacity: 75%
Angle: 45 degrees
Distance: 3px
Choke: 0%
Size: 10px
Pattern Overlay Blending Options Settings
Blend Mode: Overlay
Opacity: 50%
Scale: 100%

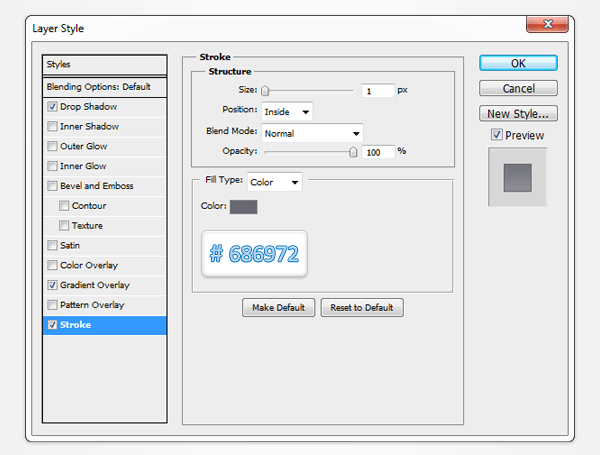
Stroke Blending Options Settings
Size: 1px
Position: Inside
Blend Mode: Normal
Opacity: 50%
Fill Type: Color

Step 21
Select the vector shape edited in the previous step and duplicate it (Control + J). Clear the Layer Style for this copy, lower its Fill to 0% and re-open the Layer Style window. Activate the Inner Shadow, enter the properties shown in the following image and click OK.

Inner Shadow Blending Options Settings
Blend Mode: Normal
Opacity: 5%
Angle: 45 degrees
Distance: 7px
Choke: 0%
Size: 0px

Step 22
Open the Layers Style window for the orange vector shape. Activate the Gradient Overlay and enter the properties shown in the following image.
Gradient Overlay Blending Options Settings
Blend Mode: Normal
Opacity: 100%
Style: Linear
Angle: -90 degrees
Scale: 100%

Step 23
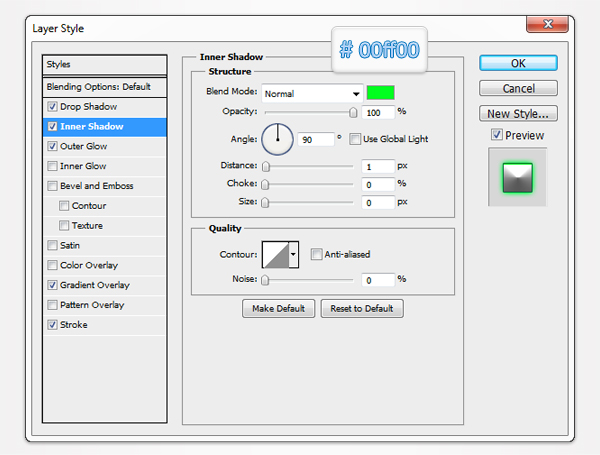
Reselect the vector shape edited in the previous step and duplicate it (Control + J). Next, you need to mask this new vector shape. Select it from the Layers panel, make the selection from step #17 the hold Alt and click on the Add Layer Mask button. Reselect this masked vector shape, clear the Layer Style, lower its Fill to 0% and re-open the Layer Style window. Activate the Inner Shadow and the Pattern Overlay, enter the properties shown in the following images and click OK.
Inner Shadow Blending Options Settings
Blend Mode: Normal
Opacity: 30%
Angle: 135 degrees
Distance: 3px
Choke: 0%
Size: 7px

Pattern Overlay Blending Options Settings
Blend Mode: Color Burn
Opacity: 30%
Scale: 100%
Step 24
Reselect the masked vector shape edited in the previous step and duplicate it (Control + J). Clear the Layer Style for this copy, lower its Fill to 0% and re-open the Layer Style window. Activate the Inner Shadow, enter the properties shown in the following image and click OK.
Inner Shadow Blending Options Settings
Blend Mode: Normal
Opacity: 100%
Angle: 0 degrees
Distance: 2px
Choke: 0%
Size: 1px
Step 25
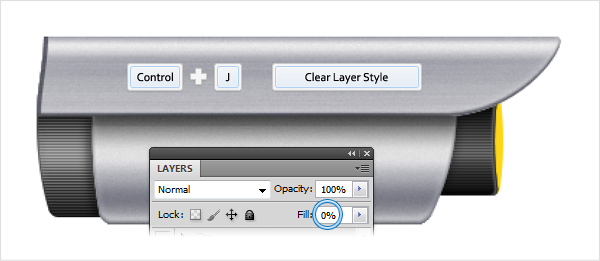
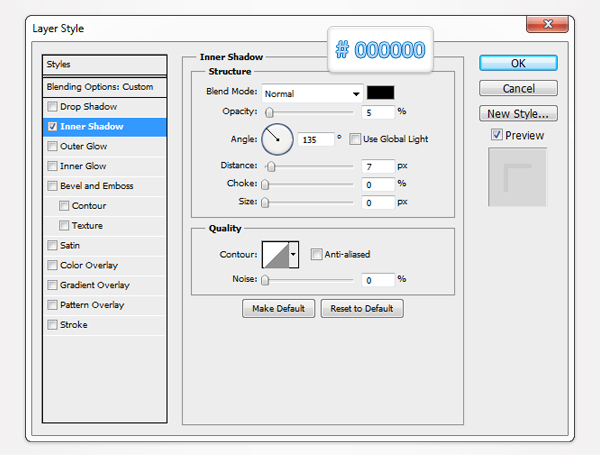
Again, reselect the vector shape edited in the previous step and duplicate it (Control + J). Clear the Layer Style for this copy, lower its Fill to 0% and re-open the Layer Style window. Activate the Inner Shadow, enter the properties shown in the following image and click OK.
Inner Shadow Blending Options Settings
Blend Mode: Normal
Opacity: 100%
Angle: 0 degrees
Distance: 1px
Choke: 0%
Size: 0px

Step 26
Once again, reselect the vector shape edited in the previous step and duplicate it (Control + J). Clear Layer Style for this copy, lower its Fill to 0% and re-open the Layer Style window. Activate the Inner Shadow, enter the properties shown in the following image and click OK.

Inner Shadow Blending Options Settings
Blend Mode: Normal
Opacity: 5%
Angle: 135 degrees
Distance: 7px
Choke: 0%
Size: 0px
Step 27
Select the yellow vector shape and replace the yellow with #8d9aa0. Open the Layers Style window for this shape, activate the Inner Shadow and enter the properties shown below.
Inner Shadow Blending Options Settings
Blend Mode: Normal
Opacity: 100%
Angle: 0 degrees
Distance: 3px
Choke: 0%
Size: 0px

Step 28
Reselect the vector shape edited in the previous step and duplicate it (Control + J). Clear Layer Style for this copy, lower its Fill to 0% and re-open the Layer Style window. Activate the Inner Shadow, enter the properties shown in the following image and click OK.

Inner Shadow Blending Options Settings
Blend Mode: Normal
Opacity: 100%
Angle: 0 degrees
Distance: 2px
Choke: 0%
Size: 0px
Step 29
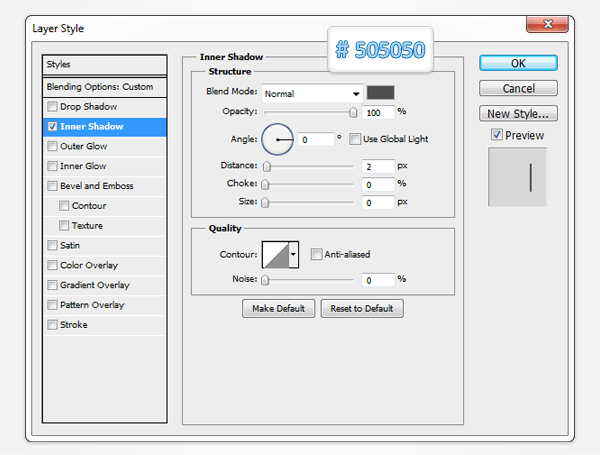
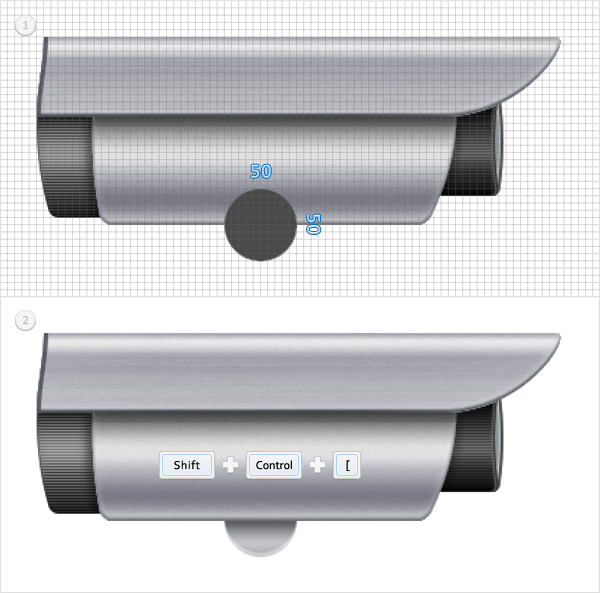
Re-enable the Grid (View > Show > Grid). Pick the Ellipse Tool, create a 50px circle and place it as shown in the first image. Send this new vector shape to back (Shift + Control + [ ) then open the Layer Style window. Enter the properties shown below and click.
Inner Shadow Blending Options Settings
Blend Mode: Normal
Opacity: 40%
Angle: -90 degrees
Distance: 4px
Choke: 0%
Size: 0px
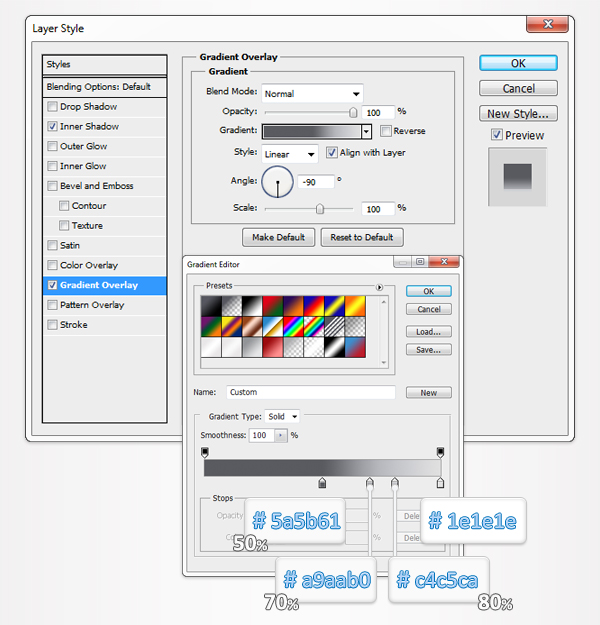
Gradient Overlay Blending Options Settings
Blend Mode: Normal
Opacity: 100%
Style: Linear
Angle: -90 degrees
Scale: 100%
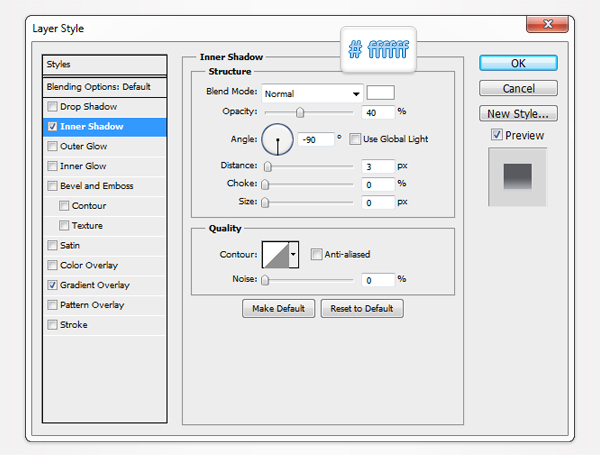
Step 30
Reselect the vector shape created in the previous step and duplicate it (Control + J). Clear Layer Style for this copy, lower its Fill to 0% and re-open the Layer Style window. Activate the Inner Shadow, enter the properties shown in the following image and click OK.
Inner Shadow Blending Options Settings
Blend Mode: Normal
Opacity: 100%
Angle: -90 degrees
Distance: 1px
Choke: 0%
Size: 0px

Step 31
Select the two vector shapes created and edited in the last two steps and convert them to a smart object. Select it and go to Effect > Noise > Add Noise. Enter the data shown below and click OK.
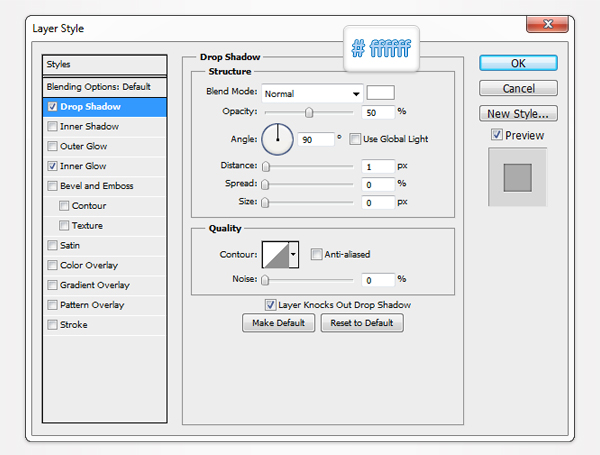
Step 32
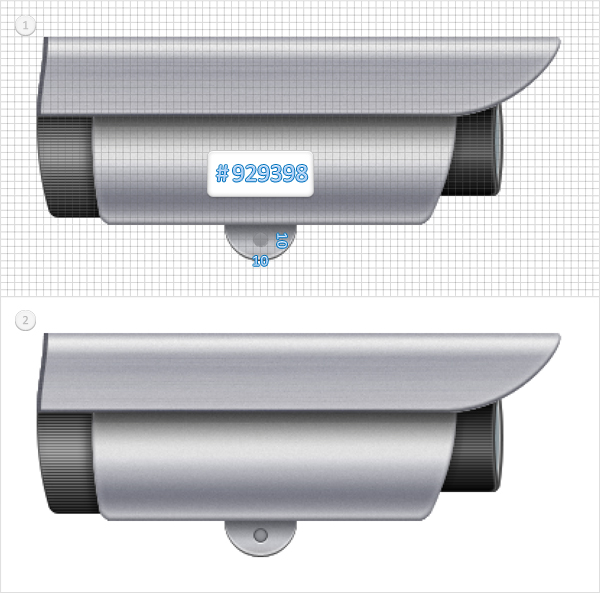
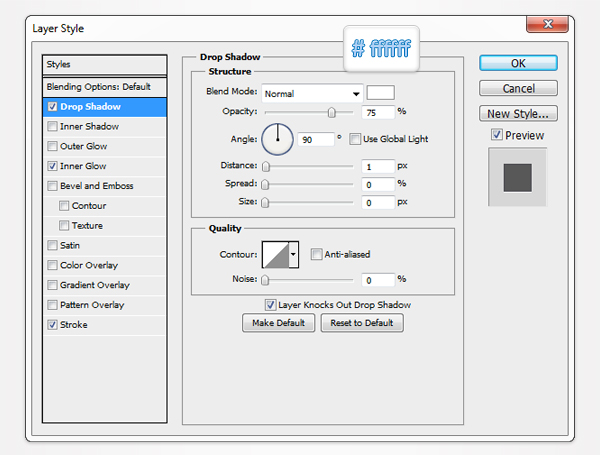
Pick the Ellipse Tool, create a 10px circle, fill it with #929398 and place it as shown in the first image. Open the Layers Style window for this vector shape and enter the properties shown below.
Drop Shadow Blending Options Settings
Blend Mode: Normal
Opacity: 75%
Angle: 90 degrees
Distance: 1px
Spread: 0px
Size: 0px
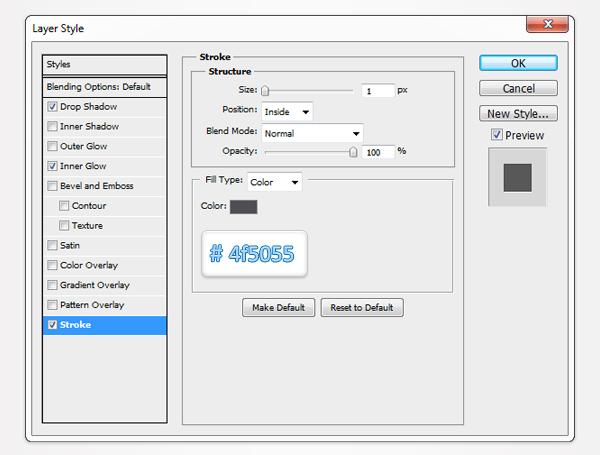
Inner Glow Blending Options Settings
Blending Mode: Normal
Opacity: 50%
Size: 4
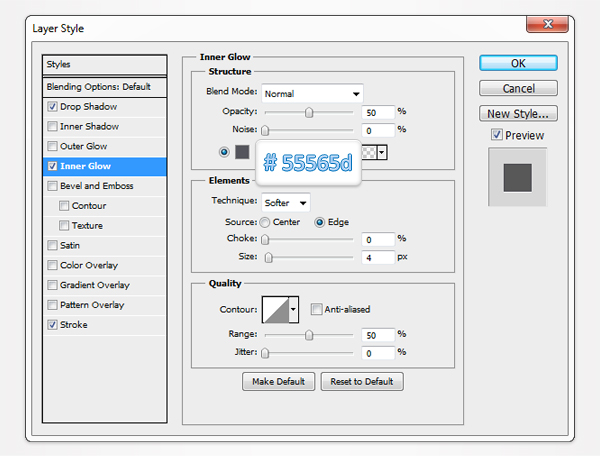
Stroke Blending Options Settings
Size: 1px
Position: Inside
Blend Mode: Normal
Opacity: 100%
Fill Type: Color
Step 33
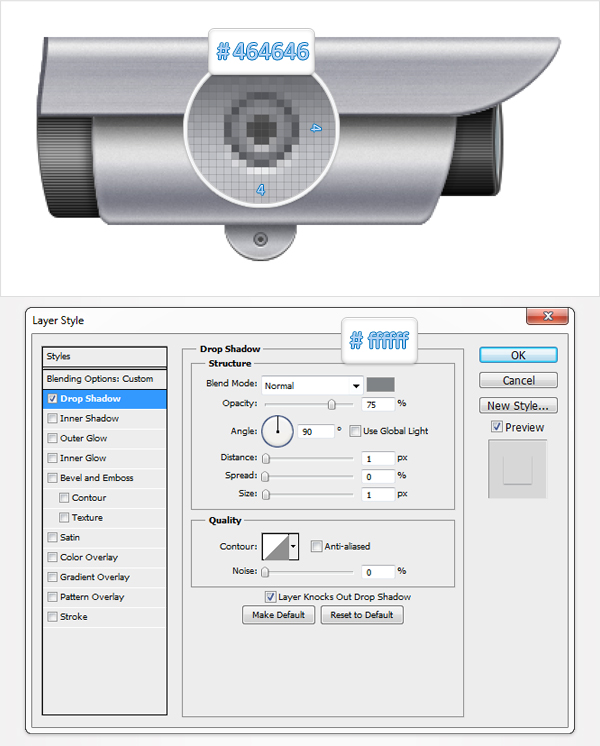
For the following step you will need a grid every 1px. So, go to Edit > Preferences > Guides, Grid & Slices and enter 1 in the Gridline Every box. Pick the Ellipse Tool, create a 4px circle, fill it with #464646 and place it as shown in the following image. Open the Layers Style window for this new vector shape, add the properties shown below and click OK.
Drop Shadow Blending Options Settings
Blend Mode: Normal
Opacity: 75%
Angle: 90 degrees
Distance: 1px
Spread: 0px
Size: 1px
Step 34
Pick the Rectangle Tool, create a 353 by 1px vector shape and place it as shown in the first image. Fill it with #575860, convert it to a smart object and go to Effect > Blur > Gaussian Blur. Enter a 1.5 radius and click OK.
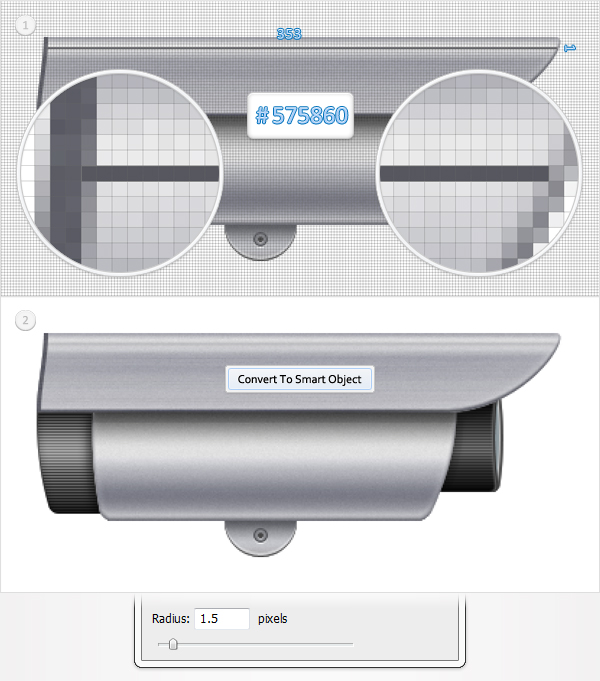
Step 35
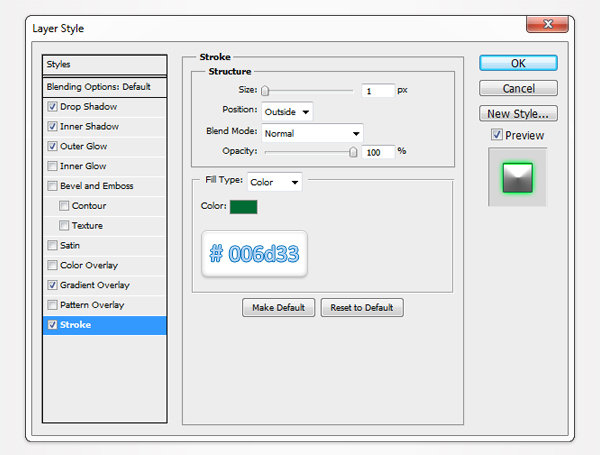
Return to "gridline every 5px". So, go to Edit > Preferences > Guides, Grid & Slices and enter 5 in the Gridline Every box. Pick the Rounded Rectangle Tool and set the radius at 5px. Create a 200 by 5px vector shape and place it as shown in the first image. Open the Layers Style window for this new shape, enter the properties shown below and click OK.

Drop Shadow Blending Options Settings
Blend Mode: Normal
Opacity: 100%
Angle: 90 degrees
Distance: 1px
Spread: 0px
Size: 0px
Gradient Overlay Blending Options Settings
Blend Mode: Normal
Opacity: 100%
Style: Linear
Angle: -90 degrees
Scale: 100%
Stroke Blending Options Settings
Size: 1px
Position: Inside
Blend Mode: Normal
Opacity: 100%
Fill Type: Color
Step 36
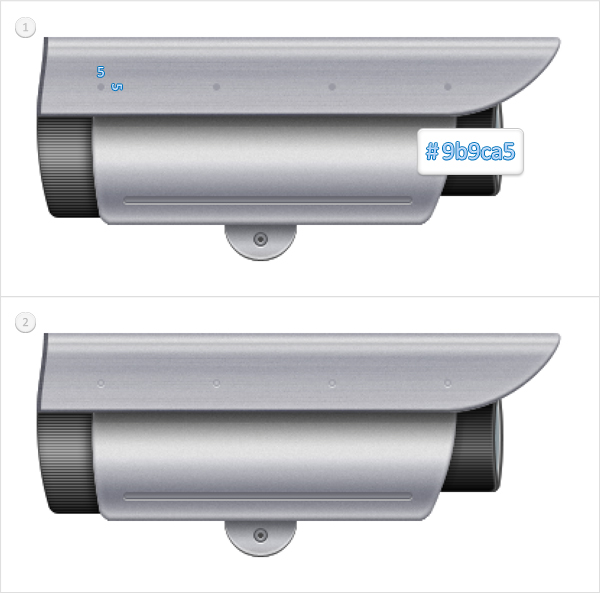
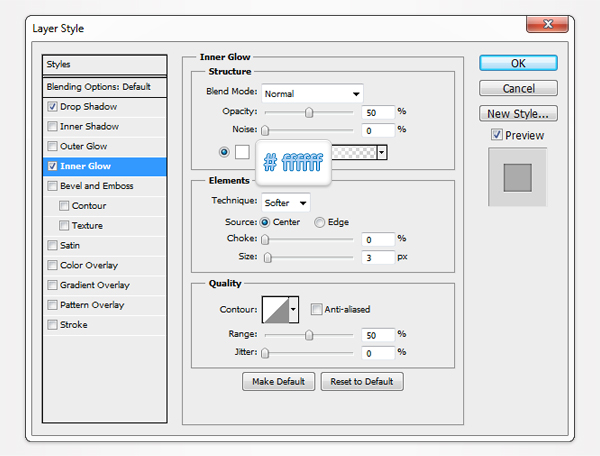
Pick the Ellipse Tool and create four, 5px circles. Fill them with #9b9ca5 and place them as shown in the first image. Open the Layers Style window for these shapes, enter the properties shown below and click OK.
Drop Shadow Blending Options Settings
Blend Mode: Normal
Opacity: 50%
Angle: 90 degrees
Distance: 1px
Spread: 0px
Size: 0px
Inner Glow Blending Options Settings
Blending Mode: Normal
Opacity: 50%
Size: 3
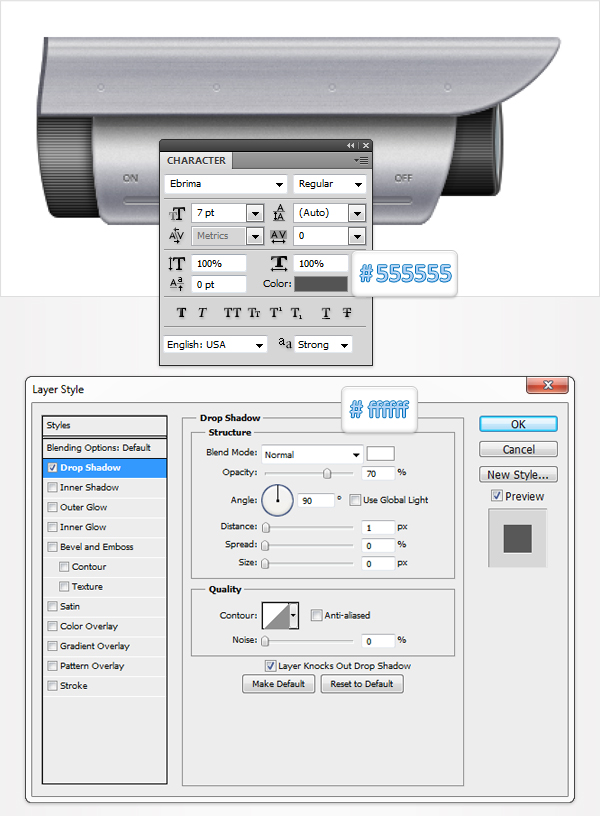
Step 37
Pick the Type Tool and add the "ON" and "OFF" text as shown in the following image. Use the Ebrima font with a size of 7pt font and set its color at #555555. Open the Layers Style window for this text and add the Drop Shadow properties shown below.
Drop Shadow Blending Options Settings
Blend Mode: Normal
Opacity: 70%
Angle: 90 degrees
Distance: 1px
Spread: 0px
Size: 0px
Step 38
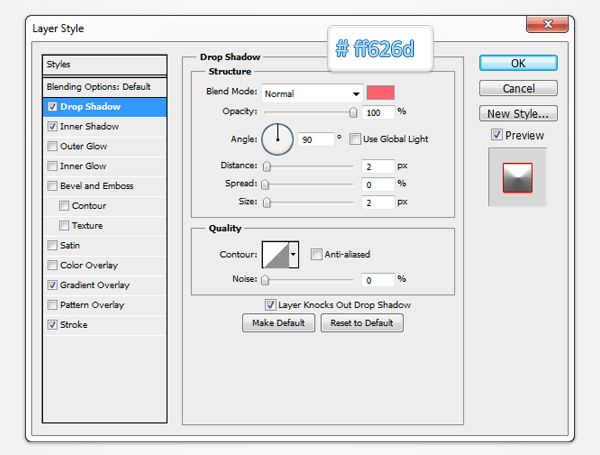
Pick the Ellipse Tool and create two, 5px circles. Fill them with #31b547 and #ed1c24 and place them as shown in the first image. Open the Layer Style window for the green circle and enter the properties shown below.

Drop Shadow Blending Options Settings
Blend Mode: Normal
Opacity: 100%
Angle: 90 degrees
Distance: 2px
Spread: 0px
Size: 2px

Inner Shadow Blending Options Settings
Blend Mode: Normal
Opacity: 100%
Angle: 90 degrees
Distance: 1px
Choke: 0%
Size: 0px
Outer Glow Blending Options Settings
Blend Mode: Normal
Opacity: 100%
Spread: 0%
Size: 8px

Gradient Overlay Blending Options Settings
Blend Mode: Color Dodge
Opacity: 85%
Style: Angle
Angle: 90 degrees
Scale: 100%

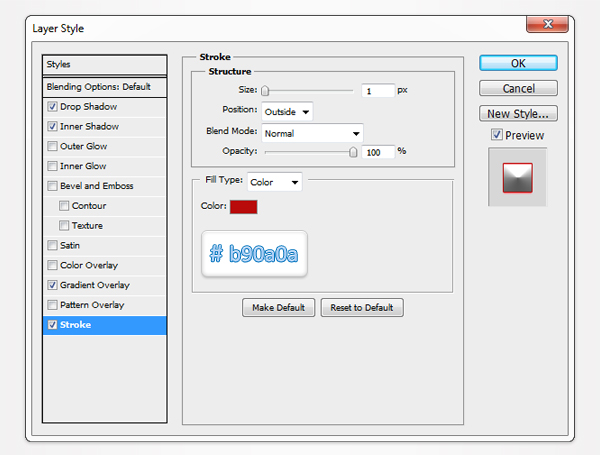
Stroke Blending Options Settings
Size: 1px
Position: Outside
Blend Mode: Normal
Opacity: 100%
Fill Type: Color
Step 39
Open the Layers Style window for the red circle and enter the properties shown below.

Drop Shadow Blending Options Settings
Blend Mode: Normal
Opacity: 100%
Angle: 90 degrees
Distance: 2px
Spread: 0px
Size: 2px
Inner Shadow Blending Options Settings
Blend Mode: Normal
Opacity: 100%
Angle: 90 degrees
Distance: 1px
Choke: 0%
Size: 0px

Gradient Overlay Blending Options Settings
Blend Mode: Color Dodge
Opacity: 85%
Style: Angle
Angle: 90 degrees
Scale: 100%

Stroke Blending Options Settings
Size: 1px
Position: Outside
Blend Mode: Normal
Opacity: 100%
Fill Type: Color
Step 40
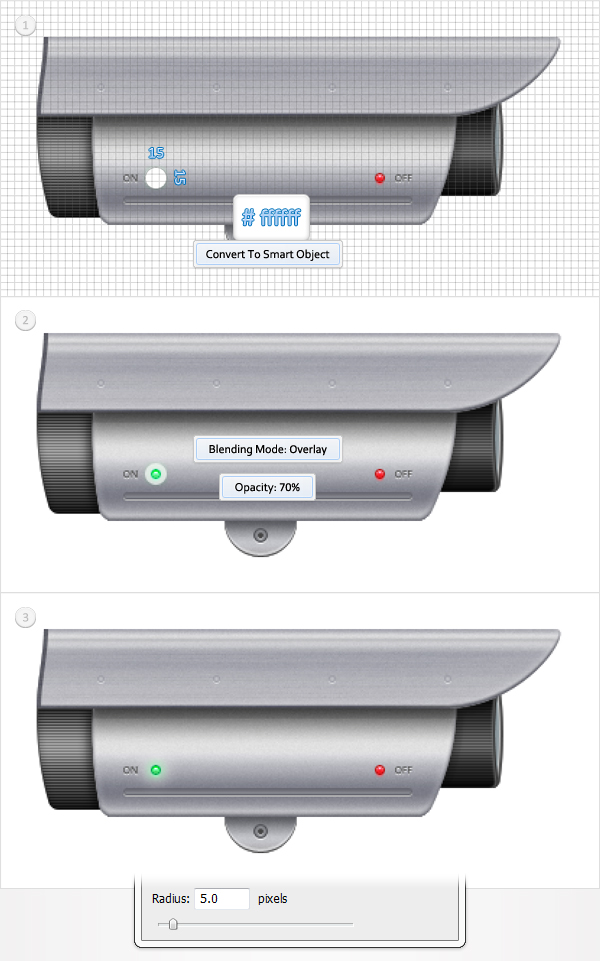
Continue with the Ellipse Tool, create a 15px circle, fill it with white then convert it to a smart object. Lower its opacity to 70%, change the blending mode to Overlay and go to Effect > Blur > Gaussian Blur. Enter a 5px radius and click OK.
Step 41
Pick the Rectangle Tool and create a 300 by 20px shape. Fill it with a random color, send it to back (Shift + Control + [ ) and open the Layer Style window. Enter the properties shown below and click OK.
Gradient Overlay Blending Options Settings
Blend Mode: Normal
Opacity: 100%
Style: Linear
Angle: 90 degrees
Scale: 100%
Step 42
Finally, select the vector shapes created in the previous step, convert it to a smart object and go to Effect > Noise > Add Noise. Enter the data shown below, click OK and you’re done.

And We’re Done!
Here is how your final result should look.
Member File Download
Download the original .psd file for this tutorial here:

 Members Area Tutorial: How to Create a Flip Clock and Calendar in Adobe Photoshop
 Members Area Tutorial: Design a Realistic Game Controller from Scratch
 Members Area Tutorial: How to Create a Graphics Tablet in Photoshop

Leave a comment
0 Comments:
No comments have been posted yet. Be the first!
Leave a Comment: