
Members Area Tutorial: Create a Cat in a Magical Pond Scene Photo Manipulation
In this tutorial I’ll show you how to create a magical pond scene with a lovely cat. You will know through step by step how to blend various stock images together, paint natural looking cat hair, retouch a dull photo, use brushes, masking, adjust colors, work with lighting and different kinds of shadow and more.
Final Image
As always, this is the final image that we’ll be creating:

Step 1
Open pond stock. I save it under another name and resize it to be a bit smaller. Open pond original stock again. Cut out the lily pads and move into our document, place at the left part of the bottom, near foreground:


Choose Edit-Transform-Flip Horizontal:

Add layer mask and use hard black brush ( hardness 95-100%) to remove some pads as shown below :

Name this layer as “pads 1″.
Step 2
Copy a pad from pond stock and place it inside the ripple to hide a fish there. Also use layer mask to erase unwanted part ( remember to use hard brush):


Name it as “pads 2″.
Copy all the pads again and place them to hide some fishes on nearer foreground, resize them to be smaller. Use layer mask to clear unecessary parts ( with hard brush as usual):


Call it “pads 3″.
Step 3
Create a new layer ( Cmd/Ctrl+Shift+N). Hit S to active Clone Stamp Tool and remember to check “Sample All Layers” on property bar. Clone over the part of a fish which look toward to the viewers ( you can turn off pads layers to make this step easier):

Step 4
Open boat stock pack. I choose this one and it has a transparent background so move it ( Move Tool -V) into our document and position it at the center, resize and transform it a bit ( use combine Cmd/Ctrl+T). You can see I made it a bit bigger in width:


Add layer mask and use soft black brush with different opacities to mask out the oar. We can see pretty clear the fishes under water so try to make the oar part under water get a similar and natural look. We’ll correct another parts of the boat later.

Step 5
Duplicate boat layer. Choose under layer, delete its layer mask ( important) and go to Edit-Transform-Flip Vertical. Move it under the bottom of the boat and use Cmd/Ctrl+T to reform it a bit. Rename uppler layer as “boat” and under as “boat reflection”:

Lower opacity of reflection to 30%. Add layer mask ans use hard black brush ( 100% opacity and flow) to remove the part which are hidden from the lily pads and soft brush with opacity about 60-70% to blur the top of this reflection:

Step 6
To edit the boat and its reflection together, hold the Cmd/Ctrl key while clicking two these layers to make them selected. Press Cmd/Ctrl+G to make group for them ( Group 1) then click the arrow symbol beside to show the layers inside this group:

Change the name of this group to “boat” and the mode from Pass Through ( default mode of group) to Normal 100%:

Make some adjustment layers to change colors and brightness of boat layers to fit the background. On boat layer, go to Layer-New Adjustment Layer-Color Balance:

Layer-New Adjustment Layer-Curves:
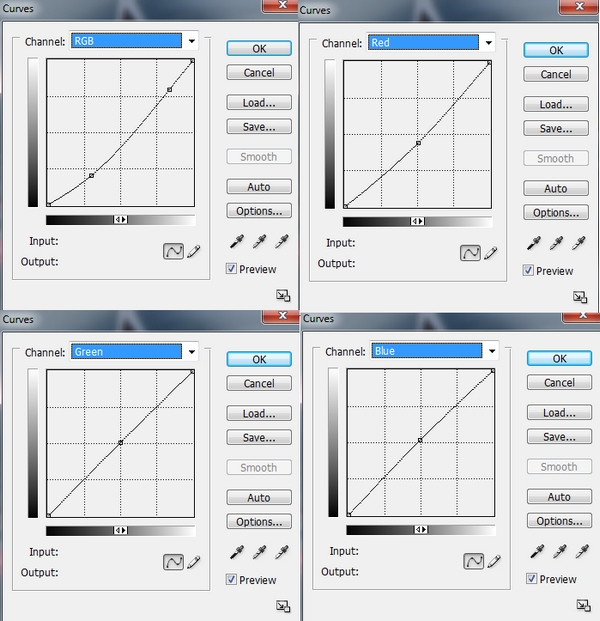
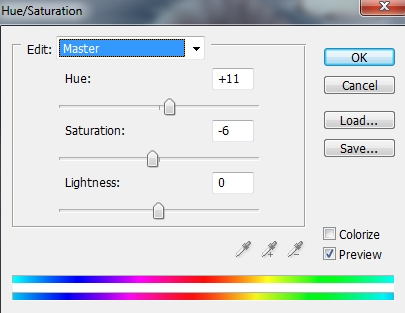
Layer-New Adjustment Layer-Hue/Saturation:

Because the mode of this group changed to Normal 100% so these adjustment layers only affect the layers inside the group ( boat and boat reflection):

Step 7
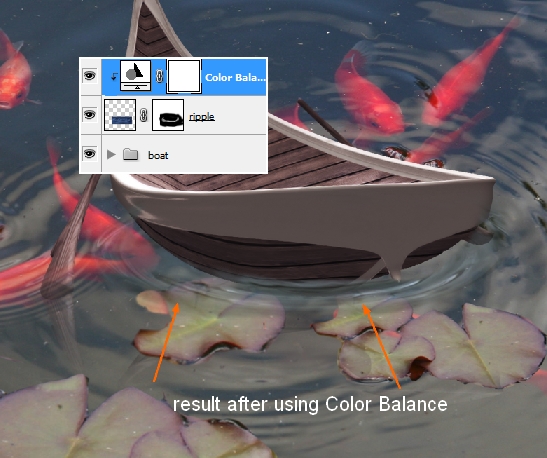
Open ripple stock. Move it into our canvas, resize and place them at the bottom of the boat:

Add layer mask and use soft black brush with opacity 100% to remove the rough edges then lower opacity to blur the ripple parts to get a similar look below:

To make color of this ripple fit the water, I use an adjustment layer with Clipping Mask. On ripple layer, go to Layer-New Adjustment Layer-Color Balance:

Step 8
Open cat stock. You can choose another cat photo with similar pose if you can’t take this image from Photoxpress. First use your familiar method to extract him/her ( without his/her furry hair) and copy it into a new layer:

As you can see, the cat hair has similar tone with the backdrop so it’s hard to get his full hair using normal extracting ways so I decide to redraw it.
Create a new layer between background and extracted cat layers and fill it with any dark colors but different from cat ones to be easier to draw. I use color #451d10 for this one but it’s up to you.

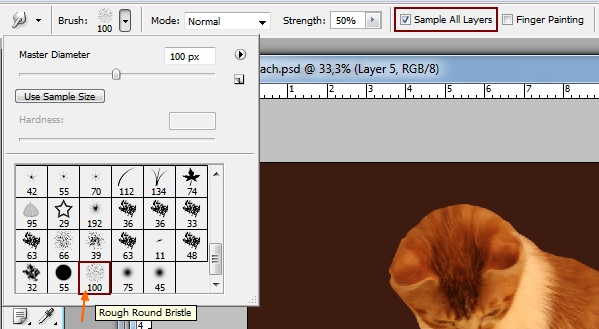
Make a new layer above the cat one and hit R to active Smudge Tool. Click on the top of toolbar of brush box then the small right pointing arrow to open the brush sub menu. Choose Reset Brushes and it will set your photoshop brushes back to default.

Choose Rough Round Bristle brush with 100 px and settings below:
Turn off the fill layer and background to get a transparent look so they won’t be affected by smudging process. Use this brush to pull out the contour of the cat relying on the direction of original photo ( look at it as a reference). Do it subtly and gently and don’t smudge twice on the same part. You can see how I did it with the arrows. Here is my result with transparent background and after turning on the fill layer:


Step 9
I’m not sastified with this new created hair so I create some new layers and on each of layer I use different color for hard brush for different parts of the cat hair. You need a graphic tablet to do this step otherwise it’s really a pain using mouse. This step is optional and you can skip it if you get desired result in previous step. Press F5 to make settings for brush like below:

I choose color #a74e0e, #b5661d, #d8a35e for brush on 3 new layers. Draw more tiny, flying hairs and missing whiskers :


Merge all transparent layers ( extracted cat, smudge tool , hair ones).
Step 10
Move the cat after being merged into our main document, resize to fit and situate him into the boat:

Add layer mask for cat layer and use brush with hardness about 50% to remove the cat bottom and get a look that he is inside the boat:

I want to retouch the cat face as I want it to be fuller ( and will look cuter ![]() ). On cat layer, go to Filter-Liquify-Forward Warp Tool:
). On cat layer, go to Filter-Liquify-Forward Warp Tool:

Pull out the two sides of his face ( bottom part – don’t overdo it as it will look unatural). My result:


The cat needs to be a bit sharpener ( it’s optional and depends on your stock). Choose Filter-Sharpen-Unsharp Mask:

Step 11
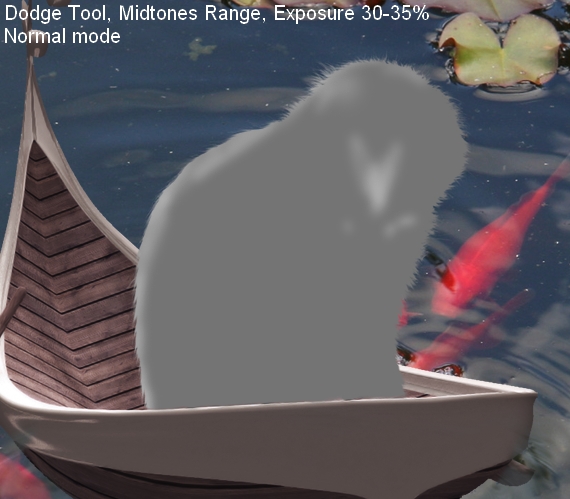
The cat looks dull ( no contrast) with excessive yellow cast so I use some different layer kinds with Clipping Mask to retouch him. First we have to define where the main light source of this picture will come from. I set it to come from the boat stern where a lantern will be placed.
On cat layer, make a new layer with Overlay mode and fill with 50% gray:

Use Dodge Tool ( hit O to active) with Midtones Range and Exposure about 30-35% to brighten the back of the cat where will meet the light from the stern, the head and face. You can see how I apply this tool with Normal mode ( brighter parts on screenshot):
Overlay mode:

We will add more light for the cat with another method later.
Step 12
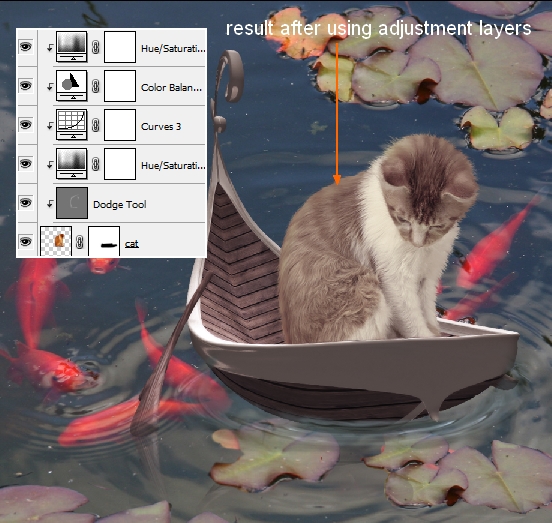
Make some adjustment layers ( Clipping Mask) to reduce saturation, change color and add contrast for the cat.
Hue/Saturation:

Curves:

Color Balance:

Hue/Saturation:
Step 13
Add more light for this cat by Inner Shadow effect. Right click cat layer, choose Blending Options:

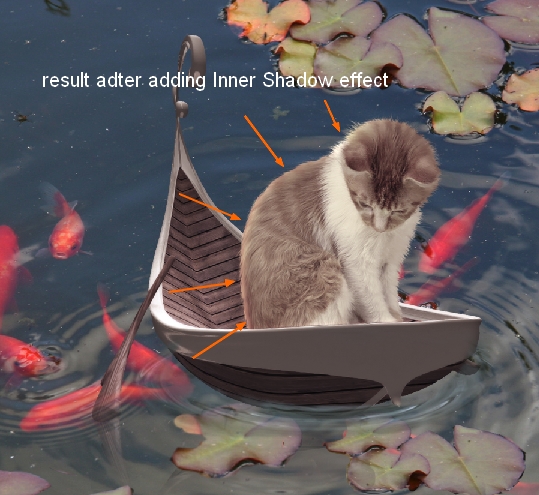
Don’t worry if it does not look good as we’ll fix it later.
Step 14
Open lantern stock. Copy the lantern which is nearest foreground and drag it into our canvas, resize and place it at the boat stern. Add layer mask and use hard black brush to clear the part covering the stern:


Step 15
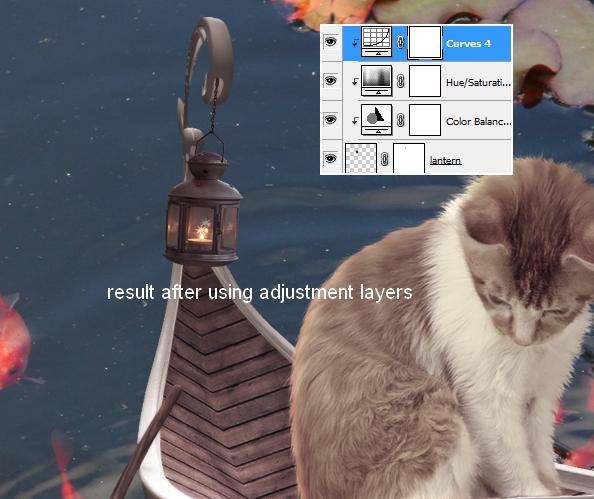
Add some adjustment layers with Clipping Mask for lantern:
Color Balance

Hue/Saturation:

Curves:

Step 16
Open lily stock. You can use your own image but better not choose a white lily but a pink or yellow one to be easier to change color. Extract it and place it onto a pad that is near the boat:

Duplicate this lily layer many times and use transform tool ( Cmd/Ctrl+T) to resize and distort the form to get rid of the same look . Position them on the pads of foreground, background and on the boat, behind and in front of cat. I use 10 layers for this effect and place them under cat layers also make group for these layers as done to boat ones ( remember to change the mode to Normal 100%).

Step 17
For lilies on the boat and the ones on top right of background I add shadow for them by Blending Options-Drop Shadow:


Make reflection for lilies on foreground as done with boat ( duplicate, flip vertical, transform, lower opacity to 30%, use layer mask to remove the part covering the pads):

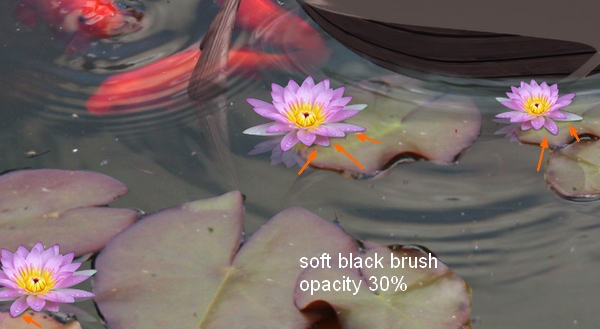
Create a new layer under lilies one. Use soft black brush with very small size ( 6-7 px) to paint under lilies petals which are on the pads to make shadow for them. Change opacity of it to 30%:
Step 18
I use two adjustment layers to change color of these lilies. On lily 10 layer ( the top one of this group), go to Layer-New Adjustment layer-Hue/Saturation:

Color Balance:


Step 19
Cut out the frog and place it on pad near foreground, resize to fit as usual:

Create a new layer under frog one. Use soft black brush with small size to paint under its right digits, trunk and hind legs. Set opacity as 70%:

Call this layer as “frog shadow 1″.
Make a new layer, use black brush with hardness about 10% to paint under front leg, from the right digit to the trunk. Lower opacity to 40%:

Go to Filter-Blur-Gassian Blur and set radius to 2 px:
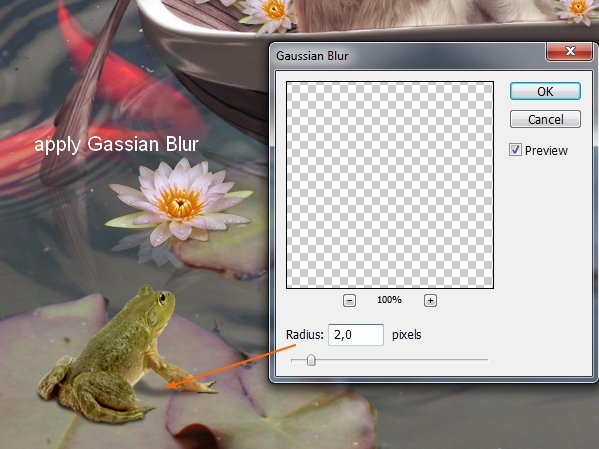
Name it “frog shadow 2″.
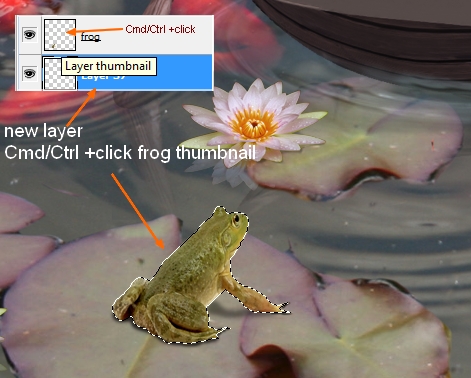
Create a new layer again ( under frog layer) and load selection of the frog by holding the Cmd/Ctrl while clicking the thumbnail of frog one:
Fill this selection with black. After deselecting , apply Flip Vertical and transform it as shown below:
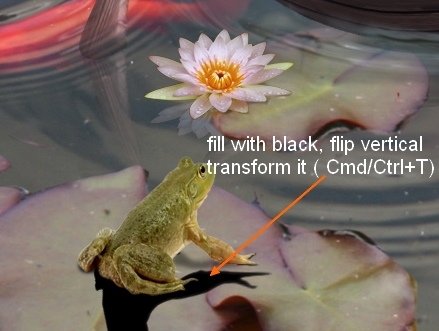
Apply Gassian blur with 2 px and lower opacity to 40%. Add layer mask to erase completely the legs parts ( opacity and flow 100%) and blur the top of shadow with brush that has opacity and flow about 50%:
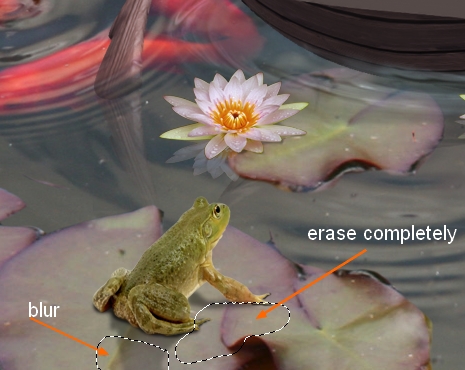
Call it “frog shadow 3″.

Step 20
Add more reflected light ( from background) for this frog by Inner Shadow effect:


Make a new layer ( Clipping Mask) and use soft white brush to paint on its trunk and front legs. Put the mode as Soft Light 30%:


Step 21
I use some adjustment layers ( Clipping Mask) to change color of the frog.
Color Balance:

Hue/Saturation:


Step 22
Create two adjustment layers on the top ( non-Clipping Mask).
Color Balance:

Gradient Map:

Set this Gradient Map layer to Soft Light 100%:

Step 23
To change the light focus of picture I use a new layer on the top. Hit G to active Gradient Tool with Radiant option and default color ( black and white). Drag a line from bottom left to top right:

Set this layer to Soft Light 100%. Add layer mask and use soft black brush with opacity 100% to remove dark contrast on cat head and with opacity about 40% to reduce dark contrast on the frog:


Create a new layer and use Radiant Gradient with same method but move light focus upward. Put it as Soft Light mode 100% and use layer mask and brush with different opacity to remove dark effect somewhere. I use brush with 100% opacity for a part of the pad where the frog is sitting, the frog, the boat and most part of the cat, brush with 40 % opacity for the the part around boat and cat. You can look at screenshot below to see how I applied it on layer mask of gradient 2 layer.


Step 24
I use a Levels layer to increase the contrast a bit. Go to Layer-New Adjustment Layer-Levels:

On the mask of this Levels layer, use soft black brush to clear dark contrast on frog and cat head:

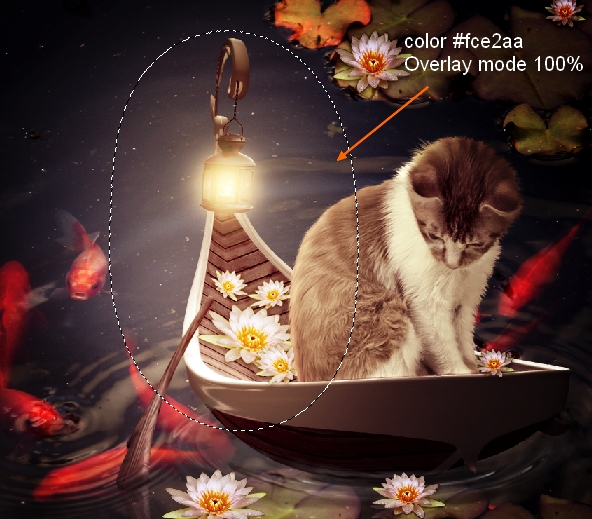
Step 25
In this step we’ll add glowing light effect for the lantern. Make a new layer on the top. Use soft brush with color #fce2aa and 150 px ( depends on the size of your picture) to spot over the lantern. Change the mode to Screen 100%:


Duplicate this layer and set the mode to Overlay 100%:

Call these layers as “light 1″, “light 2″.
Create 3 new layers and use brush with same color ( #fce2aa) but change the size. I set two as Overlay mode 100% and Overlay 60%, another as Soft Light 100%. Use this brush to paint the part around the lantern where you think the light should affect.
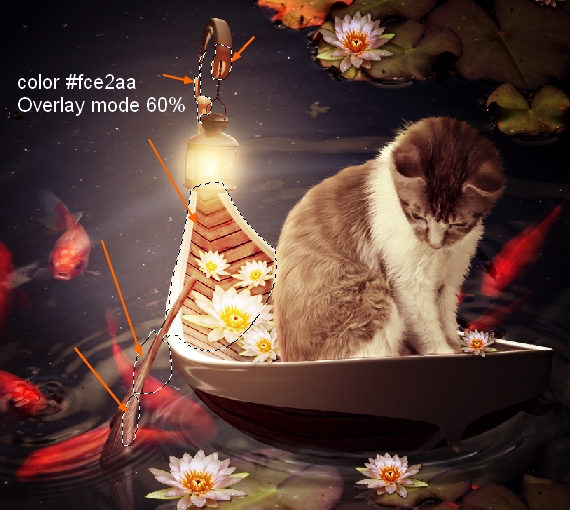

Name these layers from “light 3″ to “light 5″.

Step 26
Create two new layers and I use soft white brush to brighten more the cat. On the first I paint over the back, the left of head , the right side of him, the lily beside him and set the mode to Overlay 50%. On the second I paint on the top head, the upper back, head and set the mode as Soft Light 50%:


New layer and I take brush with color #c5baad. I paint over the white hair in of the cat and the right cat ear as I think they need to be a bit darkener. Put the mode as Multipy 30%:

Step 27
Add a new layer and use soft brush with color #2d232b. Paint on the top right of picture and change the mode to Multipy 100%. It will create a better focus for the light part in the center.

Step 28
Press Cmd/Ctrl+Shift+Alt/Option+E to merge all layers. Load selection of top right part that is darkener in previous step ( Cmd/Ctrl+click, look at step 19 if you forgot how to do it) and set feather for it as 30:

Go to Filter-Blur-Gassian Blur and choose 2 px:

Add layer mask to remove blurred part on cat, boat and lantern ( as this selection has big feather):

And We’re Done!
You can view the final outcome below. I hope that you enjoyed this tutorial and would love to hear your feedback on the techniques and outcome.
Member File Download
Download the original .psd file for this tutorial here:

 Members Area Tutorial: Create a Sinister Little Red Riding Hood Photo Manipulation
 Members Area Tutorial: Create the Surreal Photo Manipulation ‘Twisting Water’
 Members Area Tutorial: Combining Extraction Techniques to Create a Unique Photo-Manipulation

Leave a comment
0 Comments:
No comments have been posted yet. Be the first!
Leave a Comment: